When Should You Edit the Registry
|
|
The best answer to this question is: "Only in an emergency". You certainly shouldn't get in the habit of editing the registry any time a problem arises. The Windows XP developers didn't develop this system in order to have users solve minor problems by editing the registry. Microsoft has made significant efforts to develop powerful and flexible graphical administrative tools to help users solve everyday tasks related to system configuration and troubleshooting. All users are recommended to try solving the problem using these tools, and proceed with editing the registry only when all other methods have failed.
However, there's always a chance that all the methods of configuring the system using Control Panel applets or resetting device settings using Device Manager will fail. If this is the case, you'll need to know how to work with the registry and how to edit it using the registry editor.
Some actions related to customizing applications can be performed only by editing the registry directly. For example, if you need to open Windows Explorer when the user double-clicks My Computer, or to enable Windows XP built-in leak detection, you'll need to edit the registry, because these tasks can't be achieved using other methods. If you need to edit the registry, do it very carefully and in accordance with the instructions.
The Internet contains many tips related to registry editing. Usually, these tips are related to setting some registry entries. If you decide to modify the registry, don't forget to backup the registry before proceeding with these changes.
Alternative Methods of Editing the Registry
Remember that even in cases when registry editing is necessary, an unskilled user can create even greater problems when performing this task. For example, errors that occur when editing the registry may lead to problems with loading device drivers or with logging in to the system. If you're not absolutely sure that the registry changes you're going to make are correct, or simply can't afford significant time for troubleshooting, don't experiment with the operating system registry (this relates both to Windows NT 4.0/Windows 2000 and Windows XP). A single error could mean reinstalling your operating system.
| Caution | Administrative tools always provide a method of configuring the system preferable to direct registry editing. Using administrative utilities is much safer, because these utilities don't allow you to save incorrect values in the system registry. If you make an error while using one of the registry editors, you won't get a warning, because registry editors don't recognize these errors and don't take any corrective actions. |
After you get acquainted with the registry, you may feel tempted to edit it in order to install or configure hardware devices. Registry editor, discussed in Chapter 3, is a special tool used for viewing and modifying the registry. However, before proceeding with direct registry editing, try to perform the same task using the administrative utilities. Most hardware-related registry entries are very hard to understand unless you have a working knowledge of the hex format. These settings only affect the hardware devices that use them.
For example, you shouldn't manually edit the registry when installing new hardware because of the methods the system uses to configure Plug and Play devices. As you'll see in Chapter 5, Plug and Play devices now have default settings. If a device requests a resource that's already in use by another Plug and Play device, the system may change the Plug and Play device settings in such a way as to eliminate hardware conflicts with the new device. If you manually change the registry settings for Plug and Play devices, you'll get constant settings. These settings can't be changed by the operating system if another device requests the same resource.
Installing New Devices
Even if Windows XP encounters a new device not currently included in the registry, and the system has no information on this device, it first attempts to detect it. If the new device has been successfully detected and recognized, you'll see a small pop-up window in the lower right corner of the desktop, informing you that the system has found new hardware (Fig. 1.10). Notice that in this case the system will automatically install the device driver, configure the device settings and after a few seconds display another pop-up window, reporting that the newly installed device is ready to use (Fig. 1.11).

Fig. 1.10: Windows XP automatically detects new hardware
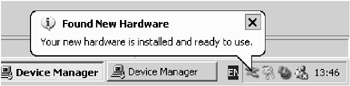
Fig. 1.11: The newly detected device is successfully installed and configured
In contrast to Plug and Play devices, legacy devices developed before the release of Windows 95 have fixed settings. The task of installing and configuring legacy devices is more complicated than installing Plug and Play devices. Always remember one thing though—before modifying the registry directly, try to achieve the same result using Hardware Wizard. In Windows XP, this program was significantly improved by extended functionality and a more intuitive user interface, even in comparison to Windows 2000. To install a legacy device in Windows XP, follow the instructions provided below:
-
Open the Control Panel window, then double-click the Add Hardware icon, or, alternately, start the System applet to open the System Properties window, go to the Hardware tab, and click the Add Hardware Wizard button. Any of these methods will open the Add Hardware Wizard window shown in Fig. 1.12. Click the Next button.
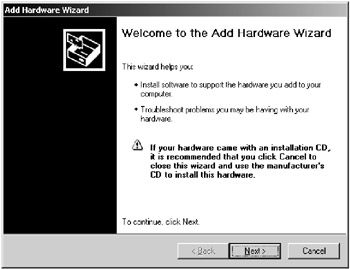
Fig. 1.12: The first window of the Add Hardware Wizard program -
The wizard will try to detect the new device. If it fails, it will display another window prompting the user to specify if the new device is already connected (Fig. 1.13). The wizard will display a series of screens containing options available for selection and step-by-step instructions. To install and configure the new device, just follow these instructions, select the required options, and click Next to continue. Besides new device installation, Hardware Wizard allows you to view the list of installed devices and troubleshoot the devices that are not working properly (Fig. 1.14). To install a new device that is not listed here, select the Add a new hardware device option and click Next.
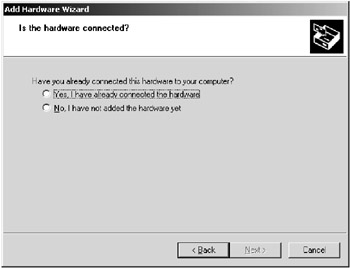
Fig. 1.13: The next screen of the Hardware Wizard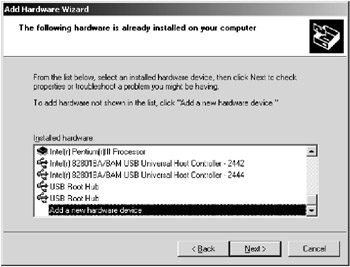
Fig. 1.14: Hardware Wizard enables you to view the list of installed devices and troubleshoot the devices that are not working properly -
Next, the Hardware Wizard prompts you to select if you are going to search for the hardware automatically or select an appropriate device from the list (Fig. 1.15). Since Windows XP provides enhanced hardware support, even in comparison to Windows 2000, to say nothing about previous Windows NT versions, it is recommended that you select automatic search. As a general rule, the system successfully detects all the hardware correctly connected to your system, both Plug and Play and legacy. Therefore, you'll need to manually select the device from the list only in a worst case scenario (Fig. 1.16). If you don't find your device even in this list, set the Show all devices options and click Next. In this case, the next window will open (Fig. 1.17), containing a long Windows NT/2000-style list of all supported hardware.
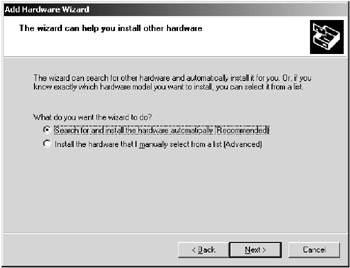
Fig. 1.15: When installing new hardware, the Hardware Wizard provides capabilities of searching the new hardware automatically or manually selecting an appropriate device from the list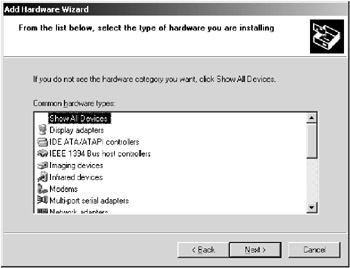
Fig. 1.16: Hardware Wizard provides a list of device classes. Select Show All Devices if you don't see the hardware category that you require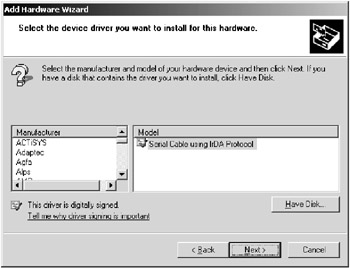
Fig. 1.17: The Windows NT/2000-style list of supported devices
As was stated above, Hardware Wizard will detect all compatible hardware devices that have been listed in the HCL (Hardware Compatibility List) and correctly connected to the system. This also applies to legacy devices. If you encounter problems, first make sure that the device you are going to install is included into the Windows XP HCL, then check that it is usable and correctly connected to your system.
This method of installing and configuring new devices is much safer than direct registry editing, because it eliminates the risk of compatibility problems. However, from time to time you may need to change the settings of the legacy devices by means of direct registry editing. Many advanced users are interested in changing the resource settings for the hardware devices. You already know that the device manager automatically controls these settings when installing a new device or booting Windows. Sometimes, though, you may need to manually set these parameters. For example, this situation is possible in case of a hardware conflict that can't be solved by the configuration manager. Suppose, for example, that there's a conflict between IRQ and DMA settings for two legacy devices. In such a case, you can also use the Device Manager to solve the problem.
Hardware-related registry keys are discussed in detail in Chapters 5 and 6, where you'll also find instructions on editing registry parameters and selecting appropriate values.
Changing Your Configuration with Control Panel Applets
Most of the truly useful system and hardware settings can be changed using the Control Panel applets. To complete these tasks, you don't need to edit the registry at all.
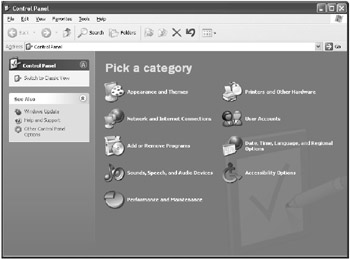
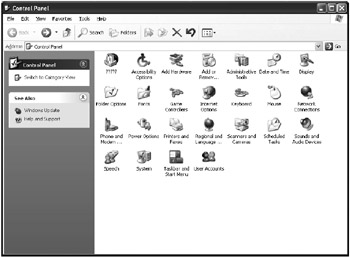
| Note | Don't be surprised or confused if you can't see all the Control Panel options in Windows XP. By default, when you start Windows XP for the first time, the Control Panel window displays only the general options (Fig. 1.18), which group system settings logically while at the same time providing links to related areas and access to Help topics. Experienced Windows users may remember that a similar feature was first introduced with Windows Millennium Edition. This new Control Panel design, known as Category View, is mainly intended for beginners. If you prefer to work with the Control Panel interface to which you are accustomed, you can easily revert to the Classic View by simply clicking the Switch to Classic View link. Your Control Panel window will then display all available options (Fig. 1.19). |
Certainly, anyone who has installed Windows XP and worked with it for some time has noticed a lot of visual changes and User Interface enhancements, which mainly encompass two areas. Windows XP now provides quite an artistic choice of icons, color schemes, graphical elements, visual effects, and much more. At the same time, the user interface becomes less cluttered and more customizable. For example, the desktop is now by default nearly empty and completely devoid of icons and shortcuts other than the Recycle Bin. One of the most interesting enhancements relates to the taskbar and Start menu, which has a new appearance and lots of interesting customization options. To access the taskbar and Start menu settings, simply right-click the taskbar and select the Properties command from the context menu, or, alternately, start the Taskbar and Start Menu applet in Control Panel. The Taskbar and Start Menu Properties window will open (Fig. 1.20).
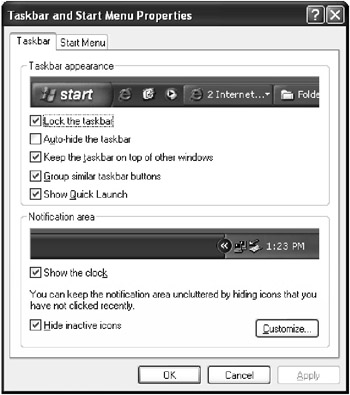
Fig. 1.20: The Taskbar tab of the Taskbar and Start Menu Properties window
As you probably have noticed, Windows XP groups similar taskbar buttons by default (some users welcome this feature, while some get annoyed with it). If you are among those who are not great fans of this feature, simply disable it by clearing the Group similar taskbar buttons checkbox on the Taskbar tab in this window.
Also notice the Notification area option group at the bottom of this window. If you are annoyed by the notifications you see on a regular basis at the bottom-right corner of the desktop, click the Customize button to open the Customize Notifications window, which provides a set of options for customizing the behavior of the notifications displayed by the system (Fig. 1.21).
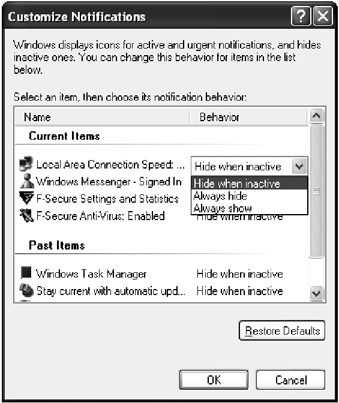
Fig. 1.21: The Customize Notifications window
The Start menu itself has become more flexibly customizable. To specify your preferences for the Start menu, open the Taskbar and Start Menu Properties window and go to the Start Menu tab (Fig. 1.22). If you don't like the new look of the Start menu, you are provided with the option of switching to the classic Start menu by setting the Classic Start menu radio button.
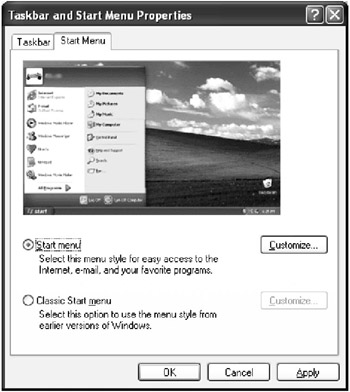
Fig. 1.22: The Start Menu tab of the Taskbar and Start Menu Properties window
Generally speaking, there are lots of various UI enhancements in Windows XP, some of which are really useful, while others are purely cosmetic. Enabling or disabling these components may significantly degrade (or, on the contrary, boost) the performance of your computer. This is the main reason why at some point you may want to disable some of these new interface components. To customize the Windows XP user interface by enabling or disabling one or more of the system's new features, proceed as follows.
-
Start the System applet in Control Panel. The System Properties window will open. Go to the Advanced tab (Fig. 1.23), then click the Settings button in the Performance option group.
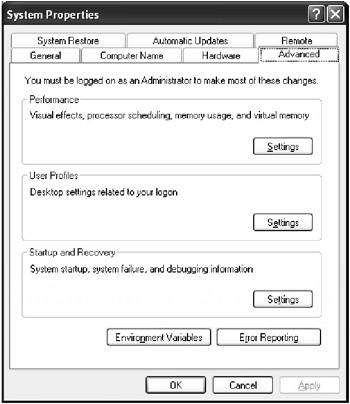
Fig. 1.23: The Advanced tab of the System Properties window -
The Performance Options window opened at the Visual Effects tab will appear (Fig. 1.24). To enable all visual effects, set the Adjust for best appearance radio button; to disable all effects, click Adjust for best performance. If you want to restore the defaults, set the Let Windows choose what's best for my computer option. Also notice that you can set a custom combination of options by selecting the Custom radio button and setting the required checkboxes in the list below.

Fig. 1.24: The Visual Effects tab of the Performance Options window
Displaying Protected Operating System Files
Starting with Windows 2000, the developers began including into the UI some protective measures, which are intended to protect beginners from themselves. Among these novelties are "super-hidden" files. By default, Windows Explorer does not display files that have both Hidden and System attributes. These files are considered protected operating system files, which should not be modified or even seen by ordinary users. Obviously, the default list of such files includes all files required for starting the operating system. A similar feature was also included with Windows Millennium Edition, and, naturally, it is present in Windows XP.
Note, however, that you can always use the command line. To view all files independently from their attributes, use the following command: dir /a.
To get the ability to view such files using Windows Explorer, start the Folder Options applet in Control Panel, and go to the View tab (Fig. 1.25). Set the Show hidden files and folders option and clear the Hide protected operating system files (Recommended) checkbox in the Advanced settings list. Now Windows Explorer and My Computer will show all files, including those protected by the operating system.

Fig. 1.25: The View tab of the Folder Options window
| Note | In Windows 2000, you need to log in to the local system as Administrator or a user belonging to the Administrators group (otherwise you will not get the desired result). |
Other Tools for Changing the Registry
Besides Control Panel applets and other GUI tools provided by Windows XP, there are other tools for changing the registry. These tools are listed below:
-
You may use the Options dialogs present in Windows-compatible applications. As was already mentioned, any Windows-compliant application has to store its settings in the registry and provide the user with graphical tools enabling him or her to change these registry settings.
-
The registry settings can also be changed using shareware or freeware applications (both Microsoft and third-party). More detailed information on the most popular registry utilities will be provided later in this book.
-
REG and INF files.
-
Installation programs.
|
|
EAN: 2147483647
Pages: 144