Hack6.Make Your NES Work Like New
![]()
![]()
Defeat the "blue screen" by installing a new 72-pin connector .
In 1985, Nintendo broke into the U.S. home electronics market with the release of the Nintendo Entertainment System [Hack #5] . The NES's slick gray design blended in with existing audio-video equipment, and featured a unique front slot-loading cartridge system. Unfortunately, as many of us who were lucky enough to own an NES have come to realize, Nintendo's choice of form over function was ill-fated. Slowly but surely, NES consoles became worn-out and refused to boot cartridges, the primary symptoms of which were the infamous flashing red power light and solid blue error screen. In this hack you'll learn how to get your NES working properly.
1.7.1. The Dying Process
This problem starts off slowly, occurring only a small percentage of the time. During these early stages of decrepitude, blowing air into the system and the cartridge usually gets just enough dust off the contacts to allow the game to load correctly. After a while, the problem starts to show up more often, and becomes a little more difficult to fix. Blowing on the contacts begins to lose its effectiveness.
Many companies, Nintendo included, provided cleaning kits for the system that included an applicator that fit into the games and console along with an alcohol-based cleaning solution. NES Cleaning Kits were more expensive than blowing on the contacts, but were also much more effective (and safer, as the alcohol solution would not degrade the connectors over time like a person's breath would). A clean cartridge and a clean system meant that loading errors were virtually eliminated, but not for long.
Even if you took excellent care of your games and system and they never needed cleaning, NES decks would routinely break down. This is because, although dirt and dust could indeed cause loading errors, the real problem was the lock-and-load cartridge slot. The front-loading mechanism differed from earlier game systems because the cartridge was not forced directly into the system. Instead, the user gently slid the cartridge in, then locked it down with a similar gentle touch. Pushing the cartridge down locked it into position and applied some pressure between the cartridge's contacts and the 72-pin connector.
Over time, the pressure applied to the 72-pin connector began to bend the pins. The bent pins meant that the connection between the two sets of contacts was not as tight as it was when the system was brand new. Thus, while removing all traces of dirt from the contacts could sometimes help this problem, the cleaning systems became less and less effective as the pins continued to bend. Successfully loading a cartridge into the NES became an art form, and kids traded their secret techniques. One especially effective method was to wedge something in between the cartridge and the top of the slot, but of course over time this caused the pins to bend even more.
At the time, not much could be done besides buying a new system [Hack #5] . But now, luckily, there are several companies producing replacement 72-pin connectors that cost around $10. The contacts on the new connectors are made from a different type of metal that is more resistant to corrosion than the originals . The new connectors are easy to install, and will make your old NES work like new. Here are a few sites that stock new connectors. You can also find them on the Internet, and eBay, by searching for "NES 72 pin connector."
- www.estarland.com
- www.playerschoicegames.com
- www.hitgaming.com
1.7.2. Installing the New Connector
Although it might sound difficult, replacing the 72-pin connector is actually a quick and easy process. The only tool that you will need is a Phillips head screwdriver. Before opening your NES, make sure that all of the cables have been unplugged from the system. Also, keep in mind that static electricity can cause damage to the circuitry , so take care to ground yourself before handling any of the electronics. Here's what you need to do:
-
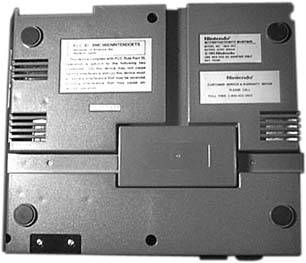
Remove the top system cover. Begin by turning the system upside down, as shown in Figure 1-3, to gain access to the screws. The six screws that need to be removed are recessed into the case. When all six of the screws have been removed, carefully turn the system over and remove the top cover.
Figure 1-3. The bottom of the NES console
-
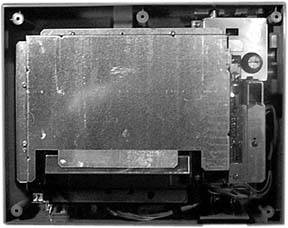
Remove the RF shield. Removing the top cover of the NES reveals the RF shield, shown in Figure 1-4, which needs to be removed to allow access to the cartridge tray. The RF shield is held in place by seven screws located around its outer edge. Once the screws have been removed, the shield needs to be slid forward slightly before it will come out.
Figure 1-4. The metal RF shield covers the innards of the NES
-
Remove the tray cartridge screws. There are six screws that hold the tray cartridge in place. Two of these screws are slightly longer than the other four (and usually a different color ) and will need to be placed back in the correct spot when reassembling the unit, so pay attention to where each screw comes from.
-
Remove the RF unit screws. Before removing the tray cartridge and replacing the 72-pin connector, you need to remove the two screws near the RF unit. After removing these screws, you will be able to move the main circuit board.
-
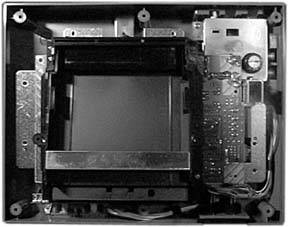
Remove the cartridge tray. Now that the main circuit board is free, you can remove the cartridge tray, shown in Figure 1-5. Simply slide the tray forward and lift the front edge of the tray. You may have to lift the main circuit board slightly to remove the tray.
Figure 1-5. The main cartridge tray exposed
-
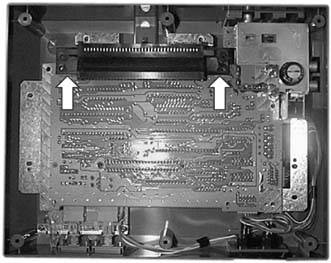
Replace the 72-pin connector. With the cartridge tray removed, the 72-pin connector is now ready to be replaced . There are no screws to remove on the existing connectoryou just need to slide it off of the main circuit board. You will have to lift the circuit board slightly so there is enough clearance for the connector to come off. The fitting is usually tight, so be careful. Grip the connector from the points shown in Figure 1-6 and push towards the back of the system. Once the old connector has been removed, it may be beneficial to clean the circuit board contacts with some rubbing alcohol and a Q-Tip before installing the new connector. After verifying that the new connector is oriented correctly, slide it onto the main circuit board.
Figure 1-6. Grip the connector from the points shown
-
Reassemble the system. Now that you have successfully replaced the 72-pin connector, it is time to reassemble the system. To reassemble , follow the disassembly steps in reverse order. Note that when reinstalling the cartridge tray, there is a plastic tab that must slip underneath the main circuit board.
After you have finished replacing the 72-pin connector in your NES, it is important to clean your games before inserting them into the system. Remember, the main cause of loading errors is dirty contacts. Inserting a dirty cartridge into your system will result in a dirty system, which will be prone to future loading errors. A common suggestion for cleaning cartridges is to use a Q-Tip dipped in rubbing alcohol. By keeping your games clean, you will in turn keep your system clean, and can enjoy hassle-free gaming for years to come!
Dan Kohler
EAN: 2147483647
Pages: 150