Hack77.Add Tiles and Sprites to Your GBA Game
![]()
![]()
Make your portable masterpiece come alive with tiled graphics .
Writing directly to the video buffer with bitmapped video modes on the Game Boy Advance [Hack #76] is all well and good, but uses a lot of memory and can be slow if you want to try any sort of complicated animation. The reason game consoles and portables are able to produce such brilliant visual effects, despite their low hardware specs compared to PCs, is because of their highly specialized graphics hardware.
In the case of the GBA, and most consoles made for 2D graphics, this comes in the form of specialized handling of tiled graphics. In this hack, I'll show you how to use tiled graphics to reduce the amount of memory taken up by an image and increase the speed at which it can be displayed.
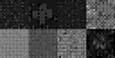
The first step in getting a GBA to display tiled graphics is, of course, to create the graphics it will be using. Tiles are essentially 8 x 8 squares that can used to draw a larger image. Larger and non-square tiles can be made up of multiple 8 x 8 tiles. Figure 8-24 shows a set of eight 16 x 16 tiles or, from the GBA's perspective, thirty-two 8 x 8 tiles.
Once you have a usable set of tiles, it's time to make the map data that will actually tell the GBA which tile to display where. There are several tools available on http://www.gbadev.org/ for creating map data, one of which is Warder1's GBA Map Editor. When you launch Map Editor, two windows open up. One is the Tools window, where you can load a bitmap containing all your tiles. The other window is the GBA Map Editor itself, which you can use to paint your map by using the tiles that are loaded in the Tools window. The maps you create with this tool can be saved in its proprietary format and loaded again later to be edited. To make use of map data on a GBA, you can export the data to either a C source file that you can include in your project or into a bitmap, which you can run through a different image-to-map converter should you desire .
Figure 8-24. Graphic tiles
|

8.6.1. Load the Map into Memory
Once your map data is converted to a GBA-friendly format, you will need to convert your tile graphic as well. As with images to be loaded in bitmapped video modes, the tile graphic must be converted into palette data and pixel data. Assuming you've converted the graphic of your tiles to a 256- color PCX, you can convert it with pcx2gba, like so:
pcx2gba SPR4T my_tiles.pcx my_tiles.h my_tiles
|

As before [Hack #76] , this command converts my_tiles.pcx into an array of palette data named my_tilespal and an array of pixel data named my_tilesdata , both in a file called my_tiles.h . The SPR4T parameter tells the program to cut the data into a series of 8x8 tiles with the conversion.
With all the data converted to a format usable by the GBA, it's time to actually load it. The first step is to change the video mode and load the palette data. These steps are pretty similar to what you have seen before.
#define USHORT unsigned short #include "my_tiles.h" int main(void) { *(unsigned short*)0x04000000 = 0x1 0x400; int i; unsigned short *tilePalette = (unsigned short*)0x05000000; for(i = 0; i < 256; i++) { tilePalette[i] = my_tilespal[i]; } } The first section of code, of course, changes the video mode. This time, I am using Mode 0 and intend to write to BG2, so I make sure it is enabled. The palette for background tiles goes to the same location in memory that the color palette for bitmapped video modes does, so the palette loading code is virtually the same.
Next, the program loads the pixel data for the tiles and the map data. This is where things get interesting. Both the tile data and map data must be loaded into the same 64KB region of memory, which starts at 0x06000000 . Also, the GBA requires that the tile data be aligned to a 16KB region called a Character Base Block, which is indexed from 0-3, and that the map data be aligned to a 2KB region called a Screen Base Block, which is indexed from 0-31. These blocks basically serve as flag posts marking where in memory the background should look for its map and tile data. Later, when you actually display the background, you will use the indexes of the Character and Screen Base Blocks to tell the GBA where to look for the relevant tile and map data. Finally, it's very important that the Character Base Blocks and the Screen Base Blocks being used do not overlap. If they do, you will get corrupted tile and map data. Figure 8-25 illustrates the concept of Character Base Blocks and Screen Base Blocks.
The following code shows how you can load the tile data into properly aligned Character Base Blocks. You'll need to add these variable declarations to the top of the preceding example:
int tile_setCharBaseBlock = 1; unsigned short *tileData = (unsigned short*)( 0x06000000 + (tile_setCharBaseBlock * 0x4000) );
Figure 8-25. Character and Screen Base Blocks

And add the following for loop immediately after the for loop you use to load the palette:
for(i = 0; i < (my_tiles_WIDTH * my_tiles_HEIGHT) / 2; i++) { tileData[i] = my_tilesdata[i]; } The first thing this segment of code does is to set the variable tile_setCharBaseBlock with the index of the Character Base Block you intend to use since you will need it later. The second line creates a pointer to the start of video memory ( 0x06000000 ) then adds 16KB ( 0x4000 ) times the index of the base block you intend to use. After that, the code follows standard procedure to load data from one part of memory to another.
This example performs a similar task for the map data:
#define USHORT unsigned short #define u8 unsigned short #include "my_tiles.h" #include "my_map.c" int main(void) { *(unsigned short*)0x04000000 = 0x1 0x400; int my_mapScreenBaseBlock = 28; int i; unsigned short *myMapData = (unsigned short*)my_map; unsigned short *tileMap = (unsigned short*) ( 0x6000000 + (my_mapScreenBaseBlock*0x800) ); for(i = 0; i < (64 * 64) / 2; i++) { tileMap[i] = myMapData[i]; } }
|
 Load Tiles from the Tools window to load your tiles bitmap (you will need to convert your
 To make sure there's no chance of collision with the previously loaded tile data, this code prepares to write to Screen Base Block 28. Because the map data imported from the GBA Map Editor is an array of 8-bit values, the second line casts it to 16-bit values in order to make it easier to load. Similar to the tile data loading code, the third line calculates the address at which to write as 0x06000000 plus the Screen Base Block index times 2048, or 0x800 in hexadecimal. The map data you're loading was exported as a 64 x 64 array of 8-bit values. Because we are loading it as 16-bit values, which are twice as large, we iterate through the loop half as many times had we been moving one 8-bit value at a time. The GBA is optimized to write 16-bit values, so it's important to do so whenever possible.
8.6.2. Display the Map
With your tiles and your map data loaded, it's time to actually start displaying them. The GBA can have up to four background layers , depending on the video mode. Mode 1 allows BG0, BG1, and BG2 to be used, with BG0 and BG1 being static and BG2 being a rotation/scaling background. Each background has a 16-bit value in memory known as the background control register. By writing certain values to one of these registers, you can change the settings of that particular background. Table 8-4 lists the memory addresses for the four background control registers.
Table 8-4. Background control registers
| Background | Location in memory |
|---|---|
|
| 0x4000008 |
| 1 | 0x400000A |
| 2 | 0x400000C |
| 3 | 0x400000E |
Setting the background control registers can be done in a fashion similar to setting the video control register, as in the following code snippet, which loads the map into BG2:
*(unsigned short*)0x400000C = (tile_setCharBaseBlock << 2) (my_mapScreenBaseBlock << 8) 0x80 0x8000;
Like the video mode changing code, this code is largely composed of using logical ORs to combine various key values into one value. New here are the operations tile_setCharBaseBlock << 2 and my_mapScreenBaseBlock << 8 . These operations take the base block values saved from loading the tile and map data and shift them to the proper bits to have them identify the relevant Character Base Block and Screen Base Block when placed in the background control register. Incidentally, assuming Mode 1, the preceding code sets the background to be a 512 x 512 pixel background using 256-color tiles. Table 8-5 lists several useful values for configuring a tiled background.
Table 8-5. Background configuration values
| Function | Hexadecimal | Binary |
|---|---|---|
| Priority 1 (display order) | 0x0 |
|
| Priority 2 | 0x1 | 1 |
| Priority 3 | 0x2 | 10 |
| Priority 4 | 0x3 | 11 |
| 8-bit Color | 0x80 | 1000 0000 |
| 16-bit Color (static backgrounds only) | 0x0 | 0000 0000 |
| Dimensions | 0x0 | 00000 0000 0000 0000 |
| 256x256 (static) | ||
| 128x128 (rotation/scaling) | ||
| Dimensions | 0x4000 | 0100 0000 0000 0000 |
| 512x256 (static) | ||
| 256x256 (rotation/scaling) | ||
| Dimensions | 0x8000 | 1000 0000 0000 0000 |
| 256x512 (static) | ||
| 512x512 (rotation/scaling) | ||
| Dimensions | 0xC000 | 1100 0000 0000 0000 |
| 512x512(Static) | ||
| 1024x1024 (rotation/scaling) |
The following complete example combines everything you've seen so far to display a map on the screen:
#define USHORT unsigned short #define u8 unsigned short #include "my_tiles.h" /* 64x32 pixel pcx, converted by pcx2gba */ #include "my_map.c" /* 512x512 tile map, exported by the map editor */ int main(void) { int tile_setCharBaseBlock = 1; int my_mapScreenBaseBlock = 28; int i; /* Initialize the display */ *(unsigned short*)0x04000000 = 0x0 0x400; /* Load the palette */ unsigned short *tilePalette = (unsigned short*)0x05000000; for(i = 0; i < 256; i++) { tilePalette[i] = my_tilespal[i]; } /* Load the tiles */ unsigned short *tileData = (unsigned short*)( 0x06000000 + (tile_setCharBaseBlock * 0x4000) ); for(i = 0; i < (my_tiles_WIDTH * my_tiles_HEIGHT) / 2; i++) { tileData[i] = my_tilesdata[i]; } /* Load the map */ unsigned short *tileMap = (unsigned short*) ( 0x6000000 + (my_mapScreenBaseBlock*0x800) ); unsigned short *myMapData = (unsigned short*)my_map; for(i = 0; i < (64 * 64) / 2; i++) { tileMap[i] = myMapData[i]; } /* Load the map into BG2 */ *(unsigned short*)0x400000C = (tile_setCharBaseBlock << 2) (my_mapScreenBaseBlock << 8) 0x80 0x8000; } 8.6.3. The Refreshing Taste of Sprites
A game without sprites is essentially a stage without any actors. Being the 2D graphics maverick that it is, the GBA has a lot of specialized functionality centered around sprites. Sprites are, like tiled backgrounds, images made from series of 8 x 8 tiles. The GBA can store up to 128 sprites, which can be between 8 x 8 pixels and 64 x 64 pixels in dimension. Sprite pixel data and palette data are stored in different parts of memory than background tile pixel and palette data, so you can have different palettes for your sprites and backgrounds.
Creating the graphics for a sprite is relatively straightforward. You need only remember to keep the dimensions within the 8 x 8 to 64 x 64 bounds and the color depth to 16 or 256 colors. Converting an image to be used by the GBA can be done with pcx2gba, using the same method used to convert background tile images.
|
Now to the actual displaying of sprites. As always, the program begins by setting the video control register with the requisite values. The following line of code sets the GBA to Mode 1 and enables sprites:
*(unsigned short*)0x04000000 = 0x1 0x1000 0x40;
The extra 0x40 at the end is another setting value related to sprites. In memory, sprites can either be stored in a 2-dimensional array or a 1-dimensional array. By default, the GBA stores sprites in a 2D array, but often it can be easier to access them in a 1D array. ORing 0x40 into the video control register causes the GBA to store sprites in a 1D array.
Loading sprite pixel and palette data follows the familiar pattern of moving the data to designated areas of memoryin this case, 0x05000200 for sprite palette data and 0x06010000 for sprite pixel data. The following code loads the palette and data for a sprite named pat (be sure to have a line with #include "pat.h" at the top of your source file):
unsigned short *spritePalette = (unsigned short*)0x05000200; for(int i = 0; i < 256; i++) { spritePalette[i] = patpal[i]; } unsigned short *spriteData = (unsigned short*)0x06010000; for(int i = 0; i < (pat_WIDTH * pat_HEIGHT) / 2; i++) { spriteData[i] = patdata[i]; } For actually controlling where a sprite is displayed, the GBA uses a section of memory called the Object Attribute Memory (OAM). This memory serves a similar purpose to the background control registers. Values placed into OAM define how sprites behave. OAM allots 8 bytes to each of its 128 sprites. The size of each entry in OAM makes it difficult to handle settings through a single variable. The easiest way to handle it is to define a data structure that is 8 bytes long.
The OAMSprite structure, below, defines a structure whose data consists of an array of four unsigned shorts. Being that each unsigned short is two bytes long, this adds up to eight bytes.
struct OAMSprite { unsigned short reg[4]; }; This structure also lines up nicely with the locations in memory where various important bits of sprite information are located. The Y and X values of the sprite, along with a few key configuration values, are located in reg[0] and reg[1] , respectively. The location of the sprite data in memory to be used by a given sprite can be referenced with reg[2] . The final variable, reg[3] , can be used to access various functions related to rotation and scaling.
At this point, it's possible to display a sprite with code similar to the following:
OAMSprite pat; int x = 24; int y = 86; pat.reg[0] = y 0x2000; pat.reg[1] = x 0x8000; pat.reg[2] = 0; unsigned short *OAM = (unsigned short*)0x07000000; unsigned short* spritePtr = (unsigned short*)&pat; for(int i = 0; i < 4; i++) { OAM[i] = spritePtr[i]; } As you can see, this code assigns values to the OAMSprite pat . The x and y values can go straight into reg[1] and reg[0] along with a couple of values for configuration. In this case, 0x2000 indicates that pat has 256 colors and 0x8000 indicates that pat is 32x32 pixels in dimension. The value in reg[2] is set to the index of the start of the sprite's image in the tile pixel array. In this case, 0 refers to the first tile. When the sprite is ready to be displayed, it is copied over into OAM, at memory location 0x07000000 . Table 8-6 contains a few useful values relating to sprites in OAM.
Table 8-6. OAM values
| Attribute | OAMSprite variable | Hexadecimal | Binary |
|---|---|---|---|
| 16 Colors | reg[0] | 0x0 | 00 0000 0000 0000 |
| 256 Colors | reg[0] | 0x2000 | 10 0000 0000 0000 |
| 8x8 | reg[1] | 0x0 | 0000 0000 0000 0000 |
| 16x16 | reg[1] | 0x4000 | 100 0000 0000 0000 |
| 32x32 | reg[1] | 0x8000 | 1000 0000 0000 0000 |
| 64x64 | reg[1] | 0xC000 | 1100 0000 0000 0000 |
| Horizontally Flipped | reg[1] | 0x1000 | 01 0000 0000 0000 |
| Vertically Flipped | reg[1] | 0x2000 | 10 0000 0000 0000 |
8.6.4. Handling Input
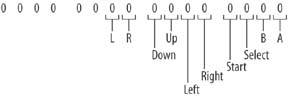
The GBA has 10 different buttons that can be used for input: the four directional keys, A, B, L, R, Start and Select. The state of these ten buttons is contained in a 16-bit value located at 0x04000130 . The lowest ten bits of this value indicate the state of each button, equaling 0 if the button is being pressed and 1 if it is not, as shown in Figure 8-26.
Figure 8-26. The key register
To determine if a particular button is being pressed, you can compare the value at 0x04000130 with a number corresponding to the bit you want to check using a logical AND operation. The number 0x2 , for example, is the result you get when only the second bit in a number is 1 and, therefore, corresponds to the B button. A logical AND can be performed with the value at 0x04000130 with the following snippet of code:
*(unsigned short*)0x04000130 & 0x2
This expression returns a 1 if the second bit of both numbers is 1. Because a button press is indicated by a value of 0 in the appropriate bit, this is actually the opposite of what you want. So, you negate this expression to get something like this:
if( !( *(unsigned short*)0x04000130 & 0x2 ) ) { //Button B is being pressed } Table 8-7 contains a list of values that can be used to identify each button in an expression like the one above.
Table 8-7. The buttons on a GBA
| Button | Hexadecimal | Binary |
|---|---|---|
| A | 0x1 | 1 |
| B | 0x2 | 10 |
| Select | 0x4 | 100 |
| Start | 0x8 | 1000 |
| Right | 0x10 | 1 0000 |
Table 8-8. The buttons on a GBA ( continued )
| Button | Hexadecimal | Binary |
|---|---|---|
| Left | 0x20 | 10 0000 |
| Up | 0x40 | 100 0000 |
| Down | 0x80 | 1000 0000 |
| R | 0x100 | 1 0000 0000 |
| L | 0x200 | 10 0000 0000 |
For further information on GBA programming, be sure to visit http://www.gbadev.org/ and http://www.devrs.com/gba/. Also see "Play Homebrews on your GBA" [Hack #46] if you want to play your game on real hardware. With what you've now seen, and what you can find on those sites, you will have enough information to put together a rudimentary GBA game with graphics and input.
Robert Ota Dieterich
EAN: 2147483647
Pages: 150