Hack71.Write a DOS Game
![]()
![]()
Put your old game programming books to good use .
Many of the most fondly remembered games in video game history were DOS games. Scorched Earth, Lemmings, the Ultima series, King's Quest, The Secret of Monkey Island, Warcraft, and many others have brought countless hours of entertainment to gamers everywhere. But, why should it stop there? With just a compiler, a decent game programming library, and a little ingenuity, you can create your own games to run in DOS alongside the giants of yesteryear.
7.5.1. Enter DJGPP and Allegro
DJGPP (DJ's GNU Programming Platform) is a free C/C++ development system for MS-DOS. It began in 1989 in response to a comment by Richard Stallman that gcc , the standard UNIX C/C++ compiler, could not be ported to MS-DOS due to the limits of DOS's 16-bit architecture. DJ Delorie took this statement as a challenge and began working on his port of gcc to MS-DOS. Since then it has become a stable and feature-rich product with a wide array of support programs and code libraries.
Allegro is a game development library developed for DJGPP that has since been ported to multiple operating systems. It wraps routines for handling 2D graphics, sound, input, and networking in a series of simple-to-use functions. Not only does Allegro simplify development by abstracting what would otherwise be complex, hardware-specific code, it also allows easier porting of projects to other operating systems supported by Allegro.
Both DJGPP and Allegro can be found at http://www.delorie.com/djgpp/.
7.5.2. Installing DJGPP
Using the Zip Picker at http://www.delorie.com/djgpp/zip-picker.html, you can download the portions of DJGPP that meet your needs. You can also download utilities to aid in program development like RHIDE, an integrated development environment similar to the Borland DOS IDE. Once you have answered the questions on the Zip Picker page, you will be presented a page of all the DJGPP packages you need. Download all of these packages to the same directory. As DOS development tends to involve a fair bit of navigation through a text console, it's probably best to use an easy to reach directory like C:\DJGPP\ .
Once you have downloaded the packages, go to your DJGPP directory and unzip all the files. Be sure to preserve directory structures when unzipping the packages. If you need an unzipping utility, you can use unzip32, also available at http://www.delorie.com/djgpp/.
The final step in the installation is to define DJGPP's environment variables . These can be edited in Windows XP by right-clicking on My Computer  Properties. In the System Properties window, select the Advanced tab, then the Environment Variables button. From here, you can define new variables for the current user or the entire system. Define the variables shown in Table 7-1.
Table 7-1. Environment variables for DJGPP
| Variable name | Variable value | Example |
|---|---|---|
| DJGPP | [DJGPP directory]\DJGPP.ENV | C:\DJGPP\DJGPP.ENV |
| PATH | [DJGPP directory]\BIN | C:\DJGPP\BIN |
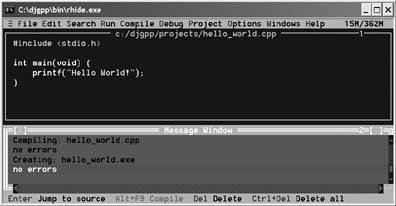
To make sure that the installation was successful, try compiling and running a simple "Hello World" program. You can run RHIDE by browsing to the bin directory in your DJGPP directory and double-clicking on rhide.exe . Create a new file by selecting New from the File menu. In the window that opens, enter the following:
#include <stdio.h> int main(void) { printf("Hello World!"); } Save the file, giving it a name like hello_world.cpp , then compile it by pressing F9. You should see a screen similar to Figure 7-11.
Figure 7-11. Not the Blue Screen of Death
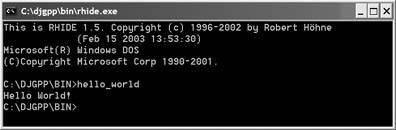
Once it's done compiling, bring up a DOS prompt by selecting DOS shell from the File menu. From here, type the name of the file without an extension (i.e., just hello_world ), and you should see output like that shown in Figure 7-12.
Figure 7-12. Hello DJGPP!
7.5.3. Installing Allegro
If you haven't already done so, download the Allegro package from the DJGPP site and unzip it in your DJGPP directory. Next , from a command prompt, go to the Allegro directory ( C:\DJGPP\allegro\ , for example) and type make . The make command will automatically start compiling and building the Allegro library. Once it's done, type make install and press Enter to finish the process.
You are now almost ready to start using Allegro, but first you need to configure RHIDE so that it knows where to look for Allegro's library files. Under the Options menu, select Libraries. Mark the checkbox next to one of the open spaces and enter "alleg". Click OK and you should be ready to start compiling code with Allegro.
7.5.4. Hello Allegro!
In order to make sure the Allegro installation completed successfully, you can run the graphical equivalent of a Hello World program: turning the screen a hideous shade of magenta ! To accomplish this task, enter and save the following code into a new file:
#include <allegro.h> int main(void) { allegro_init(); set_gfx_mode(GFX_AUTODETECT, 640, 480, 0, 0); install_keyboard(); bool game_over = false; while(!game_over) { if(keypressed()) { game_over = true; } clear_to_color(screen, 5); } allegro_exit(); } Though this might seem like a lot to take in at once, it's really a fairly simple "Hello Allegro" program. The #include <allegro.h> includes the Allegro header file in your code and allows you to access Allegro's functionality. The function call to allegro_init( ) initializes Allegro and must be called before any other Allegro functions. The set_gfx_mode(GFX_AUTODETECT, 640, 480, 0, 0) call sets the screen to 640 x 480 pixels using the default graphics device. Similarly to allegro_init( ), install_keyboard() initializes Allegro keyboard functionality and must be called before executing keyboard related functions. The body of the program is a loop that ends when a key is pressed, signaled by the keypressed() function. It also uses the clear_to_ color (screen, 5) call to clear the screen and set it to the aforementioned magenta color. In this case, screen is a special variable automatically defined by Allegro and 5 is the index number corresponding to magenta in an 8-bit (256 color) palette. Finally, allegro_exit( ) cleans up after Allegro and is called just before the program ends.
If everything went correctly you should be able compile this program, run it, and be presented with a magenta screen that remains until you press a key. It's not much, but the development of many great games began with a blank, single-colored screen.
7.5.5. Handling Images with Allegro
While magenta-colored screens are well and good, they really need something else to bring out their full potential. In this case, externally-loaded images will do nicely . Start off by making a medium- sized bitmap in your favorite image manipulation tool (the GIMP, available at http://www.gimp.org, works quite nicely) and save the image as hello_allegro.bmp in the same directory your "Hello Allegro" executable resides.
Now, it's time to add a bit of code (shown in bold) to the previous example to take advantage of the new image file:
#include <allegro.h> int main(void) { allegro_init(); set_gfx_mode(GFX_AUTODETECT, 640, 480, 0, 0); install_keyboard(); BITMAP* imgHello = load_bitmap("hello_allegro.bmp", NULL); int x = 0; bool game_over = false; while(!game_over) { if(keypressed()) { game_over = true; } clear_to_color(screen, 5); blit(imgHello, screen, 0, 0, x, 100, imgHello->w, imgHello->h); x++; } destroy_bitmap(imgHello); allegro_exit(); } The new code loads the image file hello_allegro.bmp into imgHello via the load_bitmap( ) routine. It also initializes a variable called x which is used in the blit( ) call to animate imgHello moving across the screen. blit(imgHello, screen, 0, 0, x, 100, imgHello->w, imgHello->h) copies a rectangular region from imgHello to the screen. The first two 0s represent the coordinates on imgHello from which copying begins, (0, 0) in this case. The x and 100 are the coordinates on the screen to which imgHello should be copied ; thus, increasing the value of x causes the image to move right across the screen. The final two values are the width and height of imgHello . The values for imgHello->w and imgHello->h were defined when hello_allegro.bmp was first loaded. Finally, destroy_bitmap(imgHello) deletes the reference to the image data, which is important for preventing memory leaks.
When you run this program, you'll notice that the image appears and moves across the screen like it should, but flickers terribly. This is because you are able to see the image as it is being erased by clear_to_color( ) before being redrawn in its new position by blit( ) . The solution is to implement double buffering, a staple of 2D graphics programming. Double-buffering essentially consists of copying your graphics to a separate buffer bitmap not seen by the user. Once all the graphics for that frame are copied to the buffer, its contents are copied to the screen. The modifications (shown in bold) needed to implement double-buffering can be found in the following code:
#include <allegro.h> int main(void) { allegro_init(); set_gfx_mode(GFX_AUTODETECT, 640, 480, 0, 0); install_keyboard(); BITMAP* buffer = create_bitmap(640, 480); BITMAP* imgHello = load_bitmap("hello_allegro.bmp", NULL); int x = 0; bool game_over = false; while(!game_over) { if(keypressed()) { game_over = true; } clear_to_color( buffer , 5); blit(imgHello, buffer , 0, 0, x, 100, imgHello->w, imgHello->h); x++; blit(buffer, screen, 0, 0, 0, 0, 640, 480); } destroy_bitmap(imgHello); destroy_bitmap(buffer); allegro_exit(); } The new code in this selection creates a new BITMAP called buffer with the same dimensions as the screen. Now, instead of clearing the screen to magenta and blitting imgHello to the screen, the code clears and blits to buffer instead. Once the drawing is complete, blit(buffer, screen, 0, 0, 0, 0, 640, 480) copies the buffer to the screen. Of course, destroy_bitmap( ) is used to dispose of buffer before exiting the program.
Now, when you run the program, the image shown in Figure 7-13 should move across the screen completely flicker-free. Not bad for a little extra code.
At this point, you may be curious about how to handle non-rectangular images like cars , spaceships, or anything other than boxes seen from straight above. This can be done simply by using draw_sprite( ) instead of blit() . The draw_sprite( ) routine behaves similarly to blit( ) except it doesn't draw pixels that are the designated transparent color, color for 8-bit images or RGB(255, 0, 255) for 24-bit images. You can find out more about this and other Allegro functions in the documentation found in the docs/ directory of your Allegro installation.
7.5.6. Handling Input with Allegro
A game is nothing without interactivity. With that in mind, Allegro provides multiple means to receive human input from keyboards, mice and joysticks. You have already seen very basic keyboard handling in the previous examples. The following code sample expands on the previous programs by allowing you to move the image freely around the screen:
Figure 7-13. Hello Allegro!, indeed

#include <allegro.h> int main(void) { allegro_init(); set_gfx_mode(GFX_AUTODETECT, 640, 480, 0, 0); install_keyboard(); BITMAP* buffer = create_bitmap(640, 480); BITMAP* imgHello = load_bitmap("hello_allegro.bmp", NULL); int x = 0; int y = 0; bool game_over = false; while(!game_over) { if(key[KEY_LEFT]) { x--; } if(key[KEY_RIGHT]) { x++; } if(key[KEY_UP]) { y--; } if(key[KEY_DOWN]) { y++; } if(key[KEY_ESC]) { game_over = true; } clear_to_color(buffer, 5); blit(imgHello, buffer, 0, 0, x, y, imgHello->w, imgHello->h); blit(buffer, screen, 0, 0, 0, 0, 640, 480); } destroy_bitmap(imgHello); destroy_bitmap(buffer); allegro_exit(); } Much of this code should look familiar. The major difference is the use of the key array defined by Allegro. Each index of the key array contains a value representing the state of a key on the keyboard, either true for a depressed key or false for an unpressed key. You can reference particular keys using the Allegro-defined key constants, like KEY_ESC, KEY_A, KEY_UP , etc. The program uses the key array to increment or decrement the values of x and y based on the arrow keys and to exit the program when Esc is pressed. The values of x and y determine the location of the image, which therefore appears to move as the arrow keys are pressed. Congratulations, you now have the beginnings of a very basic, but infinitely expandable, DOS game.
7.5.7. Organizing Projects with RHIDE
Before you go rushing off to create your masterpiece, I'll leave you with one last note. One of the most useful features of RHIDE is its ability to organize multiple source files into a single project. This is an essential feature when working on any non-trivially large program. By using the Project menu to define a project, you can associate multiple source files with the project and have them be compiled and linked together automatically by RHIDE. The resulting executable will also be created in the same location as the project file. This is great when you want to make sure your executable and data files are in the same place. Now, get out there and make some games!
Robert Ota Dieterich
EAN: 2147483647
Pages: 150