7.6 Programming Techniques
7.6 Programming Techniques
Numerical Input
This introductory example displays a form for input of a number between 0 and 100 (Figure 7-26). The form exhibits two features of interest:
-
Validity control of the input when OK is pressed.
-
Reciprocal updating of the editing field and scolling field when one of these controls is changed.
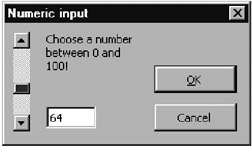
Figure 7-26: Form for the input of a number between 0 and 100
The transfer of the result is accomplished, as with most examples of this chapter, with the module variable result . New in this example is the situation that with this variable the initial state of the form can be set with this variable. To ensure that the required initialization tasks are carried out in spite of the unreliable UserForm_Activate event, the form is equipped with a new method, ShowMe , which takes over both the initialization and display of the form.
' Userform.xls, class module dlgNumber Option Explicit Public result As Variant Public Sub ShowMe() Dim nmb As Variant nmb = result If nmb < 0 Or Not IsNumeric(nmb) Then nmb = 0 If nmb > 100 Then nmb = 100 txtNumber = nmb: scrSlider = nmb Show End Sub
The synchronization between a text box ( txtNumber ) and scroll bar ( scrSlider ) is accomplished with the event procedures of these two controls.
Private Sub scrSlider_Change() txtNumber = scrSlider End Sub Private Sub scrSlider_Scroll() scrSlider_Change End Sub Private Sub txtNumber_Change() Dim nmb As Variant nmb = Val(txtNumber) If nmb >= 0 And nmb <= 100 And IsNumeric(txtNumber) Then scrSlider = nmb End If End Sub
If the form is terminated with OK, then btnOK_Click checks the contents of the input field. If the value is outside of the valid range, then the user is requested by an alert to mend his ways and input a valid number. At the same time the input focus is placed in the text box ( Focus method). If the input is correct, the form is terminated ( Hide method).
Private Sub btnOK_Click() Dim nmb As Variant nmb = Val(txtNumber) If nmb < 0 Or nmb > 100 Or Not IsNumeric(txtNumber) Then MsgBox "Please choose a number between 0 and 100" txtNumber.SetFocus Else result = nmb Hide End If End Sub
Reciprocal Calling of Forms
There are numerous possible applications of reciprocal calling of forms.
-
If the user makes an input error, he can be sent to an error-handling form that explains the error and offers the possibility of fixing it.
-
A subdialog can be available for little-used options, summoned by an Options button. After input of the options the original form would reappear.
-
If the input data are so complex that they cannot be conveniently handled in a single form, then an entire chain of forms (such as in the case of the office assistant) can be displayed that take the user step by step through the process of data entry.
Cascades of Forms
Programming cascades of forms presents few difficulties. Essentially, the event procedure for the relevant button must be programmed so that the next form is launched with Show . Forms that are active are not influenced by this process, and when the last form is terminated, they become active again. (For Visual Basic pros, the forms are displayed modally, that is, previously launched forms are blocked until the termination of the last form.)
Userform.xls contains a three-stage cascade of form pages, "Cascade1" through "Cascade 3" (Figure 7-27), which demonstrates the basic pattern (though without offering the possibility of setting any options). Here as an example is the code for the second form; the event procedures for the first and third forms are similar.
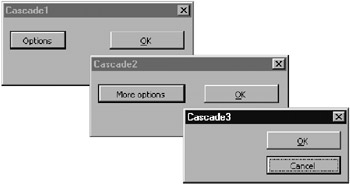
Figure 7-27: A three-step cascade of forms (all three forms can be made visible at one time)
' Userform.xls, UserForm dlgCascade2 Private Sub btnOK_Click() Unload Me End Sub Private Sub btnCancel_Click () Unload Me End Sub Private Sub btnOption_Click () dlgCascade3.Show End Sub
Chain of Forms (Creating Your Own Assistants)
In a chain of forms there are several forms of which only one is visible at a time (Figure 7-28). The main distinction between a chain and a cascade is that the user must follow the chain to the end except to cancel, while the cascade can be terminated with OK at any stage. With Next and Back buttons you can jump from one form to the following or previous one in the chain, until all input has been taken care of the chain ended in the last form.
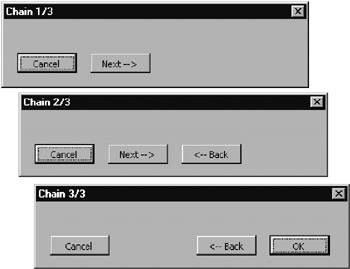
Figure 7-28: A three-stage chain of forms (only one form at a time is visible)
The only particular issue in this example is the manual positioning of the forms: When form 1 is moved to another position by the user, forms 2 and 3 appear in the same new position. To enable this feature the property StartupPosition must be set manually to (0) in the development environment. Now the position of the forms can be influenced by the properties Left and Top before the form is displayed via Show .
Now to the example: It is merely a chain of forms, without doing anything useful. The event procedures for the second form are as follows :
' Userform.xls, UserForm "dlgChain2" Private Sub btnNext_Click() dlgChain3.Left = Left dlgChain3.Top = Top Hide dlgChain3.Show End Sub Private Sub btnPrevious_Click () dlgChain1.Left = Left dlgChain1.Top = Top Hide dlgChain1.Show End Sub Private Sub btnCancel_Click () Unload Me End Sub
Editing Forms Dynamically
By the dynamic editing of a form we mean that the appearance of the form can be changed while it is being displayed. An example of a predefined dynamic form is the one for finding and replacing. When you execute EditFind and then click on Replace, the Find form is extended to include a "replace" field.
Dynamic forms are always used when a form is to be used for several similar cases or when the user might become confused by a large selection of seldomused setting options.
The simplest way to set dynamic forms is to take into consideration during the development of the form all the controls that you are going to need. In the form's program code you can then make individual controls visible or invisible as the need arises. You can also place several controls one on top of the other, provided that you take care in the code to make only one of these controls visible at a time.
Furthermore, you can place controls outside of the form's boundaries and then enlarge the form as needed to include them (by changing the Height and Width properties). But be careful to ensure that controls that lie outside of the form are nonetheless active and can be accessed (Tab) via the keyboard. Regardless of the actual size of the form field, all controls that at the moment are not usable should have their Enabled property set to False .
The form shown in Figure 7-29 can be enlarged with the More Options button. The scroll bar is displayed according to the state of the control box. When the form is displayed, there must be in the code for running the form a clearly defined state that is independent of the settings the last time the form was called. For this reason the method ShowMe is defined, which must be used to call the form instead of Show :
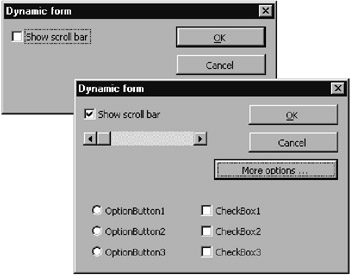
Figure 7-29: A dynamic form; left: in its initial state; right: expanded
' Userform.xls, UserForm "dlgDynamic" Public Sub ShowMe() OptionButton1.Enabled = False OptionButton2.Enabled = False OptionButton3.Enabled = False CheckBox1.Enabled = False CheckBox2.Enabled = False CheckBox3.Enabled = False Show End Sub
The event procedures for displaying the scroll bar as well as for enlarging the form are less spectacular:
Private Sub chkSlider_Click() Scrollbar1.Visible = chkSlider End Sub Private Sub btnExpand_Click() Height = 170 OptionButton1.Enabled = True ... End Sub
Working with Spin Buttons
Spin buttons are a very practical item for the user. By simply clicking on the mouse certain data can be input, such as date and time, without the risk of a syntax error. Figure 7-30 shows a few possible applications.
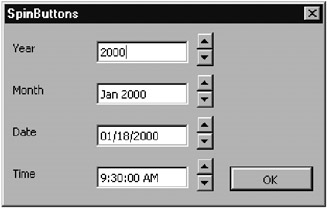
Figure 7-30: Applications of spin buttons
For the programmer, on the other hand, things are not quite so simple. The main problem is in arranging the various options, dates, or times in order. The task is made easier by the fact that one is no longer restricted, as in Excel 7, to a range between 0 and 30000.
In addition to convenient settings with the mouse, it usually should be possible for direct text input: For this reason the contents of the text field and spin box must be synchronized (see also the introductory example below).
Setting the Year with a Spin Button
The procedures spnYear_Change and txtYear_Change show how text and spin fields can be synchronized for a simple numerical input. When the spin field is changed, the current value is transformed into a character string and written into the text field. Conversely, when the text field is altered an attempt is made to associate this value to those of the spin field. The upper and lower limits are set with the control options for minimum and maximum values, which are accessible in program code via the properties Min and Max .
' Userform.xls, UserForm "dlgSpin" Private Sub spnYear_Change() txtYear = spnYear End Sub Private Sub txtYear_Change () Dim y As Integer y = Val(txtYear) If y >= spnYear.Min And y <= spnYear.Max Then spnYear = y End If End Sub
Setting the Month with a Spin Box
The situation becomes somewhat more complicated when not only the year but also the month is to be set. For changing a number in the spin box to a date the formula n=year*12+month is used. The properties Min and Max for the spin box are set to 0 and 30000, so that dates between January 0000 and December 2499 can be represented. When the spin field is clicked on, the date is calculated and the resulting date transformed with Format into a character string, which then is displayed in the text field.
In the converse case, that is, where the date is input into the text field, an attempt is made to use CDate to transform the character string into a date. If this fails (on account of a syntax error in the input), the current value of the spin field is left unchanged.
Private Sub spnMonth_Change() ' n=year*12 + month Dim y As Integer, m As Integer, dat As Date y = Int(spnMonth / 12) 'year m = spnMonth Mod 12 'month dat = DateSerial(y, m, 1) txtMonth = Format(dat, "mmm yyyy") End Sub Private Sub txtMonth_Change() Dim dat As Date On Error Resume Next dat = CDate(txtMonth) If Err <> 0 Then Exit Sub 'input is not a valid date spnMonth = Month(dat) + Year(dat) * 12 End Sub
Setting the Date in a Spin Box
There is no problem in converting the numbers in the spin box into consecutive dates. Excel's internal representation is used. The preset valid range from 0 to 109574 corresponds to dates between 12/31/1899 and 12/31/2199.
Using Like "*.*.??**" to make comparisons, a conversion to a date is attempted only if the input looks like a date. This measure prevents incomplete (and thus erroneous) input from being processed too early.
Private Sub spnDate_Change() txtDate = Format(spnDate, "mm/dd/yyyy") End Sub Private Sub txtDate_Change() Dim dat As Date On Error Resume Next dat = CDate(txtDate) If Err <> 0 Then Exit Sub 'invalid input spnDate = CLng(dat) End Sub
Setting the Time with a Spin Box
Like dates, times can also be set in a spin box. In the example below the time can be input precisely via the keyboard, or via the spin box in half- hour intervals. The valid range of values for n (in half hours) is from 0 to 47.
Private Sub spnTime_Change() Dim t As Date t = CDate(spnTime / 48) txtTime = FormatDateTime(t, vbLongTime) End Sub Private Sub txtTime_Change() Dim tim As Date On Error Resume Next tim = CDate(txtTime) If Err <> 0 Then Exit Sub spnTime = Int(CDbl(tim) * 48 + 0.5) End Sub
Initialization
UserForm_Initialize takes care that when the form is first launched, reasonable preset values are displayed.
' Initialization Private Sub UserForm_Initialize() txtYear = Year(Now) txtYear_Change txtMonth = Format(Now, "mmm yyyy") txtMonth_Change txtDate = FormatDateTime(Now, vbShortDate) txtDate_Change txtTime = FormatDateTime(Int(Now * 48 + 0.5) / 48, vbLongTime) txtTime_Change End Sub
EAN: 2147483647
Pages: 134