5.8 Protection Mechanisms
5.8 Protection Mechanisms
In setting up Excel tables and applications it frequently happens that you wish to protect parts of the workbook from unintentional changes (or from curious eyes). This section discusses the most important methods that Excel offers for this purpose.
However, please note that most of the protection mechanisms presented here represent protection only against "normal" Excel users. Any protection that you can later undo can also be undone by a professional Excel hacker. The only protection functions that are relatively secure are those that require a password (and even these can be hacked). In this respect only COM add-ins are truly perfect, which are passed as binary DLL. But they have many other drawbacks. In particular, COM Add-Ins can be developed only with Office Developer, which is a special version of Office with additional programming functions.
Restricting the Field of Action
Hiding Rows and Columns of Worksheets
The simplest way of protecting data from access by the user is to hide them. In program code this is accomplished simply by changing the Hidden property (for rows or columns) or the Visible property (for sheets). Possible settings for both properties are True and False ; Visible can also be given the value xlVeryHidden , in which case the sheet no longer appears in the unhide list and can be made visible only via program code.
Shrinking a Worksheet's Visible Area
A worksheet can be up to 256 columns wide and more then 65,000 cells high. Only very rarely will you make use of the full theoretical capacity of a worksheet. If you use a smaller area, you can hide the unused rows and columns. In this way you make it impossible for the user to wander accidentally into uncharted regions of the worksheet and proceed to input values, either intentionally or unintentionally.
If the range of cells is to be strictly predefined, you can hide rows and columns interactively. Simply select the rows and columns in question and execute the command HIDE from the pop-up menu.
However, if the size of the region to be used can vary dynamically, then you will have to let program code do the work of hiding and unhiding. To do this, simply set the Hidden property of rows or columns to False (to unhide) or True (to hide). The following lines of code will leave rows 1 to 10 unhidden while hiding all other rows. If instead of Rows and EntireRow you use the properties Column and EntireColumn , then the same thing happens, only for columns. With the Protect method you can ensure that the user does not unhide the hidden rows or columns.
Dim ws As Worksheet, i& Set ws = Sheets(1) i = 10 ws.Unprotect ws.Rows("1:" & i).EntireRow.Hidden = False ws.Rows(i + 1 & ":16384").EntireRow.Hidden = True ws.Protect Restricting the Area of Activity
Another possibility to restrict the user to a particular region of the worksheet is offered by the property ScrollArea : With it you can limit the range in which the user can operate (with the cursor keys or the mouse). The rest of the table remains, however, visible.
ws.ScrollArea = "A1:E10" ' cell pointer can be moved only in A1:E10 ws.ScrollArea = "" ' unrestricted movement
| Tip | The ScrollArea setting is not stored with the Excel file. Thus if you wish to ensure that a region is restricted as soon as a file is reopened, you need to execute the instruction ScrollArea assignment in Workbook_Open(). |
Protecting Cells and Worksheets from Changes
Excel has taken care to provide protection at the level of cells, worksheets, and entire workbooks. The protection of cells is accomplished in two steps. The first step consists in formatting the affected cells with the attributes "Locked" and "FormulaHidden" (FORMATCELLSPROTECTION); see Figure 5-11. Normally, Excel cells are locked. However, the attribute "Hidden" is inactive.
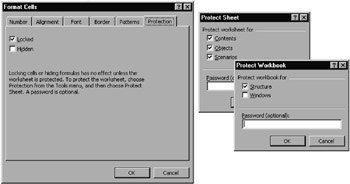
Figure 5-11: The three levels of protection (cells, sheet, workbook)
In program code, cells can be locked by changing the Locked property. Locked can be applied not only to Range objects, but also to drawing objects, controls (such as buttons and text fields), charts , and OLE objects, to protect these objects from being changed. To make formulas invisible, FormulaHidden must be set to True .
In the second step, the command TOOLSPROTECTIONPROTECT SHEET is executed. It is only now that the protection of cells has become active. This means that you have to format explicitly as "unlocked" those cells that in spite of this sheet protection should be able to be changed. If you wish to keep secret the construction of the table (that is, how the formulas are used), then you should format all cells of the table with the attribute "FormulaHidden."
With VBA code, sheet protection can be activated and deactivated with the methods Protect and Unprotect . These methods can be applied to objects of type WorkSheet , Chart , and DialogSheet . Five optional parameters can be passed to Protect , options that determine the degree of protection. Here is information on the meaning of the named parameters: The parameter password contains a character string that must be given again with Unprotect in order to lift the protection. If this parameter is not given, then protection is applied without a password, and thus it can be lifted again without any difficulty.
Whether drawing objects (included are also controls and OLE objects) are protected against changes (default setting is True ) is specified by drawingObject .
The parameter contents tells whether the contents of the sheet are protected. By this is meant cells in the case of worksheets, code in the case of modules, and in the case of forms and charts, their structure and formatting (default setting True ).
scenarios tells whether scenarios are protected against changes (default setting is True ).
userInterfaceOnly determines whether the elements of the interface of an application (such as formatting, size, and placement of objects) is to be protected but not the program code (default setting is False ). The three properties EnableAutoFilter , EnableOutlining , and EnablePivotTable determine the degree of protection. However, in spite of several experiments, the application of these three properties (which were new in version 7) is not fully clear.
The current state of sheet protection can be read from the properties ProtectContents , ProtectScenarios , and ProtectDrawingObjects . These properties can only be read. A change can be effected only through the Protect method.
Protecting the Entire Workbook
With TOOLSPROTECTIONPROTECT WORKBOOK you can protect the sequence of sheets in a workbook and/or the arrangement of windows . With the second of these you can fix the distribution of available screen space. Although this may seem tempting for many applications, you would do well to resist the temptation . The optimal distribution of screen space depends on factors that you cannot always foresee, such as screen resolution and selection of system fonts.
Workbook protection is independent of the protection of individual worksheets. Even if workbook protection is active, you can still change the cells of the worksheets of this workbook if these have not been secured by sheet protection.
The protection of a workbook is carried out in program code by the method Protect . If this method is applied to WorkSheet objects, it recognizes three named parameters: The parameter password provides the password for lifting protection (see above). The parameter structure tells whether the sequence of sheets should be protected (default setting is False ). The parameter windows tells whether the arrangement of windows is to be protected (default setting is False ).
| Tip | Since the default setting of the named parameters is False, a Protect call without parameters will have no effect. At least one of the two parameters structure and windows must be set to True . |
The current state of the protection function can be read from the two properties ProtectStructure and ProtectWindows . These properties can only be read. A change can be effected only via the Protect method.
New Protection Mechanisms in Excel 2002
In Excel 2002 the worksheet protection mechanism has been improved to the extent that there is no longer the stark choice of all or nothing. For example, now it permitted to allow the user to format protected cells (but not to alter the contents); see Figure 5-12.
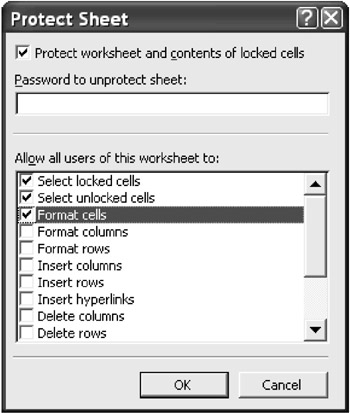
Figure 5-12: New Protection Options in Excel 2002
From the point of view of the developer, the Protect method for the Worksheet object has been extended by a host of parameters that allow control over the objects shown in Figure 5.12.
Which protection options are currently in force can be determined with Worksheet. Protection . This property refers to the like-named Protection object, whose properties AllowFormattingCells , AllowSorting , etc., give information about the protection options. Please note that these properties cannot be changed. Changes can be executed only with the Protect method.
Protecting Ranges of Cells with a Password
Another innovation in Excel 2002 is that you can equip various ranges of cells in an Excel table with a variety of passwords. If several individuals have access to an Excel file, then each of them can change only those regions of the table for which he or she knows the password. Interactively, you can set up such ranges with TOOLSPROTECTIONALLOW USERS TO EDIT RANGES. The password protection holds only if the entire worksheet is protected (TOOLS PROTECTION PROTECT SHEET).
From the developer's point of view, each range of cells thus protected is managed by an AllowEditRange object. A list of all such objects is given by the enumeration ws.Protection.AllowEditRanges . The following lines show how a new protected range can be set up.
ActiveSheet.Protection.AllowEditRanges.Add Title:="Range1", _ Range:=Range("A8:A10"), Password:="xxxx" With the AllowEditRange object, Range refers to the protected range of cells, while Title specifies the name of the object. The password cannot be read, but it can be changed with the method ChangePassword .
Permitting Access to Certain Users Without a Password
Although the idea of individual password protections for particular ranges of cells is a good one, passwords are in oversupply, and it helps no one when computer monitors become decorated with highly visible sticky notes containing secret passwords. Therefore, Excel 2002 offers the possibility of allowing certain users access to password-protected ranges of cells without a password. (These users can then change the cell contents without inputting a password.)
This is accomplished with the property Users of the AllowEditRange object on a UserAccessList object. This enumeration refers further to UserAccess objects, which contain the names of the users who are permitted to change the range of cells without a password. The following line of code shows how the user Administrator is added to the UserAccessList . (Internally, in the new UserAccess object there is stored in the Name property not only the user name, but also the computer name, for example, "saturn\Administrator", if the local computer name is saturn .)
ActiveSheet.Protection.AllowEditRanges("Range1").Users.Add "Administrator", True | Tip | Macro recording is unfortunately unable to translate a manual change in the UserAccessList of a range of cells into VBA code. |
Protection Mechanism for Shared Workbooks
Since Excel 97 it has been possible to save an Excel file in a special file-sharing format. In this way all changes made by various users can be managed by a change protocol. To activate this mode, execute TOOLSSHARE WORKBOOKEDITING and activate the option ALLOW CHANGES BY MORE THAN ONE USER AT THE SAME TIME. You will then be asked to save the file anew. (It would have been more logical to have placed this option in the SAVE AS form.)
The Excel file is now considered a "shared" file. In the TOOLS protocol just cited you can make various settings that determine how changes are tracked, updated, and sorted out when conflicting changes are made. If you wish to deactivate sharing, execute TOOLSSHARE WORKBOOKEDITING and deactivate the option CHANGES BY MORE THAN ONE USER.
If you wish to prevent another user from changing the sharing status, execute TOOLSPROTECTIONPROTECT AND SHARE WORKBOOK and activate the option SHARING WITH TRACK CHANGES. This is the top level of the protection mechanism in Excel workbooks. As long as sharing protection is active, the underlying protection mechanism cannot be changed. Sharing protection is an aid for the administrator of an Excel file. This form of protection can be set via program code with the method ProtectSharing and again lifted with UnprotectSharing .
| Note | As long as a file is being shared, VBA modules can neither be seen nor changed. (The macros can, however, be executed.) Most sharing functions including making settings and executing changes can be controlled with several Workbook properties and methods. |
Protecting Program Code and ToolBars
Just as confusing as the protection mechanisms in Excel are those in the VBA editor. If you wish to prevent another user from looking at or altering your code, then execute TOOLSVBAPROJECT PROPERTIESPROTECTION, activate the option LOCK PROJECT FOR VIEWING, and provide and then confirm a password (Figure 5-13). When you later open the file, the module can be viewed only after the password has been entered.
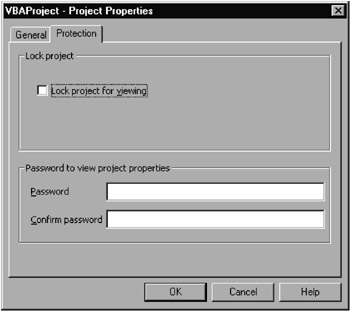
Figure 5-13: Protection of VBA code from prying eyes and unwanted changes
If you do not activate the locking option in the protection form, the only effect of the password is that you will have to provide it in order to view the VBA project properties form again. In spite of the password it is possible to view and change VBA code. Therefore, for the protection mechanism to work the option must always be activated! A deactivation is necessary only if you wish to lift the protection and eliminate the password.
| Caution | The value that Microsoft places on password protection in Excel is apparent from the change from Excel 7 to Excel 97. Modules that were invisible and password protected in Excel 7 were immediately accessible to users of Excel 97. Thus if you gave Excel workbooks to other users or purchased some yourself, your code is now accessible to any interested programmer. The password protection of Excel 2000 is somewhat better, but has already been cracked. There are commercial tools for recovering "lost" passwords or replacing them with another password (see http://soft4you.com/mso/vba.htm). The solution to this problem is not to rely on the protection mechanisms outlined above.What is truly secure is to have your code available as a COM add-in (see Chapter 14). |
Protecting ToolBars
To protect toolbars and user-defined menus from being changed you can set the Protection property of the CommandBar object. There are eight possible values to be set, by which the content, position, and visibility of the object can be protected from changes ( msoBarNoProtection , msoBarNoCustomize , msoBarNoResize , msoBarNoMove , msoBarNoChangeVisible , msoBarNoChangeDock , msoBarNoVerticalDock , and msoBarNoHorizontalDock ). These protection functions are available only via the object model. A manual change of the protection setting is impossible.
Syntax Summary
| PROTECTION FUNCTIONS | |
|---|---|
| rc.Hidden = True/False | rows/columns hide or unhide |
| ws.ScrollArea = "a1:e10" | reduce scroll area |
| ws.Visible = True/False/xlVeryHidden | hide or unhide sheets |
| obj.Locked = True/False | protect object (only in combination with Protect ) |
| rng.FormulaHidden = True/False | hide formulas |
| ws.Protect | protect worksheet (except for objects with Locked=False ) |
| ws.Unprotect | lift worksheet protection |
| ws.Protection | worksheet protection options |
| ws.Protection.AllowEditRanges.Add | password protection for ranges of cells |
| ws.Protection.AllowEditRanges(n).Users | users with access without password |
| wb.Protect | protect workbook structure |
| wb.Unprotect | lift protection |
| cb.Protection = | protect toolbar (CommandBar object) |
EAN: 2147483647
Pages: 134