3.2 The Components of the Development Environment
3.2 The Components of the Development Environment
The principal purpose of the development environment is to make possible the input of program code and the definition of " intelligent " forms. Since Excel 97 the VBA development environment is no longer integrated into Excel, but behaves almost like a freestanding application. The development environment is invoked by ToolsMacroVisual Basic Editor or with the keyboard shortcut Alt+F11 , and it then appears in an independent window. See Figure 3-1.
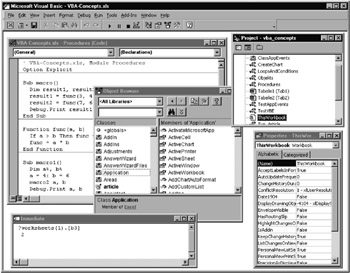
Figure 3-1: The VBA development environment
Instead of employing ToolsMacroVisual Basic Editor or Alt+F11 , the change from Excel to the development environment can be effected by means of a tool: In Excel (not in the development environment) View Toolbars CustomizeCommands and with the mouse drag the button VISUAL BASIC EDITOR from the "tools" category into the standard toolbar. Now a simple mouse click suffices to move you into the window of the development environment.
For almost every component of the development environment there have been defined context (pop-up) menus , which can be invoked with the right mouse button. They enable the efficient invocation of the most important commands. Check them out!
| Note | The changeover between Excel and the development environment functions only when no form is open in the currently active component. In Excel no cell or object can be in the process of manipulation. In the development environment the object catalog cannot be the active window. In all these cases the change will be denied (without an error message). |
| Tip | In fact, not every step in program development is carried out in the VBA development environment. For example, the recording of macros is controlled directly from within Excel. Likewise, the definition of new toolbars or menu items is done within Excel. For this reason, and in order that we may deal with related themes together, you will find further information on the development environment in other chapters: Background on the object catalog and library references: Chapter 4 Debugging aids: Chapter 6 Forms editor: Chapter 7 Definition of menus and toolbars: Chapter 8 |
Project Explorer
The project window (ViewProject Explorer or Ctrl+R ) provides an orientation to programming in Excel. With each loaded Excel file all the associated modules and forms are shown in the project explorer. By double clicking on one of the entries, its components are displayed in a window, where they can be worked on.
The individual components of a project can be arranged either alphabetically or, as shown in Figure 3-1, thematically. The change from one mode to the other is accomplished with the third tool icon in the project window (with the confusing name Toggle Folders).
| Note | If you are working on several Excel files, you can close individual files ("projects") in the project explorer (click on the symbol + or ˆ’ ). All the windows of this project will then be hidden. This greatly simplifies orientation in the chaos of windows in the development environment. In the default setting the project explorer, as well as most other components, is not displayed as a freely movable window, but is fixed to the border area of the development environment. This is practical only if you are working with a large monitor. Otherwise, you will quickly use up all available real estate. To make the components of the development environment freely movable, execute ToolsOptionsDocking and deactivate all the options on this tab of the dialog form. |
Properties Window
In the properties window (ViewProperties Window or F4 ) a number of characteristics of the current object can be set. As "objects" are considered modules and also forms and the controls contained within them. The most important role is played by the properties window in the creation of new forms: Every element of such a form has dozens of properties. In normal code modules, on the other hand, only the name of the module can be set. This name cannot contain a space character. With object modules the VBA name generally differs from the name of the Excel worksheet.
Just as in the project explorer, the entries in the properties window can be grouped (that is, first all the properties, then the methods , and finally the events, as in the tip that follows ) or sorted alphabetically. The shift is accomplished here, however, with sheet tabs and makes sense only when objects support large numbers of properties.
If you embed controls directly in worksheets, you can also use the properties window in Excel. The invocation in Excel is, however, accomplished not with F4 , but with the pop-up menu entry PROPERTIES or by clicking on the Properties tool in the "control toolbox."
Object Browser
Programming in Excel is based on a number of object libraries, of which the most important is the Excel library. Every library is equipped with a large number of objects, and the objects, in turn , with many properties, methods, and events. The only chance, then, to keep track of what is going on in this superfluity of keywords is provided by the object browser, which is displayed by executing ViewObject Browser or hitting the F2 key. See Figure 3-2. (If the cursor is located over a keyword in the code window, it will be automatically looked up in the object browser.) In many situations the object browser offers the shortest path into the on-line help.
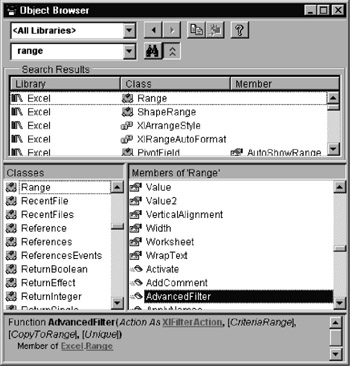
Figure 3-2: The Object Browser
In the object browser are shown the objects of all active libraries as well as (in boldface) all user -defined functions and subprograms. In the listbox in the upper left corner you can limit the display to objects belonging to a specific library. This is especially useful when the search for a particular character string returns a large number of results. You carry out a search by giving a string as input in the second listbox and pressing Return.
Normally, the browser displays only "officially" supported keywords. However, there are quite a few hidden keywords, which either are used internally or have been retained for reasons of compatibility with earlier versions. With the pop-up menu command Show Hidden Members you can also see these keywords, which appear grayed out.
| Tip | Under normal circumstances the keywords are listed alphabetically. By using the pop-up menu command Group Members you can have the entries ordered in groups, that is first all the properties, then the methods, and finally the events. As a rule, in this form the list is easier to understand. |
Editor Options
With TOOLSOPTIONS a four-sheeted form is displayed that allows you to control a variety of settings in the development environment. Most of the settings are more or less self explanatory. Here are a few notes for the others:
Auto Syntax Check (tab Editor): If this option is activated, an error message is displayed when a line containing an error is input. While you are still taking baby steps in VBA this is perhaps rather useful. However, after a couple of days these insistent error messages become burdensome. If you deactivate the option, lines with errors continued to be displayed in red, which is quite sufficient.
Require Variable Declaration: If this option is activated, in every new module the line Option Explicit is added. This means that you are allowed to use only those variables that you have declared with Dim . This option saves you from typos and supports the creation of correct code. Activate it by all means!
Auto List Members, Auto Quick Info , Auto Data Tips: These three options determine whether information about permitted methods and properties, the current content of variables, and, respectively, allowed parameters will be automatically inserted in the code window. Leave this option in the default setting, that is, activated. The information provided is extremely useful.
Default To Full Module View: This option has the effect of displaying in the code window not only an individual procedure, but all procedures belonging to the entire module.
The tab Editor Format: Here you can select the font of your choice and select a color for a variety of syntax elements.
General Options
Collapse Project Hides Windows (tab General): If this option is activated, all windows of a project are closed as soon as the project is collapsed in the project explorer (click on the minus sign). When it is opened up, the windows appear again. This option serves the purpose of maintaining a certain degree of order in the development environment even when a number of projects are open.
Edit And Continue: With many changes in code ”for example, in the declaration of new variables ”all current contents of variables must be cleared. When the option NOTIFY BEFORE STATE LOSS is activated, you will be warned before such changes are carried out.
Break On All Errors: This option cancels the effect of error handling routines. In spite of On-Error instructions the program will be interrupted . This option is often very useful in debugging. (See also Chapter 6).
Break In Class Module/Break On Unhandled Errors: These two options yield differing results only when you develop class modules. If an error occurs in a class module, in the first case the program is interrupted in the class module, and in the second case it is interrupted where the method or property of the class that caused the error was called (see also Chapter 4, the section on programming your own classes).
Compile: VBA programs are automatically compiled into pseudocode, which can be executed more efficiently than the underlying ASCII code. (We are not talking about machine code, such as would be generated by a C compiler.) The two COMPILE options govern when compilation occurs. The default setting (both options activated) indicates that program execution begins at once, and procedures are compiled only as they are needed. The advantage of this is a rapid start. The disadvantage is that any obvious errors will be announced only later. With large projects it is usually a good idea to deactivate the options, since then you will be notified at once of any syntax errors in the code (and not sometime later, the first time the procedure is called).
Tab Docking: As mentioned in one of the "tips" above, in the default configuration most of the components in the development environment are so-called docked windows. These windows stick, as it were, to an end of the development environment. If you do not happen to be working with a 21-inch monitor, these docked windows take up too much space and represent a step backwards into the era of Windows 1 (when overlapping windows were not allowed). You can call a halt to this nonsense by unchecking most (or, even better, all) of the boxes on this page of the form. Now you can move the windows around and overlap them without any restrictions.
Project Properties
With ToolsVbaproject Properties (Project Properties) you open a dialog for setting properties of the current project. On the page with the tab General you give a short description of the project and file name of an associated help file (see Chapter 14). On the page Protection you can hide the VBA part of an Excel file from view and protect it with a password.
| Caution | The status that Microsoft accords to password protection in Excel could be observed in the transition from Excel 7 to Excel 97. Modules that were hidden and password protected in Excel 7 were completely accessible to everyone with Excel 97! The password protection of Excel 2000 is, in fact, somewhat better, but it has already been broken. There are commercial tools available that allow anyone to recover a "forgotten" password or replace it with a known password (see http://soft4you.com/mso/vba.htm). |
Conditional Compilation
It often happens that along with a program you wish to manage a second version in parallel (say, a demo version with limited features or a debug version with additional tests). For this you can define a constant in Project PropertiesGeneral in the text field Conditional Compilation Arguments such as demo=1 . In the program code you can then make use of the value of the constant with #If instructions.
According to the result of the #If test one of two branches is executed. In contrast to normal If tests, here the result is determined during compilation. The compiled code contains only one variant and no #If tests, and therefore there is no loss of speed of execution. The following lines show some program code with #If instructions:
Sub Command1_Click() #If demo Then MsgBox "In the demo version nothing can be saved" #Else ' ... program code for saving #End If End Sub
EAN: 2147483647
Pages: 134