Chapter 11. Using XML in Reporting Systems
| CONTENTS |
IN THIS CHAPTER
- Architecture of Reporting Systems
- When to Use XML with Reports
- Data Source for Reports
- ResultSet to XML
- Bringing It All Together
- The Sorting Table Stylesheet
- The Cross Tab Stylesheet
- Summary
No matter what the Web application, or where it's implemented, it's a safe bet to assume that there will be some reporting involved. Even applications that don't have databases are likely to have some aspect of reporting. However, non-database systems are more likely to be looking at reports regarding numbers of page usage and data exclusive to system usage. The development of either of these reporting systems can benefit from the appropriate placement and usage of XML.
After creating a JSP that will fill the database with as much data as needed, JDOM and XSL will be used to create two reports. Before explaining those report components, we will explain a Java class that builds a JDOM XML representation from a database ResultSet.
Architecture of Reporting Systems
The different types of reporting systems that exist have to do most notably with the types of reports to create, and the structure of the entire system. The main types of reports are tables, cross tabs, and aggregate. Our first stylesheet will create a very generic table-creating stylesheet with dynamic sorting label links, while the second stylesheet will create a cross tab report from the same data source.
This brings us into the overall reporting system structure. The ideal system would have database-stored procedures perform the initial filtering and sorting of data, and have stylesheets that would each produce several reports. One stylesheet can produce multiple reports by using stylesheet parameters and changing filtering or sorting methods.
Even more ideally, these stylesheets would be created generically enough to be usable on multiple datasets. In this way, a very robust reporting system can be created quickly, after which the more specific, data-dependent reports can be created.
Another thing to consider when creating reporting systems has to do with security and access rights. Different people will be permitted to see only some reports, and it is important to incorporate a simple model to maintain this security. A common design is to have a database table that contains a record for each report. Then another table will have a record for each report and login type that has access to it. In this way, it is simple to change access rights to reports without having to touch the reporting pages themselves.
The reporting examples throughout this chapter and the next will use a database from which to create the JDOM documents that will be transformed with a generic stylesheet into our resulting HTML output page. We will glue these pieces together using a JSP to do the transformation and finally output the results. It is relatively simple to change the backend and create the JDOM document from another source.
When to Use XML with Reports
XML is not always the proper choice in reporting systems. It must be understood that its use includes an extra layer of processing beyond just programmatically converting a database ResultSet into the output desired. The difference resides in the speed at which these systems can be built because, if carefully created, the stylesheets are reusable across datasets, and fewer stored procedures have to be created.
DOM document models consume memory proportional to the size and complexity of the datasets being modeled. Database data will maintain the same complexity across ResultSets, but can be extremely large. The size of the data sets being used to create JDOMs must be considered when creating these systems, or some troubles will result.
In the next chapter an example of a paging report will be demonstrated. This report will only display a set maximum number of records per page, but it will create links that enable the rest of the data to be seen on different "pages" of the same report. This is one method of handling potentially large data sets. Another method is writing JavaBeans that will iterate through the ResultSet to create the desired output. In this way, the memory limitations of DOM will be avoided.
While SAX can be very useful in some reporting situations where there is a large amount of similarly formatted data, we are not using it here. This is because we are using the XSL sorting capabilities instead of sorting the data at the database.
Data Source for Reports
The data source for the examples in this and the following chapters come from two tables in the xmlbook database created in Appendix A,"Setting Up." The data in these tables contains some very basic information about clinic patients and their health ailments. These tables are ReportClientData and ReportClientAilment and between them there is a one-to-many relationships. That is, for each patient in ReportClientData, there might be multiple ailment records in ReportClientAilment. This relationship was created, and will be used in the next two chapters, to aid in demonstrating stylesheet methods for dealing with these types of data relationships.
Creating Database Data
The first thing that must be done is to populate the two previously mentioned tables with data. A JSP has been created to create as many records as are necessary for this purpose, and its description follows. This JSP contains a simple form that allows the user to enter the number of client records to be created.
When the form is submitted, the same JSP will begin by creating the requested number of client records. As each client record is created, a random number of ailment records are created corresponding to that client record.
The JSP named CreateDBData.jsp found in Listing 11.1 begins with an import statement and the small HTML form that allows the user to enter the number of rows of data that are created. Next, the variables are set, and the parameter entered through the form is parsed through a try-catch block as follows:
try{ client_rows = Integer.parseInt(request.getParameter("client_rows")); } //catch any and all errors with form data catch(NumberFormatException e){ client_rows = 0; } If any errors result from the parsing of the form variable, such as a nonexistent value or a non-integer value, the parameter is set to 0 in the preceding catch block. This will prevent the creation of any new records.
After creating our database Connection and Statement objects, the looping construct that will insert client records into the database begins:
for(int i = 0; i < client_rows; i++){ db_statement.execute(createQueryClient()); ResultSet rs = db_statement.executeQuery("select LAST_INSERT_ID()"); rs.last(); int last_insert_id = rs.getInt(1); Each iteration of the preceding for loop will insert one record into the ReportClientData table. After which, a statement is executed, and the resulting ResultSet is traversed to find the identity value of the newly inserted record.
This identity value is used to key ailment records with a client record. The identity value of the corresponding client record will be contained in each ailment record. This will result a one-client-to-many-ailments relationship that will be used in the following reporting chapter.
Next, a random number is generated to determine how many ailment records will be created for the current client. This number is used to loop through the creation of each ailment record:
int client_ailment = (int) (Math.random() * 5); for(int k = 0; k < client_ailment; k++){ try{ db_statement.execute(createQueryAilment(last_insert_id)); out.print("<br />Ailment added for record index: " + last_insert_id + ". With " + (k+1) + " out of " + client_ailment + " Records."); ailment_rows++; } catch (SQLException e){ out.print("<br />Ailment skipped for record index:" + last_insert_id + ". Due to duplicate." ); } } The processing of these statements is wrapped in a try-catch block to enable the handling of SQLExceptions. All the data is created randomly, and this causes the occasional duplicate ailment record to be created. Duplicates are unacceptable in this table because each client can only have one record indicating an ailment. This duplication error is handled in the preceding catch block, and permits the rest of the processing to continue.
Next is the code that outputs status statements and catch blocks to catch the various exceptions that the previous statements can create. The page declaration follows the end of the scriptlet.
This is where the methods that create our dates, names, and other record data reside. Following these are the methods that bring it all together to create the complete insert statements executed against the database.
The complete JSP that will dynamically create and insert data can be found in Listing 11.1 and should be saved as \webapps\xmlbook\chapter11\CreateDBData.jsp.
Listing 11.1 CreateDBData.jsp in Its Complete Form
<%@page import = "java.sql.*" %> <html> <head><title></title></head> <body> <form method="post"> <table> <tr> <td align="right">Number of rows to create:</td> <td><input type="text" name="client_rows" value="" size="5"/></td> </tr> <tr> <td colspan="2" align="left"> <br /><br /><input type="submit" value="Create Records" /> </td> </tr> <table> </form> <% // 1. Initialize variables int client_rows; String final_status = "There were 0 Client Data records added."; String db_query = ""; String db_location = "jdbc:mysql://localhost/xmlbook"; String db_driver = "org.gjt.mm.mysql.Driver"; int ailment_rows = 0; try{ client_rows = Integer.parseInt(request.getParameter("client_rows")); } //catch any and all errors with form data catch(NumberFormatException e){ client_rows = 0; } // 2. Make a database connection Connection db_connection = null; try{ Class.forName(db_driver); db_connection = DriverManager.getConnection(db_location); Statement db_statement = db_connection.createStatement(); // 3. Create records for ReportClientData table in xmlbook database for(int i = 0; i < client_rows; i++){ db_statement.execute(createQueryClient()); ResultSet rs = db_statement.executeQuery ("select LAST_INSERT_ID()"); rs.last(); int last_insert_id = rs.getInt(1); int client_ailment = (int) (Math.random() * 5); for(int k = 0; k < client_ailment; k++){ try{ db_statement.execute(createQueryAilment(last_insert_id)); out.print("<br />Ailment added for record index: " + last_insert_id + ". With " + (k+1) + " out of " + client_ailment + " Records."); ailment_rows++; } catch (SQLException e){ out.print("<br />Ailment skipped for record index:" + last_insert_id + ". Due to duplicate." ); } } if (client_rows -1 == i) final_status = "There were " + client_rows + " Client Data records added."; } } catch (ClassNotFoundException e) { final_status = " Error creating database drive class!"; final_status += " <br />" + e.toString(); } catch (SQLException e) { final_status = " Error processing the SQL!"; final_status += " <br />" + e.toString(); } finally { /* We must close the database connection now */ try { if (db_connection != null) { db_connection.close(); } } catch (SQLException e) { final_status = "Error in closing connection."; final_status += " <br />" + e.toString(); } } %> <br /><br /> <font color="blue"><%=final_status%> <br />And <%=ailment_rows%> Ailment Data records added. </font> <br /><br /> </body> </html> <%! char letters[] = {'a', 'b', 'c', 'd', 'e', 'f', 'g', 'h', 'i', 'j', 'k', 'l', 'm', 'n', 'o', 'p', 'q', 'r', 's', 't', 'u', 'v', 'w', 'x', 'y', 'z'}; private String createString(int length){ String result = ""; for(int i = 0; i < length; i++){ int temp = (int) (Math.random() * 26); //capitalize the first letter in this string if (i == 0) result += Character.toUpperCase(letters[temp]); else result += letters[temp]; } return new String(result); } //1 means birthdate (1930 - 1996) //2 means ailment 10 years (1980 - 1997) private String createDate(int year_range){ String result = "19"; if (year_range == 1) result += "" + (30 + (int) (Math.random() * 67)); else result += "" + (80 + (int) (Math.random() * 18)); result += "-" + (1 + (int) (Math.random() * 12)); result += "-" + (1 + (int) (Math.random() * 28)); return new String(result); } private String createColor(){ String result = ""; int pick_a_color = (int) (Math.random() * 6); switch (pick_a_color) { case 0: result = "red"; break; case 1: result = "yellow"; break; case 2: result = "blue"; break; case 3: result = "green"; break; case 4: result = "purple"; break; case 5: result = "orange"; break; default: result = "black"; } return result; } private String createQueryClient(){ String db_query = " insert into ReportClientData "; db_query += "(RCD_lname,RCD_fname,RCD_clinic,RCD_dob,RCD_color)"; db_query += " values ("; db_query += "'" + createString( 7 ) + "' ,"; db_query += "'" + createString( 5 ) + "' ,"; db_query += "'" + (1 + (int) (Math.random() * 5)) + "' ,"; db_query += "'" + createDate(1) + "' ,"; db_query += "'" + createColor() + "')"; return db_query; } private String createQueryAilment(int clientID){ String db_query = " insert into ReportClientAilments "; db_query += "(RCA_medicalailment,RCA_datefound,RCA_clientID)"; db_query += " values ("; db_query += "'" + createString( 1 ) + "' ,"; db_query += "'" + createDate(2) + "' ,"; db_query += "'" + clientID + "' )"; return db_query; } %> Now that some data exists, let's start creating some reports. The first step in this process is creating a class that will create a JDOM representation out of a ResultSet.
ResultSet to XML
RStoXML is a class that will return a JDOM representation of a database ResultSet upon the invocation of the build() method. Before this method is used, properties of the returned JDOM document can be specified. Some of the properties available include changing the default element names from the record column names and declaring columns to be created as attributes instead of elements. Another important property available is the maximum number of records that will be converted into the JDOM representation. The use of this property will be demonstrated in the next chapter when a paging report is created.
This class is a starting point for the creation of a more versatile production-oriented object. The capability to filter which columns of the ResultSet get included in the JDOM creation can easily be added with another HashMap, some more property setting methods, and some additional logic in the build() method.
What It Does
RStoXML.java at its simplest will create a JDOM document from a ResultSet object. At its default setting, RStoXML will create sibling Element nodes for each field of data found in a record. These nodes will be placed together as children of an Element node, each of which represents a record. This causes the record elements to be children of the root node, and all data containing elements to be grandchildren.
For example, the default XML structure returned from RStoXML is shown following Table 11.1, which contains two sample records.
| RCD_index | RCD_lname | RCD_fname | RCD_dob | RCD_clinic | RCD_color |
|---|---|---|---|---|---|
| 1 | Nowitz | Kerry | 1970-08-29 | 1 | yellow |
| 2 | Muller | Todd | 1981-02-08 | 2 | green |
Using all the defaults of RStoXML, the sample records found in Table 11.1 would result in a JDOM representation of the XML document shown in Listing 11.2.
Listing 11.2 Default JDOM Document Returned from RStoXML
<ROOT> <RECORD> <RCD_index>1</RCD_index> <RCD_lname>Nowitz</RCD_lname> <RCD_fname>Kerry</RCD_fname> <RCD_dob>1970-08-29</RCD_dob> <RCD_clinic>1</RCD_clinic> <RCD_color>yellow</RCD_color> </RECORD> <RECORD> <RCD_index>2</RCD_index> <RCD_lname>Muller</RCD_lname> <RCD_fname>Todd</RCD_fname> <RCD_dob>1981-02-08</RCD_dob> <RCD_clinic>2</RCD_clinic> <RCD_color>green</RCD_color> </RECORD> </ROOT>
RStoXML is not limited to outputting Elements to represent the structure of the ResultSet. Methods such as setAsAttribute() and setAllAttribute() exist to set one or all columns of data to attributes of the RECORD element. For example, if setAllAttribute() were invoked before the JDOM representation were built through the build() method, the JDOM structure as represented in Listing 11.3 would result.
Listing 11.3 JDOM Document Returned from RStoXML
<ROOT> <RECORD RCD_index="1" RCD_lname="Nowitz" RCD_fname="Kerry" RCD_dob="1970-08-29" RCD_clinic="1" RCD_color="yellow" /> <RECORD RCD_index="2" RCD_lname="Muller" RCD_fname="Todd" RCD_dob="1981-02-08" RCD_clinic="2" RCD_color="green" /> </ROOT>
Nor is RStoXML limited to the default column names that exist in the database table definition. Sometimes these names can be very long, depending upon the database schema. As a result, methods such as setName() permit the setting of the attribute or element name with which a ResultSet data column will be labeled.
The source code to this class follows in Listing 11.4. It will not be explained because it is straightforward Java. Save and compile this file as webapps\xmlbook\WEB-INF\classes\xmlbook\chapter11.
Listing 11.4 RStoXML.java
package xmlbook.chapter11; import java.io.*; import java.sql.*; import java.text.*; import java.util.*; import org.jdom.*; public class RStoXML { private SQLException exception; private ResultSet rs; private int intColCount; private ResultSetMetaData rsmd; //key is original column name keyed to replacement name private Map newNames = new HashMap(); //key is original db column, true or false private Map attribs = new HashMap(); int maxRows = Integer.MAX_VALUE; // default to all private String rootName = "ROOT"; private String rowName = "RECORD"; public RStoXML(ResultSet rs) { this.rs = rs; try { rsmd = rs.getMetaData(); intColCount = rsmd.getColumnCount(); } catch (SQLException e) { // Hold the exception until build() is called exception = e; } } public RStoXML(ResultSet rs, String rootName, String rowName) { this(rs); setRootName(rootName); setRowName(rowName); } public Document build() throws JDOMException { if (exception != null) { throw new JDOMException("Database problem", exception); } try { Element root = new Element(rootName); Document doc = new Document(root); int rowCount = 0; // get column names for the record set String[] columnName = new String[intColCount]; for (int index = 0; index < intColCount; index++) { columnName[index] = rsmd.getColumnName(index+1); } // build the org.jdom.Document out of the result set String name; String value; Element record; Element child; while (rs.next() && (rowCount++ < maxRows)) { record = new Element(rowName); for (int col = 1; col <= intColCount; col++) { if (newNames.isEmpty() || (newNames.get(columnName[col-1].toLowerCase()) == null)) name = columnName[col-1]; else name = lookupName(columnName[col-1]); value = rs.getString(col); if ( attribs.containsKey(columnName[col-1].toLowerCase())) { //if the value of the column is in attribs //and notnull create attribute record.setAttribute(name, value); } else { //other wise create child element child = new Element(name); if (!rs.wasNull()) child.setText(value); record.addContent(child); } } root.addContent(record); } return doc; } catch (SQLException e) { throw new JDOMException("Database problem", e) ; } } //origName is column name in db, if name exists in the newNames hashmap //return it, else returned passed in name. private String lookupName(String origName) { String name = (String) newNames.get(origName.toLowerCase()); if (name != null) { return name; } else { return origName; } } public void setRootName(String rootName) { this.rootName = rootName; } public void setRowName(String rowName) { this.rowName = rowName; } public void setMaxRows(int maxRows) { this.maxRows = maxRows; } public void setAsAttribute(String columnName, String attribName) { String name = columnName.toLowerCase(); attribs.put(name, "t"); newNames.put(name, attribName); } public void setAllAttribute() throws JDOMException{ try{ int intColCount = rsmd.getColumnCount(); for (int index = 0; index < intColCount; index++) { attribs.put(rsmd.getColumnName(index+1).toLowerCase(), "t"); } } catch (SQLException e) { throw new JDOMException("Database problem", e); } } public void setName(String columnName, String name){ newNames.put(columnName.toLowerCase(), name); } //set a database column name to a specific element name public void setAsName(String columnName, String elemName) { String name = columnName.toLowerCase(); newNames.put(name, elemName); } } Bringing It All Together
Next is the JSP that will bring everything together. This JSP will connect to a database and execute a statement that will produce a ResultSet. After that, the ResultSet will be passed into the newly created RStoXML and used to obtain a JDOM representation. This will then be transformed with a stylesheet, and the results output.
The TableSort.xsl stylesheet will create an HTML table whose label cells are links. Each of these links will provide the column number in the query string, so that when the string is followed, the JSP will obtain this parameter from the URL. Once obtained, that value will be passed into the stylesheet to result in the appropriate sort.
After parsing the import statements, DBtoXML.jsp parses the query string to find the column number to sort on. If this parse results in an error, the default defined in the JSP will be used:
<% // 1. get parameters from url int sort_by; try{ sort_by = Integer.parseInt(request.getParameter("sort")); } catch(NumberFormatException e){ //if invalid or nonexistent parameter, sort by RCD_lname sort_by = 1; } The page then initializes the variables that will be used throughout the rest of the page. These variables include those for database processing, such as the query statement and the XSLT stylesheet filename.
After this, the page will connect to the database, execute the SQL statement, return a ResultSet, and release the resources used. These statements have been explained previously, and will not be re-explained here.
After the ResultSet has been obtained, the process of conversion to a JDOM representation is started through the creation of an RStoXML object:
// create a resultsetbuilder to transform resultset to XML RStoXML rsb = new RStoXML(rs, "ROOT", "RECORD");
Two constructors exist for RStoXML. One uses all the defaults of the class, and therefore only requires the ResultSet parameter. The other, shown here, takes a ResultSet and two Strings as parameters. The first String parameter sets the root element name of the resulting JDOM representation, and the other sets the name of the elements that will each represent one record:
//create the XML from resultset org.jdom.Document jdomdoc = rsb.build(); rs = null;
The build() method is then invoked upon the object that will cause the creation of the JDOM representation, and the resources used in the ResultSet are released.
If any properties are to be set, such as setAllAttribute(), the setter methods must be called before the build() method is invoked. Otherwise, all the class defaults are used.
Now that the JDOM representation is available, it's time to create the Transformer object to do the transformation. This Transformer is created with the stylesheet previously defined by the variable xsl:
//create transformer Transformer transformer = TransformerFactory.newInstance() .newTransformer(new StreamSource(xsl));
With the help of the newly created Transformer, the two parameters that exist at the root level of the XSL stylesheet are set as shown below. The first is the column number that the resulting table will be sorted on, and the second is the name of the page that the linked table labels should be directed to. The presence of this parameter enables the stylesheet to be completely generic and not bound to any dataset, column names, or page names.
transformer.setParameter("Sort", new Integer(sort_by)); transformer.setParameter("Page", "DBtoXML.jsp"); With the parameters set, the stylesheet is ready to transform the JDOM representation. Before this occurs, a JDOMResult object is created to hold the results of the transformation. It is now time to transform() the JDOM representation of the ResultSet with the stylesheet using the Transformer object. Again, we release the resources used by the jdomdoc source object after it is no longer useful:
JDOMResult jdomresults = new JDOMResult(); transformer.transform(new JDOMSource(jdomdoc), jdomresults); jdomdoc = null;
The results of the transformation are now in jdomresults and need to be output. An easy way of doing this is through the use of the XMLOutputter class found in the org.jdom.output package. This class will format the JDOM document into a stream through which it can be output to the user through the output of the JSP. The Document of the transformation results are obtained and output:
//create outputter to output results XMLOutputter output = new XMLOutputter(" ", true); //output the results Document docResults = jdomresults.getDocument(); output.output(docResults, out); Notice that the constructor used here for XMLOutputter takes two parameters. These parameters determine the indentation, and whether new lines will be included in the output. Through the use of these parameters, the tidiness of the output HTML can be altered. The settings chosen here will cause the output HTML to be formatted in a readable form.
After handling some possible exceptions that might occur, the page is complete. DBtoXML.jsp can be found in its entirety in Listing 11.5.
Listing 11.5 Complete DBtoXML.jsp File
<%@page import = "java.sql.*, org.jdom.*, org.jdom.output.*, javax.xml.transform.*, javax.xml.transform.stream.*, org.jdom.transform.*, xmlbook.chapter11.*" %> <html> <head><title>DB to XML and XSL</title></head> <body> <div> <% // 1. get parameters from url int sort_by; try{ sort_by = Integer.parseInt(request.getParameter("sort")); } catch(NumberFormatException e){ //if invalid or nonexistent parameter, sort by RCD_lname sort_by = 1; } // 2. Initialize other variables String final_status = ""; String db_query = "select RCD_lname, RCD_fname, "; db_query +="DATE_FORMAT(RCD_dob, '%Y-%m-%d') as RCD_dob , "; db_query +="RCD_clinic, RCD_color from reportclientdata"; String db_location = "jdbc:mysql://localhost/xmlbook"; String db_driver = "org.gjt.mm.mysql.Driver"; String stylesheet = "TableSort.xsl"; // 3. Make a database connection Connection db_connection = null; Statement db_statement = null; ResultSet rs = null; try{ Class.forName(db_driver); db_connection = DriverManager.getConnection(db_location); db_statement = db_connection.createStatement(); //get a resultset rs = db_statement.executeQuery(db_query); } catch (ClassNotFoundException e){ final_status = "Error: Unable to create database drive class."; final_status += " <br />" + e.toString(); } catch(SQLException e){ final_status = "Error: Unable to make database connection"; final_status += "or execute statement."; final_status += " <br />" + e.toString(); } finally { /* We must close the database connection now */ try { if (db_connection != null) { db_connection.close(); } } catch (SQLException e) { final_status = "Error: Unable to close database connection."; final_status += " <br />" + e.toString(); } } try{ // create a resultsetbuilder to transform resultset to XML RStoXML rsxml = new RStoXML(rs, "ROOT", "RECORD"); //create the XML from recordset org.jdom.Document jdomdoc = rsxml.build(); rs = null; //get the stylesheet String path = request.getServletPath(); path = path.substring(0,path.indexOf("DBtoXML.jsp")) ; String xsl = application.getRealPath(path + stylesheet); //create transformer Transformer transformer = TransformerFactory.newInstance() .newTransformer(new StreamSource(xsl)); transformer.setParameter("Sort", new Integer(sort_by)); transformer.setParameter("Page", "DBtoXML.jsp"); //transformer.setParameter("NFilter", new Integer(nFilter_by)); //transformer.setParameter("CFilter", cFilter_by); JDOMResult jdomresults = new JDOMResult(); transformer.transform(new JDOMSource(jdomdoc), jdomresults); jdomdoc = null; //create outputter to output results XMLOutputter output = new XMLOutputter(" ", true); //output the results Document docResults = jdomresults.getDocument(); output.output(docResults, out); } catch (TransformerFactoryConfigurationError e) { final_status = "Error: Unable to create factory to transform "; final_status = "XSL and XML."; final_status += "<br />" + e.toString(); } catch (TransformerException e) { final_status = "Error: Unable to transform XSL and XML."; final_status += "<br />" + e.toString(); } catch (JDOMException e) { final_status = "Error: Unable to create XML from database query."; final_status += "<br />" + e.toString(); } if(final_status != "") out.print("<br><font color=\"red\"><H2>" + final_status + "</H2></font>"); %> </div> </body> </html> The Sorting Table Stylesheet
Now that we have walked through the process of converting a ResultSet to a JDOM representation, it's time to take a look at the transforming stylesheet.
This XSL stylesheet is as generic as possible. In fact, it can be used to transform many different sets of data without altering anything. Any XML document that has grandchild elements with text data and child elements that group the grandchild elements can be output as a table with linked labels using this stylesheet.
The stylesheet has two root-level parameters. The first, Sort, is the column number by which to sort the resulting table. This parameter is used to enable the JSP to pass this sorting information through from the URL parameter. The value of the second parameter, Page, is used to create the links that will cause the re-sorting of the report.
The stylesheet is composed of three templates. The first template will match on the root element and begin the processing of the entire document. The next template will create all the table column labels, which are linked to cause the document to reload sorted on the chosen row. The last template will match each child of the root element in turn and output all element children as table cells.
The stylesheet begins with the XML document declaration, and root xsl:stylesheet element that describes the namespace of the XSL elements. The root level parameters are then declared void of default values, and the output method is set:
<?xml version="1.0" encoding="UTF-8"?> <xsl:stylesheet version="1.0" xmlns:xsl="http://www.w3.org/1999/XSL/Transform"> <xsl:param name="Sort"/> <xsl:param name="Page"/> <xsl:output method="html" />
Next is the start of the first template. This template matches the root of the XML document with the match attribute value of /. This causes the entire XML document to pass into this template. The HTML div and table elements are output at this point, and the header template is called with an empty body through the call-template element. Then, the body of the header template is executed with the context node as the root of the document:
<xsl:template match="/"> <table border="1"> <xsl:call-template name="header"/>
Next, an apply-templates is used to select each element that matches the XPath statement */*. This statement will select each child element of the root in turn and match each to a template with a matching select attribute.
Notice that the body of this template tag is not empty. Inside, there is a sort element that selects which of a set of nodes to be sorted on. More specifically, this sort element selects the child whose position number is equal to the $Sort parameter by which to sort. This parameter-dependent statement enables us to dynamically sort the output. When these operations are completed, the end table HTML tag is output and the template is finished:
<xsl:apply-templates select="*/*"> <xsl:sort select="*[$Sort]" /> </xsl:apply-templates> </table> </xsl:template>
Let's look at the next template that creates the linked table labels. This again starts out by defining the template tag with the name attribute value of the header:
<!-- creates the table headers from the tag names --> <xsl:template name="header">
Next, a table row tag is output, followed by the beginning of a for-each loop. This loop selects each grandchild of the root element whose parent is first in the sibling position. This results in the exclusive selection in turn of each child that is descended from the first child of the root element. In other words, it selects each column of data one at a time from the first record of the ResultSet from which this XML descends:
<tr> <xsl:for-each select="*/*[1]/*">
This causes the stylesheet to properly handle any number of data columns from the original ResultSet.
Within this loop, each link is created through the use of the appropriate text and stylesheet parameters. In this case, href is equal to the $Page variable set previously through the JSP, and the number of the data column in terms of sibling position returned by the position() method:
<th> <A href="{$Page} ?sort={position()}"> In the preceding code snippet, the shorthand value-of notation is used namely the curly brackets. This permits the inclusion of the results of XPath expressions within other output tags. If this feature were unavailable, the only way to access this information would be through the use of a value-of tag. This would make it impossible to dynamically create HTML element attribute values, because tags cannot contain other tags.
Now that the anchor element has been created with the proper href attribute value, the tag name of each element will be selected. This enables us to label the HTML table with each element's tag name regardless of the number of columns found in the original record set. This is achieved through the use of the local-name() method with the . parameter, which denotes this:
<xsl:value-of select="local-name(.)" />
Next, the anchor and table head cell is closed, as is the for-each loop that iterated through each element. The table row is closed and the template is complete:
</A> </th> </xsl:for-each> </tr> </xsl:template>
Last up is the template that will select each child element of the root, no matter how many, and output a table row formatted with cells for each text data containing child elements.
Like the previous template, this one iterates through each child of the root except this one doesn't exclude all but the first child element. Once matched, a table row tag will be output, and a for-each element will iterate through each child element of the currently selected element through the *:
<!-- creates a row for each child of root, --> <!-- and cell for each grandchild of root --> <xsl:template match="*/*"> <tr> <xsl:for-each select="*">
Next, the . notation is used to output the value of this, which will be each column of data found in one record. Finally, the table row is closed, and the template ended:
<td><xsl:value-of select="." /></td> </xsl:for-each> </tr> </xsl:template>
Finally, the stylesheet root element is closed, and the document is finished. The complete stylesheet follows in Listing 11.6, and should be saved as \webapps\xmlbook\chapter11\TableSort.xsl.
Listing 11.6 TableSort.xsl
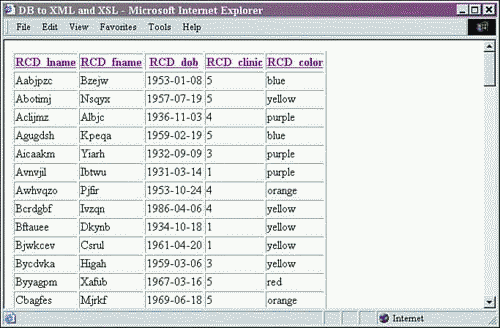
<?xml version="1.0" encoding="UTF-8"?> <xsl:stylesheet version="1.0" xmlns:xsl="http://www.w3.org/1999/XSL/Transform"> <xsl:param name="Sort"/> <xsl:param name="Page"/> <xsl:output method="html" /> <xsl:template match="/"> <table border="1"> <xsl:call-template name="header"/> <xsl:apply-templates select="*/*"> <xsl:sort select="*[$Sort]" /> </xsl:apply-templates> </table> </xsl:template> <!-- creates the table headers from the tag names --> <xsl:template name="header"> <tr> <xsl:for-each select="*/*[1]/*"> <th> <A href="{$Page} ?sort={position()}"> <xsl:value-of select="local-name(.)" /> </A> </th> </xsl:for-each> </tr> </xsl:template> <!-- creates a row for each child of root, --> <!-- and cell for each grandchild of root --> <xsl:template match="*/*"> <tr> <xsl:for-each select="*"> <td><xsl:value-of select="." /></td> </xsl:for-each> </tr> </xsl:template> </xsl:stylesheet> The output of the previous Java class, JSP, and XSL stylesheet is as shown in Figure 11.1.
Figure 11.1. Results of DBtoXML.jsp, RStoXML.java, and TableSort.xsl.
NOTE
If you encounter problems, verify that Xerces, Xalan, and JDOM have been installed. These examples depend on that software for successful execution.
Notice that the column heads are linked properly in order to cause the re-sorting of the document as shown, with the URL shown in the status bar. Also, the data is sorted on column number 1, as was set in the catch loop of parsing the query parameter in the JSP. To change this default value, just alter the parameter in the JSP.
This has been an example to demonstrate how easy it is to create a large number of reports. Simply by changing the data set that the stylesheet transforms, a large number of custom-arrangeable table reports can be created.
The Cross Tab Stylesheet
In the next example, we'll change the stylesheet in order to create a cross tab report on the same dataset. Unlike the previous stylesheet, this one is not completely generic, but depends upon a particular dataset. However, with the addition of more parameters set within the JSP, this stylesheet can be converted into a more generic form.
The CrossTab.xsl stylesheet begins with a parameter called NumClinics, whose default value is 5. This parameter will be used as the counter in the looping template used to iterate the rows of the resulting cross tab report:
<xsl:param name="NumClinics" select="5"/>
Next are two templates. The first begins by matching on the root of the XML document and creating the resulting table labels:
<xsl:template match="/"> <table border="1"> <!-- crosstab labels of first row--> <tr><th> </th><th>Blue</th><th>Green</th><th>Orange</th> <th>Purple</th><th>Red</th><th>Yellow</th><th>Totals:</th> </tr>
The rest of this template calls the crosstab template, and our looping begins. Notice that the call-template tag contains the with-param tag, which will set the parameter denoted by the name attribute value found in the template. In this case, the template is called with the parameter Clinics set to 1:
<!-- begin loop to create crosstab body --> <xsl:call-template name="crosstab" > <xsl:with-param name="Clinics" select="1"/> </xsl:call-template> </table> </xsl:template>
Our looping template called crosstab then begins with the Clinic parameter creation and output via the value-of tag, surrounded by some HTML table-related tags:
<xsl:template name="crosstab"> <xsl:param name="Clinics"/> <tr><th><xsl:value-of select="$Clinics" /></th>
Next is the output of the count() of the number of elements meeting the criteria as stated in the XPath statement. This particular statement counts the number of child elements (that is, records) that match the following criteria: The statement requires the RCD_color element to contain the text data blue, and the RCD_clinic element must contain the text data that $Clinics resolves to. In this case, the $Clinics parameter was set to 1 upon the start of this template. As a result, this value-of will return the number of records with data blue, and 1:
<td><xsl:value-of select="count(*/*[RCD_color='blue' and RCD_clinic=$Clinics])" /></td>
The following lines also follow the same format as the previous fragment, except with a different color value:
<td><xsl:value-of select="count(*/*[RCD_color='green' and RCD_clinic=$Clinics])" /></td> <td><xsl:value-of select="count(*/*[RCD_color='orange' and RCD_clinic=$Clinics])" /></td> <td><xsl:value-of select="count(*/*[RCD_color='purple' and RCD_clinic=$Clinics])" /></td> <td><xsl:value-of select="count(*/*[RCD_color='red' and RCD_clinic=$Clinics])" /></td> <td><xsl:value-of select="count(*/*[RCD_color='yellow' and RCD_clinic=$Clinics])" /></td> <td><xsl:value-of select="count(*/*[RCD_clinic=$Clinics])" /></td> </tr>
This closes the creation of one row of the cross tab report being created. The only thing left is to iterate through the template the correct number of times to create the remaining rows.
This is done by using an if tag and making sure $Clinics is less than $NumClinics. If the condition is true, then the crosstab template is called again with the incremented value of $Clinics:
<!-- continue looping when condition met --> <xsl:if test="$Clinics < $NumClinics"> <xsl:call-template name="crosstab"> <xsl:with-param name="Clinics" select="$Clinics + 1"/> </xsl:call-template> </xsl:if>
And thus the template is recursive, and any recursive template can be created using the same method.
Finally, the last row of the table is output when the two parameters are equal, and the recursion is complete:
<xsl:if test="$Clinics=$NumClinics"> <tr><th>Totals:</th> <td><xsl:value-of select="count(*/*[RCD_color='blue'])" /></td> <td><xsl:value-of select="count(*/*[RCD_color='green'])" /></td> <td><xsl:value-of select="count(*/*[RCD_color='orange'])" /></td> <td><xsl:value-of select="count(*/*[RCD_color='purple'])" /></td> <td><xsl:value-of select="count(*/*[RCD_color='red'])" /></td> <td><xsl:value-of select="count(*/*[RCD_color='yellow'])" /></td> <td><xsl:value-of select="count(*/*)" /></td> </tr> </xsl:if>
Besides some closing tags, this completes the cross tab stylesheet. The complete stylesheet can be seen in Listing 11.7 and should be saved as \webapps\xmlbook\chapter11\CrossTab.xsl.
Listing 11.7 CrossTab.xsl
<?xml version="1.0" encoding="UTF-8"?> <xsl:stylesheet version="1.0" xmlns:xsl="http://www.w3.org/1999/XSL/Transform"> <xsl:param name="NumClinics" select="5"/> <xsl:output method="html" /> <xsl:template match="/"> <table border="1"> <!-- crosstab labels of first row--> <tr><th> </th><th>Blue</th><th>Green</th><th>Orange</th> <th>Purple</th><th>Red</th><th>Yellow</th><th>Totals:</th> </tr> <!-- begin loop to create crosstab body --> <xsl:call-template name="crosstab" > <xsl:with-param name="Clinics" select="1"/> </xsl:call-template> </table> </xsl:template> <xsl:template name="crosstab"> <xsl:param name="Clinics"/> <tr><th><xsl:value-of select="$Clinics" /></th> <td><xsl:value-of select="count(*/*[RCD_color='blue' and RCD_clinic=$Clinics])" /></td> <td><xsl:value-of select="count(*/*[RCD_color='green' and RCD_clinic=$Clinics])" /></td> <td><xsl:value-of select="count(*/*[RCD_color='orange' and RCD_clinic=$Clinics])" /></td> <td><xsl:value-of select="count(*/*[RCD_color='purple' and RCD_clinic=$Clinics])" /></td> <td><xsl:value-of select="count(*/*[RCD_color='red' and RCD_clinic=$Clinics])" /></td> <td><xsl:value-of select="count(*/*[RCD_color='yellow' and RCD_clinic=$Clinics])" /></td> <td><xsl:value-of select="count(*/*[RCD_clinic=$Clinics])" /></td> </tr> <!-- continue looping when condition met --> <xsl:if test="$Clinics < $NumClinics"> <xsl:call-template name="crosstab"> <xsl:with-param name="Clinics" select="$Clinics + 1"/> </xsl:call-template> </xsl:if> <!-- table foot --> <xsl:if test="$Clinics=$NumClinics"> <tr><th>Totals:</th> <td><xsl:value-of select="count(*/*[RCD_color='blue'])" /></td> <td><xsl:value-of select="count(*/*[RCD_color='green'])" /></td> <td><xsl:value-of select="count(*/*[RCD_color='orange'])" /></td> <td><xsl:value-of select="count(*/*[RCD_color='purple'])" /></td> <td><xsl:value-of select="count(*/*[RCD_color='red'])" /></td> <td><xsl:value-of select="count(*/*[RCD_color='yellow'])" /></td> <td><xsl:value-of select="count(*/*)" /></td> </tr> </xsl:if> </xsl:template> </xsl:stylesheet>
The last thing that we need to do is to change the stylesheet being used in DBtoXML.jsp in Listing 11.5 to CrossTab.xsl. This can be achieved by changing the value of the variable stylesheet from
String stylesheet = "TableSort.xsl"
to
String stylesheet = "CrossTab.xsl"
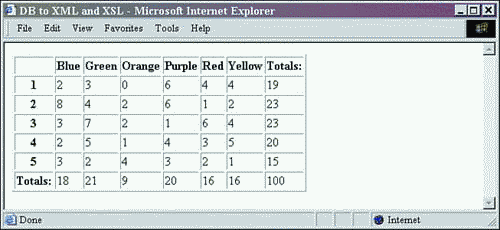
After this has been done, the results will look like those in Figure 11.2. Note that the actual counts will vary depending on the data in your database.
Figure 11.2. Results of DBtoXML.jsp, RStoXML.java, and CrossTab.xsl.
Summary
Depending upon the data and reports needed, XML can be a very powerful tool. It can enable the quick creation of many different reports. This can be done through the use of the same stylesheets for multiple sets of data. XML also aids development by enabling the database to perform the initial data filtering, and then using stylesheets to add an additional layer of filtering. As demonstrated through the stylesheets of this chapter, the usefulness of generic stylesheets in terms of reporting systems becomes clear.
Combined with HTML forms, stored procedures, and JSPs, XML and XSL assist in the speedy creation of extremely robust reporting systems with many filter and sorting options. More of these capabilities will be demonstrated in the next chapter, where a "paging" report will be created to handle large sets of data, and other stylesheet techniques will be used.
| CONTENTS |
EAN: N/A
Pages: 26