Creating Web Sites Using Dreamweaver MX
|
You can use Dreamweaver MX to create a Web site that resides in a local directory on your computer. This local site can contain static pages as well as dynamic pages. You can see the static pages of a local site in your Web browser, but you can't run dynamic pages because they need a Web server to run. To run a dynamic page, you have to configure your site on a Web server and then invoke the dynamic page from the Web browser using Hypertext Transfer Protocol (HTTP).
Dreamweaver also lets you create a site that resides on a remote folder on the Web server. Dynamic pages in the remote folder can execute on the Web server. The Web server then sends the results back to the Web browser.
Creating a Local Site Using Dreamweaver MX
To create a local site using Dreamweaver MX, perform the following steps:
-
Start Dreamweaver MX.
-
Choose Site, New Site to open the Site Definition dialog box.
-
Click the Basic tab in the Site Definition dialog box. An input box prompts you for the name of your site.
-
Type the name for your site, such as local_demo.
-
Click the Next button. You're asked whether you want to use a server-side technology, as shown in Figure D.3.
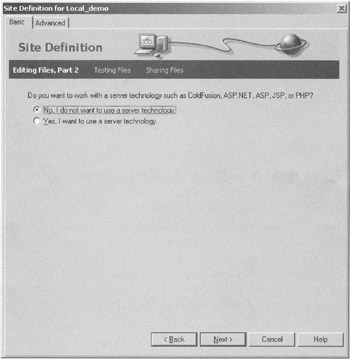
Figure D.3: Options for choosing a server-side technology. -
Select the first option, indicating that you do not want to use a server-side technology.
-
Proceed to the next screen. Choose a local path on your computer or a network path where the files of the Web site will be stored, as shown in Figure D.4.
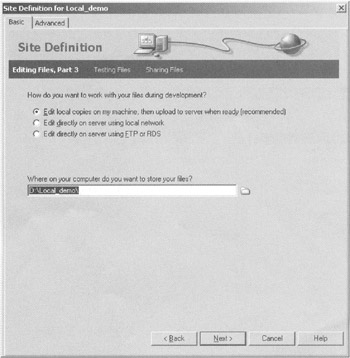
Figure D.4: Choosing a local path for the Web site. -
Select the first option, indicating that you want to create a local site in your computer.
-
Proceed to the next screen, which shows a pop-up for choosing the directory of your remote server where the files of your local site will be stored.
-
Choose None from the pop-up menu and click the Next button.
-
Click Done to finalize the settings for your local site.
Creating a Web Page in the Local Site
To create a Web page in your local site, perform the following steps:
-
Choose File, New to open the New Document dialog box, as shown in Figure D.5.
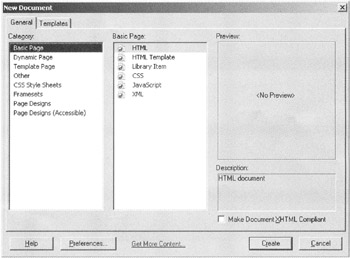
Figure D.5: Creating a Web page using the New Document dialog box. -
Under the Category heading, select Basic Page.
-
Under the Basic Page heading, select HTML.
-
Click the Create button to create the HTML page. This opens the newly created HTML page in the Code view of the Document window.
-
Choose File, Save to save the HTML page in the local folder of your site.
Using the Code View to Add Custom HTML Code to a Static Page
After creating a static HTML page, you can add your custom code to it using the Code view of the Document window:
-
Open an HTML page in your local site by selecting File, Open.
-
Click the Select Code View button on the Document toolbar to open the Code view in the Document window.
-
Replace the code shown in the Code view of the document with the following code:
<html> <head> <title>This is my first static page</title> <meta http-equiv="Content-Type" content="text/html; charset=iso-8859-1"> </head> <body> <p> <font face="red"> <b> The world will now know me as one of the greatest developers ever. Have I spoken too soon? </b> </font> </p> <a href="http://www.demolink.com">Demo hyperlink</a> </body> </html>
-
Choose File, Save to store the HTML code in the static HTML page.
-
Choose File, Preview in Browser, iexplore to preview the HTML page in your Web browser, as shown in Figure D.6.
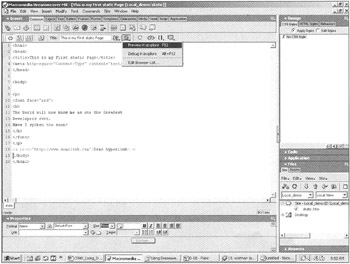
Figure D.6: Previewing the HTML page.
Using the Design View to Add HTML Components to a Static Page
The Design view gives you a visual representation of the HTML page the way it will appear in the Web browser.
| Note | The Design view can show you the results of HTML code, but you cannot see the results of client-side JavaScript or VBScript code. |
Perform the following steps to add an HTML component to the static page:
-
Open an HTML page in your local site by choosing File, Open.
-
Click the Select Design View button on the Document toolbar to open the HTML page in the Design view.
-
Click the Common tab in the Insert bar.
-
Click the Insert Table button in the Common tab. The Insert Table dialog box specifies settings for the HTML table, as shown in Figure D.7.
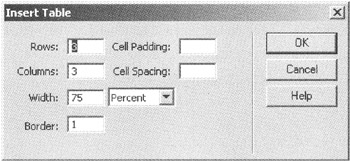
Figure D.7: Creating an HTML table. -
In the Rows box, enter 2.
-
In the Columns box, enter 3.
-
Click OK to create an HTML table with 2 rows and 3 columns in your HTML page.
-
To add content to a Table cell in the HTML table in the Design view, click in the cell and type the content you want to add.
-
Save the HTML page.
Figure D.8 shows the preview of the page after a static table is added.
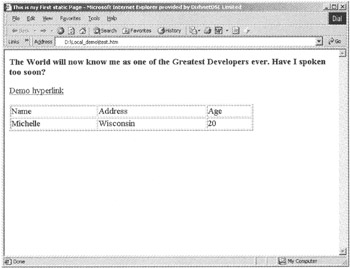
Figure D.8: Adding static content to an HTML table.
|
EAN: 2147483647
Pages: 200