Chapter 7: Optimizing and Troubleshooting SQL Server
|
|
In this chapter, I'll discuss setting up your environment for optimal performance, including applications and queries. I'll discuss some troubleshooting techniques you can use when you encounter a problem and methods for diagnosing the cause. I'll also cover some of the ways you can shorten your development cycle and make your production work easier by having standards.
Optimizing Windows 2000 Networks for SQL Server
Before you can even begin debugging performance problems in SQL Server, you must optimize Windows 2000. A poorly run operating system leads to a badly performing database system, because SQL Server is so dependent on the operating system.
Optimizing Operating System Components
A common debate among administrators (especially on the SQL newsgroups) is which file system is faster, FAT or NTFS? Testing has proven that the difference is so minor that this really shouldn't be a concern. NTFS is slightly faster on reads, while FAT is slightly faster on writes. The real concern is the level of functionality. The FAT file system doesn't offer nearly the robustness or security that NTFS offers.
I get a minor performance boost by placing my operating system and page file on two separate FAT drives (the operating system is on the boot partition). I use NTFS for my SQL Server and data files. The Pagefile.sys file is used to temporarily swap data in and out of memory when RAM runs short. The file writes data much like the SQL Server transaction log, sequentially. With that in mind, you should try to place at a minimum your Pagefile.sys file and your transaction logs on RAID 1 or 10 arrays and any other files on RAID 5 arrays. Ideally, you would want to place all SQL Server data and logs on a RAID 10 drive, but sometimes that can be too cost prohibitive.
The Pagefile.sys file can cause performance problems if it's constantly being expanded due to over-utilization. To avoid this expansion, you should set it to a static number. The general rule of thumb for this file is to set it at 1.5 times the amount of physical memory. Monitor the usage of this file closely in Performance Monitor to make sure you're not exceeding the amount you've allocated. The system issues an error message when you exceed the amount of space allowed.
| Tip | Also in the Performance Options screen, ensure that your server is optimized for background services by selecting the Background Services option. This gives additional priority to background processes like SQL Server, rather than foreground processes like Word and Enterprise Manager. This is set to the proper setting when you install SQL Server, but other applications may set it back. |
To adjust the amount of virtual memory, open the System Properties dialog box and click the Performance Options button in the Advanced tab. Click Change and set the Initial Size (MB) and Maximum Size (MB) options to the same size as shown in Figure 7-1. Restart the computer to put the new settings into effect.
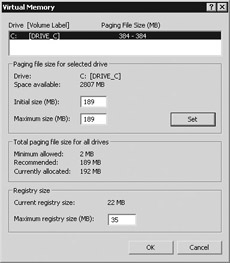
Figure 7-1: Set Pagefile.sys to a static number
| Tip | When your system files become fragmented, your server will begin to run slower. You can download free utilities like PageDefrag (http://www.sysinternals.com/) to defragment your drive at Windows startup. |
Optimizing Network Settings
A slower network prevents SQL Server from sending and receiving data as efficiently as it could. You can configure network options to improve performance. In Windows 2000, hardware components such as your network card can be configured to go to sleep if there is no activity over a given amount of time. In a production environment, you should adjust these settings so that no item on the server ever goes to sleep. (Sometimes components go to sleep and never come out of this mode until you cold-boot.)
If your NIC has power management capabilities, open the Local Area Connection Properties and select the NIC that handles your SQL Server activity, then select Properties. Click Configure to adjust the network card's settings. In the Power Management tab, you can specify the way power management works, using the options shown in Figure 7-2.
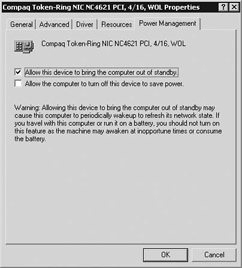
Figure 7-2: Network card sleep settings
| Note | Often there are BIOS settings to adjust to keep your system from using some of the power management features. |
If you've installed multiple protocols, but you're communicating primarily over TCP/IP, ensure that TCP/IP is on the top of your protocol list. You can set the priority order for protocols by opening the Network And Dial-up Connections window. From the menu bar of the window, choose Advanced | Advanced Settings. On the Adapters And Bindings tab, select the TCP/IP list and use the Up arrow to move it to the top of the list, or select another protocol and use the Down arrow to lower its position in the list (see Figure 7-3).
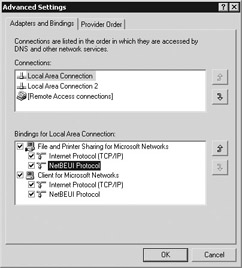
Figure 7-3: Rearranging the network protocols
Optimizing Name Resolution
Many networks do not have the luxury of having a WINS server available. Essentially, WINS servers provide name resolution and map IP addresses to computer names. In this type of scenario, you have two options: create a LMHOSTS file or add entries to the Client Network Utilities. The LMHOSTS file allows you to manually map IP addresses with machine names. It is located in the \Winnt\ System32\Drivers\etc directory for Windows 2000 and NT machines. For Windows 98 and ME machines, you can find the file in the \Windows directory.
To add an entry, simply go to the bottom of the file and add the IP address followed by the computer name (press the TAB key between columns). You also can optionally preload the entry into the server's cache by following the entry with the #PRE keyword. By default, the LMHOSTS file is only used when the dynamic resolution fails. For example, the following entries show you one entry that's not cached and one that is
204.168.51.18 ServerName 198.16.5.14 ServerName2 #PRE
| Tip | Use the #PRE keyword to gain a minor performance boost for name resolution. |
For SQL servers, you can use the Client Network Utilities program to perform a similar function as the LMHOSTS file. This is handy if you only want your clients in an environment to resolve SQL Server's information, but not be able to easily access file-level information using the server's name. The Client Network Utilities is installed when you install the SQL Server client tools and is located in the Microsoft SQL Server program group.
When you open the program, you can go to the Alias tab to assign server names to IP addresses, as shown in Figure 7-4. The Server Alias option is the name you want to give the entry. Whenever you access this alias, whether through Enterprise Manager or ADO in your programs, your login is redirected to the IP address. The IP address is represented in the Server Name option if you're using TCP/IP. You can select the protocol you're using in the Network Libraries area of the screen.
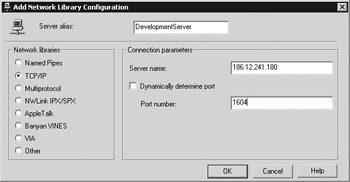
Figure 7-4: Adding an alias in Client Network Utilities
The server alias doesn't have to be the server's actual name. If you have a strange naming convention for server names, the alias can be a friendly name like DevelopmentServer. Just make sure your development staff doesn't program around the alias, because clients don't have this entry.
You can also create aliases on workstations that do not have the SQL Server administrative tools installed. Open the Administrative Tools applet in Control Panel and select ODBC Data Sources (32 bit). Alternatively, the applet may be named Data Sources (ODBC), depending on the version of MDAC you installed. On the System DSN tab, click Add to create a new DSN. From the list of data sources, select SQL Server as the database type and click Finish.
In the Create New Data Source To SQL Server dialog box, enter any name and description for the DSN (it doesn't matter what you enter because you aren't going to save the DSN). For the Server option, enter the server name you want to establish as your alias, and then click Next. In the next window, select Client Configuration and set the options as you did previously in the Client Network Utilities tool.
A slower network may also manifest itself in another unpredictable way. The most frequent call I received when my company upgraded their workstations to SQL Server 2000 was from users who suddenly couldn't connect to our servers in Enterprise Manager, but could connect in Query Analyzer. The problem turned out to have a simple solution. In our network, it typically took Enterprise Manager 3 seconds for SQL Server to connect to the remote server. When we upgraded to SQL Server 2000, it took about 4.5 seconds to connect to SQL Server through Enterprise Manager. By default, the login process times out after 4 seconds.
You can extend the default login timeout of 4 seconds by opening Enterprise Manager and choosing Tools | Options. In the Advanced tab, change the Login Time-out (Seconds) specification to an appropriate number for your network. Incidentally, Query Analyzer was not failing because its default timeout is 15 seconds.
|
|