Import Column
The Import Column transform was named the File Inserter transform in the beta releases of SQL Server 2005, and it is a partner to the Export Column transform, which was renamed from File Extractor. After discovering what they do, you may find that the former names are more intuitive. These transforms do the work of translating physical files from system file storage paths into database blob-type fields and vice versa. The trick to understanding the Import Column transform is that its input source requires at least one column that is the fully qualified path to the file you are going to store in the database, and you need a destination column name for the output of the resulting blob and file path string. This transform also has to be configured using the Advanced Editor — something you've only briefly looked at in earlier chapters.
The Advanced Editor is not intuitive, nor wizard-like in appearance, hence the name "Advanced," which you will incidentally be once you figure it out. In the editor, you won't have the ability to merge two incoming column sources into the full file path, so if your source data for the file paths have the file name separate from the file path, you should use the Merge transforms to concatenate the columns before connecting that stream to the Import Column transform.
Import Column Example
Now you'll do an example where you'll import some images into your AdventureWorks database. Create a new SSIS project named "Import Column Example." Transforms live in the Data Flow tab, so add a Data Flow task to the Control Flow, and then add an Import Column transform to the Data Flow surface. To make this easy, you're going to need to complete the following short tasks:
-
Create a directory called c:\import\images\.
-
Find a small JPEG file and copy it three times into c:\import\images. Change the file names to 1.jpg, 2.jpg, and 3.jpg.
-
Create a text file with the following content and save in c:\import\images\ as filelist.txt.
C:\import\images\1.JPG C:\import\images\2.JPG C:\import\images\3.JPG
-
Run the following SQL script in AdventureWorks to create a storage location for the image files.
use AdventureWorks Go CREATE TABLE dbo.tblmyImages ( [StoredFilePath] [varchar](50) NOT NULL, [Document] image )
-
You are going to use the filelist.txt file as your input stream for the files that you need to load into your database, so add a Flat File Source to your Data Flow surface and configure it to read one column from your filelist.txt flat file. Name the column "ImageFilePath."
Take advantage of the opportunity to open up the Advanced Editor on the Flat File transform by clicking on the Show Advanced Editor link in the property window or by right-clicking on the transform and selecting Advanced Editor. Look at the difference between this editor and the normal Flat File Editor. The Advanced Editor is stripped down to the core of the transform object — no custom wizards, just an interface sitting directly over the object properties themselves. It is possible to mess these properties up beyond recognition, but even in the worst case you can just drop and re-create the transform task. Look particularly at the Input and Output Properties of the Advanced Editor. Expand the nodes out until the editor looks like Figure 6-5.
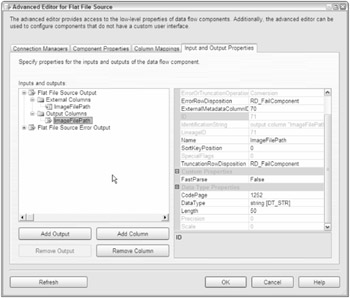
Figure 6-5
You didn't have to use the Advanced Editor to set up the import of the filelist.txt file. However, looking at the way the Advanced Editor displays the information will be really helpful when you configure the Import Column transform. Notice that you have an External Columns (Input) and Output Columns collection with one node in each collection named "ImageFilePath." This reflects that your connection describes a field called "ImageFilePath" and that this transform will simply output data with the same field name. The Column Mappings tab shows a visual representation of this mapping. If you changed the Name property value to myImageFilePath, you'll see the column mappings morph to reflect the new name. Notice also that the ID property for the one output column is 71 and its ExternalMetaDataColumnID is set to 70. Clicking on the one External Column reveals that its ID property is 70. From this, you can determine that if you had to create this transform using the Advanced Editor, you would have had to add both columns and link the external source (input) to the output source. Secondly you'd notice that you can add or remove outputs, but you are limited in this editor by the transformation as to what you can do to the output. You can't, for example, apply an expression against the output to transform the data as it flows through this transform. That makes sense because this transform has a specific task. It moves data from a flat file into a stream.
Connect the Flat File Source to the Import Column transform task. Open the Advanced Editor for the Import Column transform and click on the Input Columns tab. The input stream for this task is the output stream for the Flat File. Select the one available column, move to the Input and Output Properties tab, and expand these nodes. This time you don't have much help. An example of this editor can be seen in Figure 6-6. The input columns collection has a column named ImageFilePath, but there are no output columns. On the Flat File task, you could ignore some of the inputs. In the Import Column transform, all inputs have to be re-output. In fact, if you don't map an output, you'll get the following error:
Validation error. Data Flow Task: Import Column [1]: The "input column "ImageFilePath" (164)" references output column ID 0, and that column is not found on the output.
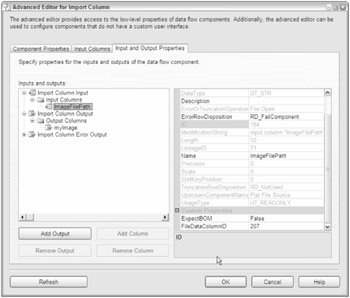
Figure 6-6
Add an output column by clicking on the output columns folder icon and click on the Add Column button. Name the column "myImage." Notice that the DataType property is [DT_IMAGE] by default. That is because producing image outputs is what this transform does. You can also pass DT_TEXT, DT_NTEXT, or DT_IMAGE types as outputs from this task. Your last task is to connect the input to the output. Take note of the output column property ID for myImage. This ID will need to be updated in the FileDataColumnID property of the input column ImageFilePath. If you fail to link the output column, you'll get this error:
Validation error. Data Flow Task: Import Column [1]: The "output column "myImage" (207)" is not referenced by any input column. Each output column must be referenced by exactly one input column.
The Advanced Editor for each of the different transforms follows a similar layout but may have other properties available. Another property of interest in this task is Expect BOM, which you would set to True if you expect a byte-order mark at the beginning of the file path. A completed editor would resemble Figure 6-6.
Complete this example by adding an OLE Destination to the Data Flow design surface. Connect the data from the Import Column to the OLE Destination. Configure the OLE destination to the AdventureWorks database and to the tblmyImages structure that was created for database storage. Click on the Mappings setting. Notice that you have two available input columns from the Import Column task. One is the full path and the other will be the file as DT_IMAGE type. Connect the input and destination columns to complete the transform. Your final Data Flow design surface should look like Figure 6-7. Go ahead and run it.
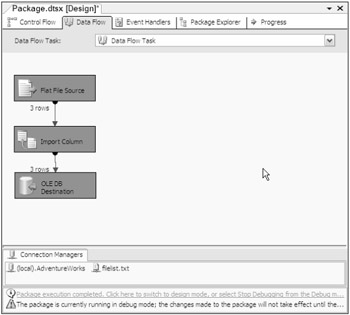
Figure 6-7
Take a look at the destination table to see the results:
FullFileName Document ---------------------- ----------------------------------- C:\import\images\1.JPG 0xFFD8FFE120EE45786966000049492A00... C:\import\images\2.JPG 0xFFD8FFE125FE45786966000049492A00... C:\import\images\3.JPG 0xFFD8FFE1269B45786966000049492A00... (3 row(s) affected)
Import Column Example Using File Iteration
In the real world, you'd never get a list of image files to import in a nice, neat text file for your input stream. What you are going to get is a file path where someone has FTP'd, copied, or dumped files into a folder that need to be loaded into a database. You're going to have to generate your own stream. You can use a Foreach task that can iterate and build a list of files. The problem is finding a stream that you can fill with this list of files. To start, take a look at the sources that you can use. There is a neat connection that can handle multiple files, but that doesn't convert into a transformation source. You could jump into a script and generate your nice, neat text file, but there's a better way. Use your earlier Input Column example and your database server and create a file list that will replace the flat file source. Your strategy will be to read the files that are in the c:\import\images\ directory and save each file into a temporary staged table on the server. Then you'll use an OLE DB Source to query these results and stream them into the ImportColumn task, which will store your file contents.
-
Using the previous Import Column example, first create a temporary table by running the following SQL code in the Adventure Works database.
USE AdventureWorks GO CREATE TABLE stgfilelist ( [FullFileName] [varchar](50) NOT NULL, )
-
Add a Foreach container to the Control Flow surface. Set the Foreach container enumerator to Foreach File Enumerator, the Folder property to "c:\import\images\," the Files property to "*.jpg," and the Retrieve File Name setting to Fully qualified.
-
Click on Variable Mappings in the Foreach Loop editor. Create a string variable at the package scope level named myFilePath. Leave the value blank. Save the variable by closing the variable editor. Set the Variable Index in the task to 0. This will allow the Foreach Loop to save the value of each file name it finds in the directory into the variable myFilePath. Save the Foreach Loop.
-
Now add an Execute SQL task to the Control Flow surface inside the Foreach container. Configure the Connection in the SQLtask to the Adventure Works database.
-
Click on the Expressions option in the Execute SQL task editor. Find the property SQLStatementSource. Set up an expression that will build an INSERT statement to store the name of the current file path retrieved by the Foreach loop that will be stored in the variable myFilePath. The expression should look like this, including quotes:
"INSERT INTO stgFileList SELECT '"+ @[User::myFilePath] + "'"
-
Click on the Foreach Loop container and connect to the Data Flow task using the green successful-completion arrow. The Data Flow so far should look like Figure 6-8.
-
In the Data Flow surface, remove the Flat File Source. Add a new OLE DB Source. Set its connection to Adventure Works. Set the data access mode to Table or View. Select stgFileList as the table or view. Click on columns to refresh the transform mappings and save.
-
You'll notice that the Import Column task now has an issue with the fact that you've changed around the import source for the task. Either hold the mouse over the transform or look in the error output window. You'll see an error similar to the following:
Validation error. Data Flow Task: DTS.Pipeline: input column "FullFileName" (336) has lineage ID 319 that was not previously used in the Data Flow task
-
Reconfigure the import source of the Import Column task by attempting to reopen the Advanced Editor. You'll see the Restore Invalid References Editor instead. See Figure 6-9 for an example of this editor. In the list, you'll see any invalid references with a drop-down to allow you to remap the reference if you'd like. You can also select any invalid mappings, or select all mappings if that is more efficient, and delete them, attempt to remap by column name, or simply ignore them and continue. In this example, you replaced the source column FullFileName from a flat file to a column FullFileName from an OLE DB Source. SSIS recognizes each of these as separate columns since each has its own ID column. Since the column names are similar, the default in the available columns drop-down is set to your new column. Leave the defaults, select Apply, and close the editor.
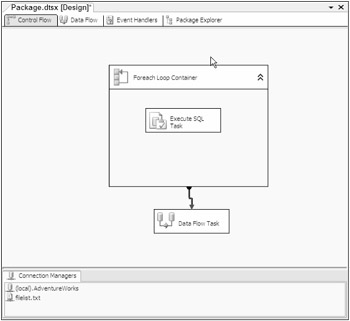
Figure 6-8
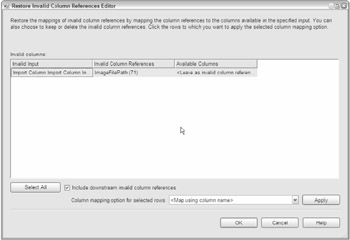
Figure 6-9
Finally, open the OLE DB destination and ensure that the mappings for the destination still exist. Map the resulting FullFileName column from the Import Column transform task to the OLE same column name. Execute the package and you'll see that the files are enumerated into your temporary storage location and that they have been turned into a stream of fully qualified file paths as input into an Import Columns task; the result is that you store both the path and the digitized document into the database in a data field.
EAN: 2147483647
Pages: 182