Code Deployment and Promotion from Development to Test to Production
In DTS, you had the option to store packages in SQL Server or persist them to disk as either a Visual Basic or Structured Storage file. But most DTS development occurred within the context of a SQL Server.
SQL Server Integration Services is decoupled from the SQL Server engine. Packages are developed in either Business Intelligence Development Studio or Visual Studio 2005. Because of this, code promotion is addressed in different ways.
For instance, in DTS you would likely develop a package on a local or development server. You would unit test the package to ensure proper functionality and desired results, and then you would click Package Save As to promote the package to a test server. This was by no means the only method available, but it was a popular method for accomplishing package migration through the SDLC hierarchy in many SQL Server 2000 shops.
Now that SSIS is decoupled from the SQL Server environment, developing packages is equivalent to external software development. Some DBAs have experience as developers. To them, this will pose no challenge or threat. To others, this may be outside their comfort zone. To the uncomfortable, I say, "Relax. You can do this!"
The Deployment Wizard
You will now look at one method for migrating a package created in Visual Studio 2005 into an instance of SQL Server 2005 Integration Services: using the Deployment wizard.
| Note | For the example, you'll use a project you built in Chapter 17. You can substitute the previous project or a project of your own. |
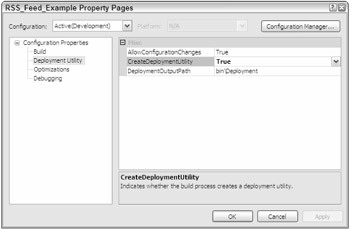
In Solution Explorer, right-click the project and click Properties to display the project Property Pages. Click Deployment Utility beneath Configuration Properties and set CreateDeploymentUtility to True as shown in Figure 18-59.

Figure 18-59
Click OK to close the Property Pages.
Build the solution in Visual Studio 2005 (or Business Intelligence Development Studio) by clicking Build the Build Solution (or Build [Solution Name]). A \Deployment folder is created in the project \bin directory if you accepted the Configuration Property defaults in a previous step. The Deployment folder contains the package dtsx files (one per package in the project) and a file of type SSISDeploymentManifest (one per project). To deploy the package, right-click the SSISDeploymentManifest file and click Deploy to start the Package Installation Wizard.
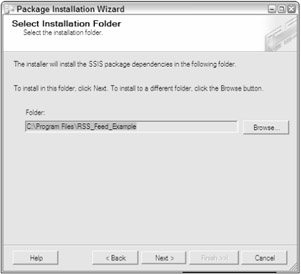
The Package Installation Wizard allows you to install a SSIS package to an instance of Integration Services or to a File System location. For SQL Server or File System installations, a folder is created (the default directory is in %Program Files%) to hold support files only or support and package dtsx files, respectively — as shown in Figure 18-60.

Figure 18-60
After you select the installation location, click Next to continue. A confirmation wizard screen displays; click Next to continue. A summary displays showing the location of the files installed; click Finish to complete the installation.
Import a Package
Another method for migrating a code-complete package is to import it directly into an instance of Integration Services on a target server, as follows:
First, build the solution. The Output window will display a message indicating the status of the build. If the Output window is not visible, click View Other Windows Output to view it.
Once the solution has been successfully built, open Microsoft SQL Server Management Studio and connect to an instance of Integration Services on the destination SQL Server. In the Integration Services treeview, expand the Stored Packages item. There are two subitems listed beneath Stored Packages: File System and MSDB. The package may be imported into either (or both — with the same name, if desired). Right-click File System or MSDB and click Import Package to begin the import.
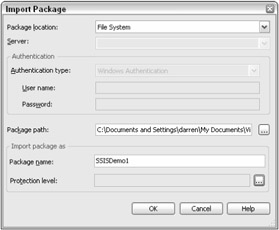
Select a Package location (SQL Server, File System, or SSIS Package Store). Choosing File System disables the Server text box and Authentication controls. Select File System. Click the ellipsis beside the Package Path text box and navigate to the dtsx file of the package you desire to import as shown in Figure 18-61. Enter a Package name in the appropriate text box and click OK to import the package.

Figure 18-61
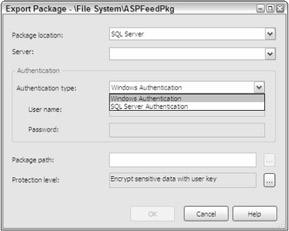
Once a package is imported into an instance of SQL Server Integration Services, it may be exported to another instance of SQL Server, File System, or SSIS Package Store via the Export Package functionality as shown in Figure 18-62. To start the export, right-click the Package name and click Export Package.

Figure 18-62
Export functionality can be used to promote SSIS packages from development to test to production environments.
EAN: 2147483647
Pages: 182