Performing Recovery
In this section, we discuss the various methods of recovery, through Management Studio and through T-SQL. We also discuss how to restore the system databases.
Restore Process
A DBA task is to ensure that backups are consistently taken and to validate that they will restore. Each backup sequence is labeled and stored to allow quick identification to restore a database.
Instant File Initialization
Previous versions of SQL Server required file initialization by filling the files with zeros to overwrite any existing data inside the file for the following SQL Server operations: create a database; add files, logs, or data to an existing database; increase the size of an existing file; restore a database or filegroup. As a result, for a large database, file initialization would take a significant time. In SQL Server 2005, however, data files can use instant file initialization provided that the SQL Server service account is assigned to the Windows SE_MANAGE_VOLUME_NAME permission, which can be done by assigning the account to the Perform Volume Maintenance Tasks security policy.
| Note | The instant file initialization works only on Windows XP and Windows 2003. Additionally, the transaction-log file cannot be instant-file initialized. |
Full Database Restore
A full restore contains the complete backup image of all the data in all files and enough of the transaction log to allow a consistent restore of committed transaction and uncommitted transaction. A full restore can be the base restore for differential and transaction-log restores to bring the database to a certain point in time. During the full restore, choose whether you want to overwrite the current database, if the database should be left in operation mode, or to allow additional restores like differential backups or transaction logs. You also need to choose "with move" if the database files are to be moved to a different directory location or filename. Then perform the full database restore followed by all differential and transaction-log backups. The advantage of this process is that it will recover the database in fewer steps and be online for user access. However, it is slow; there needs to be a maintenance window to perform it.
A full differential restore image contains all extants that have been modified since the last full backup. Typically, it is smaller and faster than a full backup image, provided there is not a high turnover of modification activity. A differential restore is commonly used to augment the full restore. During the restore, the full backup is restored, the database is left in norecovery mode, and the differential restore is performed.
Partial database Restore
A partial restore image contains the primary filegroup, all the read/write filegroups, and any read-only filegroups specified. A filegroup is read-only if it was changed to read-only prior to its last backup. A partial restore of a read-only database contains only the primary filegroup. This kind of backup is typically used when a database has read-only filegroups and, more important, large read-only filegroups that can be backed up to save disk space.
A partial differential backup image contains changes in the primary filegroup and any changes to read/write filegroups. To restore a partial differential, requires a partial backup image.
Transaction-Log Restore
As we've mentioned, a mission-critical database reduces data-loss exposure by performing periodic transaction log backups. The transaction-log restore requires a full database backup as its base or the files or filegroups backups. Then apply the differential restores, and then apply all transaction-log backups in sequence, with the oldest first to bring the database to a point in time either by completing all the transaction-log restores or stopping at a specific point. For example, you can restore the database to a point before a certain error by using one of the following transaction-log restore options:
-
With Stopat: Stop the transaction restore at the specify time.
-
With Stopatmark: Stop the transaction-log restore at the marked transaction.
-
With Stopbeforemark: Stop the transaction-log restore before the marked transaction.
You can insert a transaction-log mark in the transaction log by using the WITH MARK option with the BEGIN TRANSACTION command. During each mark, a row is inserted into the logmarkhistory table in msdb after the commit completes.
An example of a transaction-log restore sequence may be as follows:
-
Restore the full database with NORECOVERY.
-
Restore any differential backups with NORECOVERY.
-
Restore each transaction log with NORECOVERY. You can use the STOP clause to restore the database to a point in time.
-
If you have the tail transaction log, restore it. Then set the database to RECOVERY.
| Note | After the database is recovered, no additional restores can be performed without starting over. |
File/Filegroup Restore
An example of restoring a database in piecemeal by filegroup is below, starting with the Primary filegroup.
RESTORE DATABASE AdventureWorks FILEGROUP='PRIMARY' FROM AdventureWorks_Backup WITH PARTIAL, NORECOVERY; RESTORE DATABASE AdventureWorks FILEGROUP=' AdventureWorks2 ' FROM AdventureWorks_Backup WITH NORECOVERY; RESTORE LOG AdventureWorks FROM AdventureWorks_Backup WITH NORECOVERY; RESTORE LOG AdventureWorks FROM AdventureWorks_Backup WITH NORECOVERY; RESTORE LOG AdventureWorks FROM AdventureWorks_Backup WITH NORECOVERY; RESTORE LOG AdventureWorks FROM TailLogBackup WITH RECOVERY;
The Filegroup AdventureWorks3, which is read/write, is recovered next.
RESTORE DATABASE AdventureWorks FILEGROUP=' AdventureWorks3' FROM AdventureWorks_Backup WITH NORECOVERY; RESTORE LOG AdventureWorks FROM AdventureWorks_Backup WITH NORECOVERY; RESTORE LOG AdventureWorks FROM AdventureWorks_Backup WITH NORECOVERY; RESTORE LOG AdventureWorks FROM TailLogBackup2 WITH RECOVERY;
The Filegroup AdventureWorks4, which is read-only, is restored last and does not require transaction logs, as it is read-only.
RESTORE DATABASE AdventureWorks FILEGROUP=' AdventureWorks4 ' FROM AdventureWorks_Backup WITH RECOVERY;
| Note | Files and filegroups backups require that the recovery model is either full or bulk-logged to allow transaction-log backups, unless the database is read-only. |
Database Snapshot Restore
SQL Server 2005 supports database snapshots where a read-only, point-in-time copy of the database can be taken. The snapshot file, when taken, contains no data, because it uses the "copy on first write" technology. As the database is modified, the first time a value is modified, the old value is placed in the snapshot file. Usually, the database snapshot is used for point-in-time reporting, but it can be used for database recovery if a database snapshot is available and the user or application modifies some data by mistake. A restore from snapshot will return the database to the point in time that the snapshot was taken.
To create a database snapshot, use this syntax:
CREATE DATABASE AdventureWorks_dbss9AM ON (NAME = AdventureWorks_Data, FILENAME = 'F:\MSSQL\Data\AdventureWorks_data_9AM.ss') AS SNAPSHOT OF AdventureWorks;
To restore from a snaphot, use this syntax:
USE MASTER RESTORE DATABASE AdventureWorks FROM DATABASE_SNAPSHOT = 'AdventureWorks_dbss9AM';
Full-Text Restore
During a full or differential database restore, the full-text database is restored along with the database. Additionally, the filegroup or file of full-text can be restored independently of the database.
To restore a full-text file, use this syntax:
RESTORE DATABASE AdventureWorks FILE = ' FulltextFI' FROM Adventureworks_FT To restore a full-text filegroup, use this syntax:
RESTORE DATABASE AdventureWorks FILEGROUP = ' FulltextFG' FROM Adventureworks_FT
History Tables Restore
The msdb database maintains restore metadata tables. These will be restored as part of msdb database restore.
-
restorefile: Contains one row for each restored file, including files restored indirectly by filegroup name
-
restorefilegroup: Contains one row for each restored filegroup
-
restorehistory: Contains one row for each restore operation
SQL Server Management Studio Restore
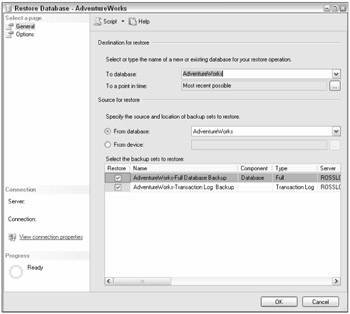
To restore a database from SQL Server 2005 Management Studio, choose the Database folder, right-click the database of your choice, and choose TasksRestore. The Restore Database dialog box exposes the restore capability, shown Figure 18-7.

Figure 18-7
In addition to database restore, there are files and filegroups and transaction log restores available from the same restore menu.
In the Restore Database dialog, in the Destination for Restore area, select these options:
-
To Database: Choose the name of an existing database or type the database name
-
To a point in time: For a transaction log restore, choosing a stop time for the restoration is equivalent to the STOPAT in the Restore Log command. A point in time is commonly used when a database is been restored because of a user or application data modification error and you have identified the time when the error occurred. Therefore, you want to stop the restoration before the error. This option is not possible for the Simple recovery model, because the transaction log is truncated.
In the Source for restore area of this dialog, configure these options:
-
From database: The name of the database to restore; this information is retrieved from the backup history tables in msdb.
-
From device: Choose either the backup device or backup filename to restore from. This may be used when restoring a database onto another SQL Server 2005 instance, and there is no restore data in the backup tables in msdb.
Then select the backup sets to restore from the list at the bottom of the dialog. When selecting the restore source, it populates this field with the backup sets available for the database. Moreover, it provides an option to choose which backup sets to restore.
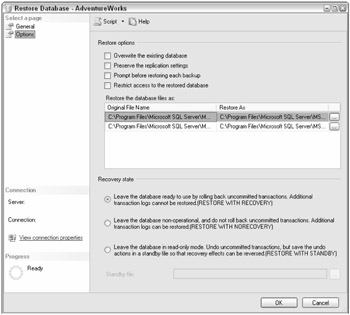
While in the Restore Database dialog box, select Options, and you'll be taken to the dialog shown in Figure 18-8.

Figure 18-8
In the Restore Options section of this dialog, configure the following options:
-
Overwrite the existing database: This checkbox is used when there is an existing database in the SQL Server instance. Checking this box this will overwrite the existing database; this is equivalent to the REPLACE option in the Restore Database command.
-
Preserve the replication settings: Use this checkbox when you're restoring a publisher database; it's equivalent to the PRESERVE_REPLICATION option in the Restore Database command.
-
Prompt before restoring each backup: Use this checkbox when you're swapping tapes that contain backup sets.
-
Restrict access to the restored database: Use this checkbox when you need to perform additional database operations or validation before allowing users to access the database. This option limits database access to members of db_owner, dbcreator, or sysadmin and is equivalent to the RESTRICTED_USER option in the Restore Database command.
-
Restore the database files as: Here you can choose to restore the database in another directory and filename. For example, if a new database copy has been created in the same directory, you will need to change the filename of the restored database. This is equivalent to the MOVE option in the Restore Database command. If the filenames are not changed, SQL Server will generate the following error.
Restore failed for Server 'Server1'. (Microsoft.SqlServer.Smo)System.Data.SqlClient.SqlError: The file 'C:\Program Files\Microsoft SQL Server\MSSQL.1\MSSQL\Data\AdventureWorks_Data.mdf' cannot be overwritten. It is being used by database 'AdventureWorks'. (Microsoft.SqlServer.Smo)
In the Restore State section of this dialog, select one of these options:
-
Restore with RECOVERY: The default setting recovers the database, which means that no more backup images can be restored and the database becomes available to users. If additional backup images need to be restored, such as a full database restore, followed by several transaction logs, the recovery should be performed after the last step, because after recovery, no additional backup images can be restored without starting the restore over. This is equivalent to the WITH RECOVERY option in Restore Database command.
-
Restore with NORECOVERY: After a backup image is restored, the database is not recovered, to allow additional backup images to be applied, such as a database differential or a transaction log backup. Moreover, the database is not user accessible while in NoRecovery. Also, this state is used on the mirror server in data mirroring and is one of the states available on the secondary server in log shipping. This is equivalent to the WITH NORECOVERY option in the Restore Database command.
-
Leave the database in read-only mode: After a backup image has been restored, the database is left in a state where it will allow additional backup images to be restored while allowing read-only user access. In this state, for the database to maintain data consistency, the undo, uncommitted transactions are saved in the standby file to allow proceeding backup images to commit them. Perhaps you're planning on applying additional backup images and may want to validate the data before each restore. Oftentimes, this option is used on the secondary server in log shipping to allow users access for reporting. This is equivalent to the WITH STANDBY option in the Restore Database command.
T-SQL Restore Command
All the restore commands using SQL Server 2005 Management Studio and all functionality are available directly from T-SQL. For example, to conduct a simple restore of a full database backup, use this syntax:
RESTORE DATABASE [AdventureWorks] FROM DISK = 'F:\MSSQL\Backup\AdventureWorks.bak'
The following is a more complex example of a database restore using a full database, differential, and then transaction-log restores, including the STOPAT option, to allow the DBA to stop the restore at a point in time before a data modification that caused an error. As a good practice, the STOPAT option has been placed in all the transaction-log backups. If the stop date is in the previous transaction-log backup, it would stop there. Otherwise, if the stop date has been passed over, the restore process would have to be started again.
--Restore the full database backup RESTORE DATABASE AdventureWorks FROM AdventureWorksBackup WITH NORECOVERY; --Restore the differential database backup RESTORE DATABASE AdventureWorks FROM AdventureWorksBackup WITH NORECOVERY; -Restore the transaction logs with a STOPAT to restore to a point in time. RESTORE LOG AdventureWorks FROM AdventureWorksLog1 WITH NORECOVERY, STOPAT = 'Apr 20, 2006 12:00 AM'; RESTORE LOG AdventureWorks FROM AdventureWorksLog2 WITH RECOVERY, STOPAT = 'Apr 20, 2006 12:00 AM' ;
Restoring System Databases
The cause of the master database failure will determine the procedure that may be followed to recover it. For a failure where a new SQL Server 2005 instance must be installed, if you have a copy of the most recent master full database backup, follow these steps:
-
Install the new SQL Sever 2005 instance.
-
Start the SQL Server 2005 instance.
-
Install Service Packs and hotfixes.
-
Stop the SQL Server agent; if you do not, it may take the only single-user connection. Additionally, shut down any other services that may be accessing the SQL Server instance as that may take the only connection.
-
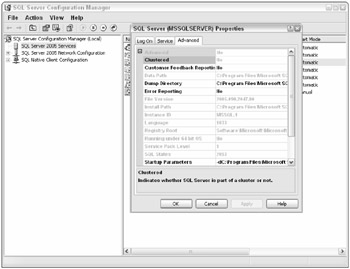
Start the SQL Server 2005 instance in single-user mode. There are several ways to set SQL Server 2005 to single user mode: by using SQL Server Configuration Manager, executing the SQL Server binary from the command line, or, from Windows Services, locating the SQL Server service. In all cases, add the -m startup parameter to set SQL Server 2005 to single user mode; then restart. The recommended approach is to go to SQL Server Configuration Manager, under SQL Server 2005 Services, and locate the SQL Server instance. Stop that SQL service; on the Advanced tab, add the -m startup parameter to the service, and restart the SQL service, as shown in Figure 18-9.
-
Use SQLCMD or an administration tool to log on to the SQL Server 2005 instance with a system administrator account. Restore the master database by executing the following command:
RESTORE DATABASE [MASTER] FROM DISK = N'C:\Program Files\Microsoft SQL Server\MSSQL.1\MSSQL\Backup\master.bak'

Figure 18-9
If SQL Server will not start because the master database is corrupted and a current master backup is not available, the master database would have to be rebuilt. Execute the SQL Server 2005 Setup.exe to repair the system databases.
| Note | The rebuildm.exe application, available in SQL Server 2000, is discontinued. |
After the rebuild and SQL Server 2005 starts, if a current copy of the master database backup is available, set the SQL Server 2005 instance in single-user mode and restore it, according to the previous instructions. If a current master database backup is not available, any modifications to the master database (for example, login security, endpoints, or linked server) will be lost and need to be redeployed.
Additionally, setup.exe creates a new msdb and model during the system database rebuild. If a current copy of model and msdb are available, restore them. If not, all modifications performed to model and msdb will need to be redeployed.
The syntax to rebuild the master database is as follows:
start /wait setup.exe /qn INSTANCENAME=<InstanceName> REINSTALL=SQL_Engine REBUILDDATABASE=1 SAPWD=<NewStrongPassword>
Then attach the user databases.
If only the model or msdb databases are damaged, you can restore them from a current backup. If a backup is not available, you'll have to execute Setup.exe, which recreates all the system databases. Typically, model and msdb reside in the same disk system with master, and if there were a disk-array failure, most likely, all three would be lost. To mitigate disk failure, consider using a RAID array where master, model and msdb reside. Tempdb does not need to be restored, as it is automatically recreated by SQL Server at startup. Tempdb is a critical database and is a single point of failure for the SQL Server instance and should be deployed on a fault-tolerant disk array.
EAN: 2147483647
Pages: 193