Working with Smart Objects in Photoshop and Illustrator
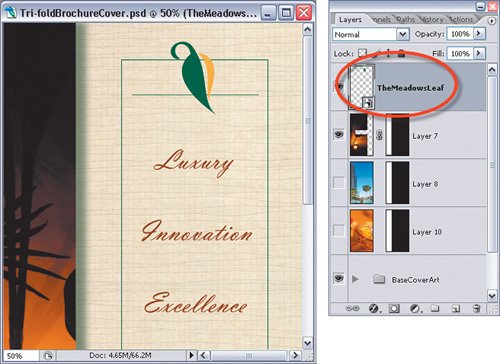
| Truth be told, I'm a big Illustrator user. I usually use Photoshop and Illustrator together almost every day. I often create vector artwork in Illustrator, paste it into Photoshop, and inevitably want to change the artwork. So, I'd change the artwork in Illustrator and re-paste it into Photoshop. As you can imagine, this process is slow. With Smart Objects, it's a lot easier. I insert the artwork as a Smart Object and Photoshop links back to the original file for editing and automatic updating. Step OneA great candidate for a Smart Object is a logo. Typically, logos are vector files created in Illustrator. If you were to simply copy-and-paste the logo from Illustrator into Photoshop, then every time the logo changed you'd need to re-paste it into Photoshop. Smart Objects make this process a lot easier. First, open a design in Photoshop that you'd like to insert an Illustrator file into. ©ISTOCKPHOTO/THOMAS POLEN
Step TwoNow choose File>Place. Find the logo on your hard disk and click Place. You'll then see another Place dialog where you can just press OK to select the defaults.  
Step ThreeNext, you'll see the logo appear with a bounding box around it on your image. You can resize it as needed (remember it's a vector graphic so you can make it as large as you want) and move it into place. Press the Return (PC: Enter) key when you're done and you'll have placed the vector file into your image as a Smart Object.  ©ISTOCKPHOTO Step FourNow, let's hypothetically imagine that a client requests a change to the logo (you know how those clients can be, right?). It could be simple or it could be complicated, but let's stick with a simple color change here. Since you placed the logo as a Smart Object, just double-click on the Smart Object layer's thumbnail and Illustrator will launch (if it's not open already). The logo will open inside of it because Photoshop knows that this is the default editing application for vector files. Now, using the Direct Selection tool (A), click on one part of the logo and change its fill color to a light green.  Step FiveChoose File>Save (or just press Command-S [PC: Control-S]) and Illustrator will save the changes. That's not all, though. If you switch back to Photoshop, you'll see that the changes are automatically reflected in your document without you having to re-paste or replace anything.
|
EAN: 2147483647
Pages: 113


