Digital Audio Onstage
| The more widespread computers have become in performance, the more wide open their uses. Some computer performances expand upon conventional techniques. There are keyboardists playing soft synths, guitarists using computers for effects, turntablists using real vinyl to scratch digital files, and drummers hitting pads to trigger cues in a flexible backing track. Other possibilities include:
Despite such a wide range, you may be surprised at how much computer performersfrom the rock guitarist to the DJ to the experimental sound composerhave in common. The main challenge all computer performers face is to adapt software and hardware tools, most of which are intended primarily for a studio environment, to playing live in front of an audience. This requires that you set up easy-to-see onscreen setups and easy-to-play hardware controls, so that you have access to what you need at the touch of your hands or feet. Certain tools work well for many kinds of live performances. Software like Ableton Live is popular with musicians in divergent genres because it can perform tasks normally associated with DAWs and samplers in real time onstage, and has an interface that's easy to see and control while performing. For those willing to invest time in making their own custom performance tools, modular environments like Cycling '74 Max/MSP (www.cycling74.com), Pure Data (www.puredata. info ), and Native Instruments Reaktor (www.native-instruments.com) can help tailor the computer to fulfill almost any set of needs without the necessity of writing a line of actual programming code. Many performers have musical techniques in common, too. DJs were among the first to manipulate audio in performance, and some of the methods they have developed are reflected in a broad cross-section of musical genres. Underneath all of these techniques are specific applications of technologies we've already looked at. MIDI is still the most readily available way to translate physical gestures into musical control. The ability to control the virtual world of the computer with physical movement is essential to making a computer a performance instrument, even if the movements are as simple as playing a QWERTY keyboard in a dramatic, virtuosic way. And the basic techniques of synchronization, used by many performers, are key to making events onstage match musical time.
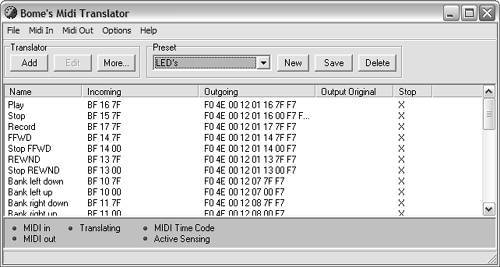
The process of preparing for a performance begins with some basic questions. What do you want to be able to control directly, and what do you want the computer do for you (for those tasks for which you don't have enough hands and feet)? For the elements you want to control, what's the best interface for making your performance expressive and fun? Live InstrumentsA big draw of having a laptop onstage is being able to play your collection of software synths live. A keyboard or other MIDI instrument and a computer are a viable choice for replacing or supplementing outboard hardware synths and instruments. With a little preplanning, they can make it easy to call up, play, and manipulate a broad arsenal of sounds. All you need is a low-latency audio interface for the computer and a MIDI input to the computer (possibly in the form of a USB output from the keyboard), and you're ready to go. Switching soundsYour primary need onstage is probably being able to easily play different sounds. Using a single soft synth, that means being able to switch patches. If your soft synth lets you create different folders of patches, it's a good idea to copy the patches you intend to use (or a selection of favorites) into a separate folder to make them more manageable. To avoid having to click the mouse, assign the "next patch" or "next program" control to a MIDI parameter. In Propellerhead Reason, for instance, the "next" and "previous" patch controls are MIDI-assignable, so you can scroll between them with MIDI buttons ( Figure 13.1 ). In Reason 3 or later, you should assign these buttons to a folder of Combinator patches, since that module can contain any combination of Reason's devices. Figure 13.1. Assign the program change control to a MIDI controller, and it'll be easy to change patches on your soft synth without using your mouse or computer keyboard. In Reason, the next and previous program controls are configured by default for keyboards that support Reason's Remote communications protocol, but you can create your own assignments, which you can access via Options > Remote Override Edit Mode. If you're using Reason 3 or later, set up all your patches with the Combinator so you can easily control splits , layers, and MIDI assignments for any of Reason's built-in synths.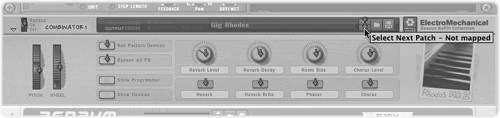 When using multiple instruments, it's often easiest to set up each instrument on its own MIDI channel. Most hosts will use processor resources only if a signal is being generated by the plug-in, so you can switch which instrument you're playing by switching which channel is enabled for MIDI input, or change the MIDI transmit channel on your master keyboard. For instance, you might put a piano sound on the first channel and an organ sound on the second channel. In Ableton Live, you can switch between sounds by assigning the record-enable for each track to a different button on your keyboard or foot pedal. If you're using Steinberg Cubase as a host, you can use the computer keyboard's up and down arrow keys for switching. Other programs may require a little mouse work.
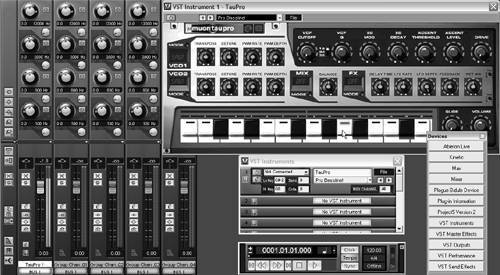
If your keyboard is doing double-duty, both generating its own internal sounds and controlling sounds on your computer's soft synth, you can switch between them using a hardware mixer, or, if your hardware synth is routed into software, the mixer in your DAW. That way, to switch from one to the other, you can grab a mixer fader instead of having to work with the menus on your synth. (Note that you may experience in-to-out latency issues routing analog inputs from a hardware synth when mixing with software. This is avoided with synths that include low-latency drivers for audio input like the Novation X-Station and Access Virus TI.) Most of the time, you'll probably use your hardware synth's built-in program change controls to switch its sounds. But if you want automatic software control for quicker changes or automatic changes during the course of a song, you can store program changes in software and transmit them from the computer to the keyboard while the music plays. In Ableton Live, for instance, you can give each MIDI clip an associated program change: double-click a MIDI clip, and then select bank, sub-bank, and program numbers for that clip in the Note Box. (For more on bank select messages, see "Programs and Banks" in Chapter 8. Ableton's bank values correspond to the bank select MSB, and their sub-banks are the bank select LSB.) You can quickly fire off different patterns, each of which will transmit a different program number to your external synth. In Cakewalk's Project5, you can do the same by clicking on any MIDI track. (You'll need a different MIDI track for each program change.) Playing multiple soundsProgram changes let you switch between sounds quickly and easily. But what if you want to play more than one sound at once? One option is to use multiple input devices, each assigned to a different synth. For instance, you might place two or three keyboards on a multitier rack or use a keyboard and drum pad. Place different plug-ins on different tracks in your host (or different instances of the same plug-in with different patches loaded) and set the input of each to a different keyboard. (If the keyboards are plugged into different MIDI ports or use USB, you can select them by port. If they're chained together via MIDI, set them to different MIDI channels and set each track to the corresponding channel.) To play more than one sound simultaneously from a single keyboard, you can use splits and layers. Splits assign different sounds to different areas of the keyboard, and layers assign multiple sounds to each note. (For more information on what splits and layers are and how to configure them, see Chapter 8.) There are several ways to set up splits and layers ( Figure 13.3 ):
Figure 13.3. Mapping inputs can help you play more than one instrument at a time. Cakewalk's Project5 lets you configure which ports, note ranges, and even velocities go where just by clicking on an instrument. This makes Project5 an ideal host for playing live on Windows (1). Reason's Combinator lets you combine splits into a single instrument (2). If you need additional settings beyond what your software and keyboards provide, turn to a tool like MidiPipe on the Mac (3) or MIDI-OX in Windows.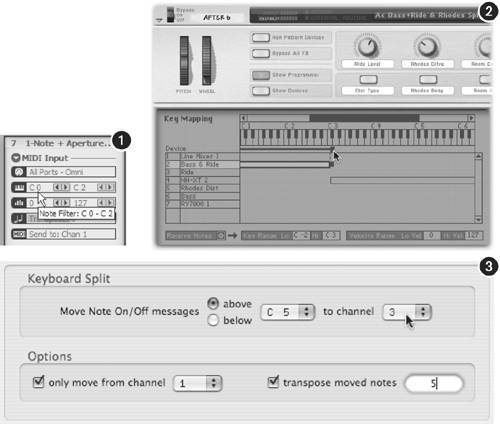 Tools for hosting soft synthsIf you're opting for plug-in instruments (rather than software with built-in instruments), you'll need a host environment. That can be your DAW or workstation software, which often has the advantage of providing its own built-in instruments and effects, plus arrangement and backing track features. Alternatively, if you just want a simple way to host a couple of plug-ins, you can opt for a more basic plug-in host. There are several potential advantages to using a host: this type of software can be simpler to configure, less expensive, and more lightweight in terms of system resources. A host can also provide additional features. Some of the more useful possibilities include:
Several more sophisticated tools can also be used for hosting, adding in modular tools for building your own custom instruments. These tools are probably overkill if you just want a simple way of hosting a couple of soft synths or effects, but if you want to tinker with more advanced, "under-the-hood" MIDI and audio operations, they can be invaluable. In addition to options like Max/MSP, Reaktor, and Pd, other tools especially well-suited to the task include:
Arpeggiators and PatternsUsing pattern-based software and arpeggiators, it's possible to "perform" complex rhythmic phrases that would be difficult or impossible to play yourself. You can use these for rhythmic pitched effects or to control effects and other parameters in sequence. ArpeggiatorsAn arpeggiator is a special MIDI effect that automatically plays a sequenced pattern based on an input note or notes. In musical terms, an arpeggio is the notes of a chord played in a series from bottom to top or top to bottom rather than all at once. (It's also called a "broken chord"; the sound of a harp or guitar strum is a fast arpeggio.) In its simplest form, an arpeggiator plays the notes of a chord you're holding down in sequence. You can use an arpeggiator for more dramatic rhythmic effects, however, depending on the parameters it provides. Different arpeggiator shapes or "styles" can be used for different effects, like playing up and down the chord in series. Some can play prerecorded , polyphonic patterns. By adjusting the rhythmic interval of the pattern or using an arpeggiator that's synchronized to tempo, you can create unique, rhythmic special effects. Some arpeggiators can automatically generate chords as well as sequential patterns. It's the opposite of an arpeggio, really, but the term has come to mean any software effect that adds notes based on the ones you're playing. Some arpeggiators might best be considered "interactive pattern generators," because they're capable of generating various patterns based on input pitch. Up and down scales can get fairly boring, but with a full-featured arpeggiator or pattern sequencer, you can use arpeggiators to produce otherwise unplayable patterns. Although an arpeggiator is most often used with a pitched soft synth, you can route an arpeggiator's MIDI output to any instrument or effect parameter with a MIDI input. For instance, applying an arpeggiator to a drum track can "mix up" a drum pattern or create doubling effects. You can even use an arpeggiator with a keyboard input to automatically control a MIDI-assigned effect, such as a filter, in an interactive way. You can even use arpeggiator parameters as performance tools. The effect is somewhat less than subtle, but you can accentuate the pattern of the arpeggiator by assigning knobs or faders to parameters like the step length (the length of each arpeggiator note) or speed, and then adjust that knob during a performance. Custom pattern generatorsWhat if you're not happy with preset arpeggiator patterns or static pattern clips that aren't based on input pitch? You're a candidate for building your own custom interactive patterns.
Modular environments like Pure Data, Max, and Plogue Bidule are all designed for the job. In fact, creating MIDI processing patches is often the best way to begin learning one of these environments, because such patches tend to be the simplest. For instance, you can create chords automatically using basic arithmetic: for each note-on event, use an "add" module to output an additional note event some number of scale steps higher. For a triad , use two add objects, each connected to an output object ( Figure 13.5 ). Figure 13.5. Three approaches for controlling MIDI data live using custom software patches. Using basic arithmetic, you can patch together objects in software like Max/MSP to change notes (1). By building up various objects in this manner, you can create a custom pattern sequencer, for example, based on your own needs (2). Using prebuilt "macros" ( components of a larger patch) or " ensembles " (prebuilt instruments), you can jump-start custom performance software creation in Reaktor using objects like this step sequencer (3).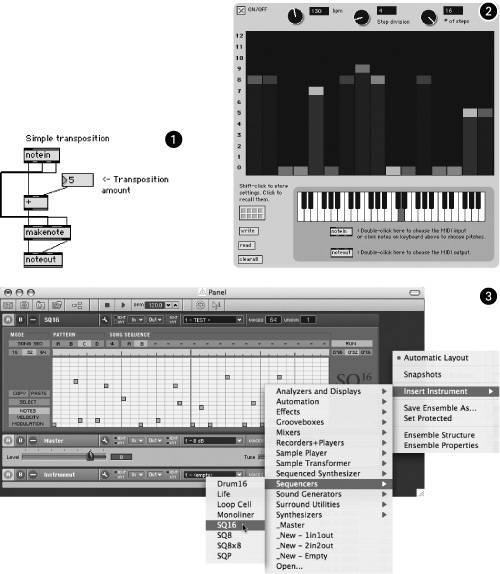 More sophisticated users may create elaborate random note generation algorithms. Taking the concept to the extreme, you can reduce your "performance" to pressing a single key. When designing your own pattern generator, keep in mind that you can use patterns to control any number of parameters, not just pitch.
If the prospect of digging into a modular software environment is frightening, you can simply chain MIDI effect devices in Ableton Live. The Random effect, since it has a variable amount of randomness, is particularly useful for creating complex effects. You can also design rule-based pattern generators using MIDI-OX or MidiPipe. Live EffectsBy using software-based effects live, you can apply your full arsenal of sonic tools to both live audio input and recorded sources ( Figure 13.6 ). When effects parameters are manipulated onstage, effects become part of the performance. If you're just adding effects to existing elements, like loops, prerecorded audio materials, and soft synths, the process is fairly simple. You'll route effects just as you would for studio recording. (For more on using effects, see Chapter 7.) Figure 13.6. A multi-effects package like the Line6 TonePort can help you emulate studio equipment when you're onstage. These packages are favored by electric guitar and bass players, but mic preamp models are ideal for vocals, and you can use the distortion, amps, and effects with other instruments, too. (Photo courtesy Line6, Inc.)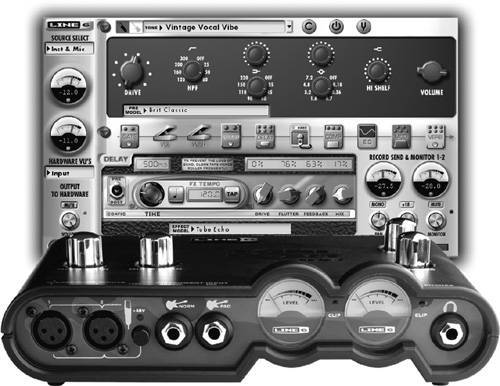 Live performance can pose two special challenges: how to minimize or manage the latency of live audio being sent to the computer, and how to easily turn effects on and off and control their settings in real time. (Note that you should be especially careful managing CPU load with Ableton Live, because, unless you've frozen tracks, it's also performing time-stretching in real time.)
Live audio input and latencyWith live input, signal must pass through the audio interface, through whatever software you're using, and back out through the interface again. As a result, the time lag (latency) becomes particularly significant. (If you're using your software for mixing, you'll face the same issue.) Above about 1011 ms, latency becomes great enough that instrumentalists who are playing live will notice it. Generally, 3 ms is the minimum practical latency that can be achieved on computers; it's nearly undetectable. (The range in between is usually tolerable.) You should double-check two basic elements for low-latency operation:
Some effects plug-ins introduce more latency than others, so try auditioning different effects if one seems to be causing too much latency. Also, latency is dependent on the speed of your computer's CPU. A slower computer will run out of processing headroom more quickly when set to a low latency. This means that you may have to make a trade-off between low latency and running all of the effects or soft synths you'd like to. Native Instruments, for instance, recommends a relatively high- powered processor for live operation of its Guitar Rig live effects software (minimum 1.25 GHz Mac or 1.4 GHz PC). Note that "latency compensation" or delay compensation features have no bearing on live audio input. They work with plug-ins only during track playback. See "Delay Compensation" in Chapter 7. Turning effects on and offRunning effects constantly can quickly get unwieldy, both musically and in terms of CPU resources. If you're using insert effects in Ableton Live or plug-ins that support MIDI mapping, make sure you assign the bypass switch on your effect (or the enable/disable switch) to an easily accessible MIDI control. You can also assign sends to a fader for easy adjustment of level feeding the effect.
Using software effects doesn't mean giving up the easy footswitch method of enabling and disabling effects to which guitarists and bass players are accustomed. A MIDI pedalboard or foot controller can provide control. They're useful for laptop-based musicians who need their hands to play their instruments (like horn players, string players, and keyboardists), not just guitarists ( Figure 13.7 ). Figure 13.7. A MIDI-only footswitch like the Behringer FCB1010 lets you add pedal control to any software that can be mapped to MIDI notes or control changes. The large pedals send continuous expression data (useful for controlling the level of an effect). (Photo courtesy Behringer Spezielle Studiotechnik GmbH)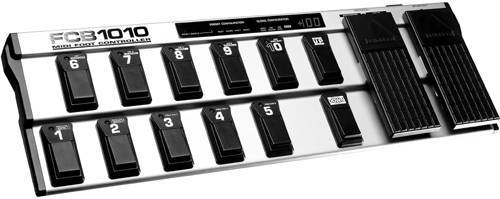 Native Instruments' Guitar Rig includes its own pedalboard called the Rig Kontrol 2; IK Multimedia's AmpliTube is available with an optional StompIO controller. You can also use MIDI pedalboards to control these and other sets of effects. Real-Time ControlWith just two hands, two feet, and a performance to focus on, assigning live control of parameters to easily accessible knobs, faders, buttons, and foot pedals is essential. (See "Using Control Surfaces" in Chapter 8 for more information on choosing and configuring control surfaces.)
It's useful to have a "tool belt" for handling MIDI routing and assignment chores. Some routing tools may be included in the program you're using. Logic Pro's Environment, although initially daunting, can be used for sophisticated MIDI routing and automation tasks. For instance, you can combine a number of changes to instruments and effects into a selector patch, as shown in Figure 13.8 . Hosts like Plogue Bidule and EnergyXT also have modular MIDI routing and assignment tools. Figure 13.8. A power-user approach to the problem of switching between instrument and effect settings is to create a virtual patch bay to route notes and change parameters, as in this custom Environment for Apple's Logic Pro. (File courtesy of Christopher Scheidel, www.heavyliftmusic.com)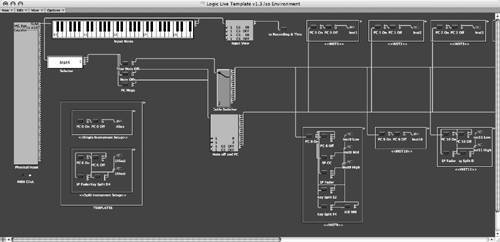
The other option is to use a tool to intercept MIDI data between your input device and your software of choice. MIDI-OX on Windows and MidiPipe on Mac both work well for basic MIDI routing and assignment. If that's too limiting, you can also build your own custom tool in a program like Max/MSP or Pd.
One especially useful tool on Windows is PeterTools LiveSet (www.petertools.com), a Reason-like rack of MIDI tools. It includes multiplexers for manually creating layers of synth and effect controllers, transposers, chord players, and a MIDI routing module, among other elements ( Figure 13.9 ). LiveSet is clearly designed to work with Reason, but it works equally well with other software that benefits from these features; it's compatible with any Windows ReWire client. Figure 13.9. LiveSet (left) is a Windows-based ReWire host that fills in a lot of the performance MIDI features other applications lack. It includes a collection of devices that can combine MIDI control, facilitate custom routing to soft synths, create chords, patterns, and loops, and handle other tasks. Just as in Reason, press the Tab key and you can create custom signal routings (right), which are vital for getting your MIDI data to go where you want.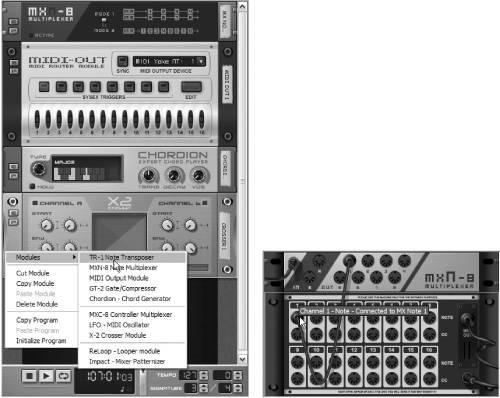
SynchronizationOnce you start playing with multiple software applications, multiple pieces of music gear, or multiple computers, you'll probably want to sync everything to a single tempo to keep all your gear and software in time. By using synchronization, you can:
Tempo master and slaveCommon to all these techniques is the need to have what is usually called a single "master" and one or more "slaves" for tempo. You need a single piece of hardware or software to act as the master, setting the tempo for all of the other pieces of hardware and software and transmitting the necessary clock information to the slaves on a continual basis. There can be only one master. If you had more than one, it'd be like having more than one conductor running a symphony orchestra. You can have any number of pieces of hardware and software following the tempo, but only one can set the tempo. ReWirePlug-ins are able to route MIDI and audio to a host, and some are able to synchronize timing to the host tempo (for tempo-synced delays, for example). If you want to use different stand-alone applications for this task, however, you need ReWire . ReWire is a technology developed by Propellerhead that has become an industry standard for interconnecting different pieces of software on the same machine. ReWire transmits the following data:
In other words, you have full audio and MIDI routing, and complete control over the transport. Synchronization is sample-accurate (a far cry from MIDI clock, as you'll see in a moment), and once a ReWire client is loaded into the host application, the management of resources is handled by the host. A client ReWired into a host takes up fewer system resources than the two would on their own, and they're able to share a sound card and external sync settings (controlled by the master). Unlike other synchronization methods, ReWire accomplishes all this transparently without your intervention. The process sometimes confuses beginners because you don't have to do anything with most applications to make ReWire work. The process is simple ( Figure 13.11 ):
Figure 13.11. ReWire can extend your available software instruments without taxing system resources. Reason, for instance, can be loaded into Live so you can play synths from Reason together with synths, audio loops, and MIDI patterns in Live. In this example, to access just one synth we've routed the left/right audio output mix from Reason into a Live track while routing a MIDI track back to the Reason synth so it can be played by Live's MIDI patterns. A common usage of ReWire is to set up the host application as "mixer," controlling tempo and backing track arrangements, and a client application as the "instrument" for adding a synthesizer, virtual instrument, drum machine, sampler, arpeggiator, or other instrument that isn't available in the host application. (You'll sometimes even see the terms "mixer" and "instrument" in place of master and slave or host and client, although the latter is more common.) For audio and MIDI routing, depending on your host's ReWire implementation, you should have several options. If you just want to play a client as a synth, you may just route the left/right audio mix into your host. If you want multichannel control of each separate output, you can route channels independently into your host. If you want to play MIDI patterns from a program like Live or Project5 back into the ReWire client, set a MIDI track output from your host to the input of your client. One particularly popular combination is the use of Propellerhead Reason with Ableton Live. Live provides the audio input, more extensive loop, pattern, and arrangement triggering, arpeggiator, and MIDI tools that Reason lacks, while Reason fills out Live's built-in instruments with a healthy collection of samplers, drum machines, and synths. That's just one example, though; the appeal of ReWire is being able to mix and match any applications you like. Some examples of applications with ReWire support include:
If an application can run as either a host or a client, its role will depend on the order in which it is loaded. For instance, if you load Live and then load Max/MSP, Live will be the host and Max the client. If you load Max and then load Live, Max will be the host and Live the client. Usually, you'll use only one client at a time, although some hosts can support more than one client at once. As with other sync methods, there can be only one master clock source, so two hosts can't operate together.
ReWire gives you significantly more control than other synchronization methods. It does require that all the software be running on the same machine. For information on how to synchronize between computers, see the upcoming sections, "MIDI clock synchronization" and "Networking computers and distributed computing." If you want to use stand-alone applications that don't support ReWire, you can use MIDI data routed between the applications; see "MIDI clock synchronization." Some applications that don't support ReWire, such as Native Instruments Reaktor, can instead be loaded as plug-ins. Plug-ins share many of the advantages of ReWire, including clock sync. For more information comparing ReWire to using plug-ins or stand-alone applications, see "Combine software for a custom studio" in Chapter 2.
MIDI clock synchronizationThe easiest and most reliable way of providing synchronization between devices is with MIDI clock. Most often, MIDI clock is used to synchronize hardware to hardware or hardware to software rather than software to software. You'll need devices capable of sending and/or receiving MIDI clock data, and they'll need to be connected using MIDI cables (or via MIDI over USB or FireWire). You can synchronize different software applications using MIDI clock. On the Mac, use the Inter-Application Communications driver or a virtual MIDI driver. On Windows, use MIDI Yoke. (For more information on utilities to use with Windows and Mac for MIDI, see "Essential MIDI Tool Belt" in Chapter 8.) For a full explanation of how MIDI clock works, see "MIDI Time Code and MIDI clock" in Chapter 8. With that in mind, let's look at the specifics of how MIDI clock is relevant to performance. It's important to understand what data a MIDI clock connection transmits:
Tempo isn't transmitted explicitly: the master doesn't transmit "120 bpm" to receiving devices. Instead, the MIDI clock signal consists of a regular "pulse" of messages at a resolution of 24 pulses per quarter-note. The receiving device has to count those 24 messages, or at least measure the time gap between two of them, before it knows what the tempo is. It's a bit like watching a conductor: the conductor doesn't say, "okay, we'll do this at 133.34 bpm." Instead, musicians simply watch the steady pulse provided by the movements of the conductor's hand. A resolution of 24 messages per quarter-note (24 PPQN) is significantly less than the MIDI editing resolution of most audio software, but it's enough for performance synchronization. You'll encounter sync issues only if you make tempo changes that are too sudden. You might not want to go from 40 bpm to 240 bpm instantaneously, for instance. Gradual tempo changes, or small intervals, will usually work fine. You can use the combination of tempo data and start and stop messages to quickly sync software, computers, and hardware. Here's the basic process:
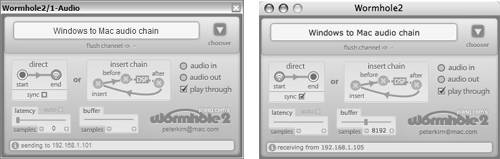
If you want to get a little fancier and have software and hardware that support it, you can use MIDI clock to locate to specific points in an arrangement or to select songs using position and song select messages. Not all devices support position messages (called Song Position Pointer, or SPP), but most recent devices that support MIDI clock do. Position is defined in terms of the number of sixteenth-notes since the start of the music. But you're probably only jumping to a downbeat in a performance anyway, so the fact that you can't locate to a position between sixteenth-notes is unlikely to matter. You can use SPP to jump to certain parts in a arrangement if you have a sequence in a piece of software that's synced to a drum machine pattern, for instance. Most hardware devices also support a song select message, which lets you jump to a specific song. For example, you can store various patterns on a piece of hardware like a Korg ElecTribe and call them up by transmitting song select messages. (Software is less likely to receive this message, but some sequencers that support subsequences and MIDI remote control do.) Tap tempoDepending on the features of your software, you can set a tempo by typing a number directly into a tempo box, turning a knob on a control surface assigned to the software, or using the tempo controls on a piece of hardware that's transmitting MIDI clock. For dynamic control of tempo, however, tap tempo is the way to go. By pressing a tap button on hardware or (better yet) assigning hardware or software tap tempo to a MIDI foot pedal, you can set a tempo for your gear much the way you would do a countoff for your band . (You'll find a handy tap tempo button in Ableton Live.) Using tap tempo, you can dispense with other synchronization methods altogether. For instance, a VJ or electronic musician might follow a live instrumental performance by an acoustic jazz quartet by tapping along to the tempo manually. (You can either tap continuously through the song or simply tap to set a tempo and leave it there, then begin tapping again when the tempo needs adjustment.) One advantage of this method is that it allows you to synchronize with live instruments. (An acoustic jazz quartet is made up of human beings without a MIDI out port!) But it can also be used with electronic instruments to keep the tempo feel of a performance loose and improvisatory. Networking computers and distributed computingMIDI and audio are ultimately just data, so there's no reason the "pipe" for the data can't be a network. The reason we're not all using Wi-Fi-enabled MIDI and audio for performance is synchronization: keeping data in perfect sync while it's transmitted over a busy network is a challenge. Although there's still no major standard for networked transmission of MIDI and audio, you can accomplish the task with specialized tools. An additional benefit becomes the ability to implement distributed computing, in which the resources of multiple computers are combined to accomplish a single task. At the simplest level, this can be using one computer to run backing tracks and reverb while another runs a synthesizer. This requires that you manually choose which computer does what, although with audio and MIDI flowing between two synchronized computers, you have some flexibility. Dynamically distributed processing systems like Logic Node have the ability to distribute processing load automatically among computers without human intervention. Several tools, some free, can provide these features, though they're specific to different platforms (note that these tools assume you're using a local network, such as an Ethernet connection between laptops; using the Internet poses other challenges):
|