Arranging
With all the raw materials of a song, composition, or other digital audio project in place, the next step is to assemble those materials into a finished form. Part of the appeal of digital audio software is the flexibility with which you can creatively manipulate a project's structure. Traditional composers like Beethoven littered their studios with sketches and scraps of notation on paper. Even a couple of decades ago, arranging with analog reel-to-reel tape involved cutting the tape apart with a razor blade . Digital audio software, in contrast, offers nearly endless "what-if" scenarios. Far from being limited to the structure you created when you recorded your tracks, you have a great deal of compositional control in rearranging materials, from making minor adjustments to radically recomposing your music.
Arranging music can mean adjusting a wide range of different elements, including bass lines and harmonies, chord voicings, and instrumentations. All of these are vital to music, but they're well beyond the scope of this book. What we'll examine here is how you'll assemble audio and MIDI elements into your finished music, arranging them on the timeline of a project in your digital audio software.
Mix Project Files
A digital audio mix project is a collection of audio files and/or MIDI data. These chunks of sound and notes could include a range of different kinds of content, like looped MIDI patterns and looped audio (as in Chapter 5), recorded vocals, spoken word, instruments, and field recordings (Chapter 6), or MIDI-recorded phrases and soft synth lines (Chapters 8 and 9). The mix project file, or simply "the project," brings all of these pieces together and organizes them into a finished piece of music.
When you make a new multitrack file in your DAW, whether you're starting a new "session" in Pro Tools or creating a new "set" file in Live, you're creating a project file. It's the file that will hold (or refer to) audio files and note data, your arrangement, mix information, and other edits. You'll notice that the size of this file is relatively small, often less than a megabyte. That's because recorded audio data, whether you recorded it directly into your project or imported it from another source, is stored in separate files. (MIDI data is stored in the project file, but, as we've seen, it's very compact.)
Nondestructive editing
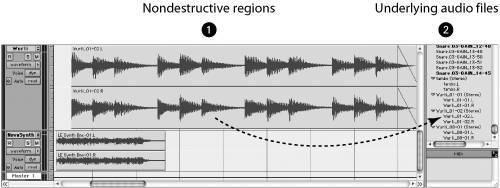
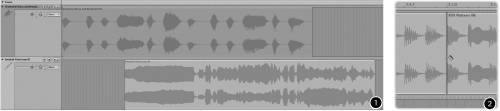
Audio files you record or import into the mix project are stored in files on your hard drive, independent from the project file. That way, when you move the audio as represented graphically on the screen or process the track's output with effects plug-ins, you don't directly impact the original audio files. The rectangular blocks you see on the screen in an arrangement view, which act as pointers to the underlying audio files, are called regions ( Figure 10.1 ).
Figure 10.1. The rectangular blocks (regions) you see onscreen in your DAW (1) act as placeholders for audio files (2) stored on your hard drive, as seen here in Pro Tools. You can slice up, alter, and move the regions without damaging the associated file. Your DAW then plays back the mix by streaming the audio from the files on the hard drive or by preloading them into RAM prior to playback.
When separate copies of audio are kept on the hard drive, independent of and unaffected by any edits you make, your manipulations of the audio are called nondestructive editing . Editing the audio in the project files has no impact on the original audio files. Your software reads the audio files from your hard drive, so that you hear the audio edits in the mix project. But if you need to go back to the original audio for any reason, you'll find that the files are unchanged.
Certain edits do require modifications to the file. For these, most DAWs automatically make duplicate copies of the file. Automatic duplication can sometimes create redundant files you don't need, so you might routinely take a look at the file window in your audio editor to see if there are files you can delete (see "File management," next page).
Not all audio tools are nondestructive. Typically, waveform editors like BIAS Peak and Sony Sound Forge edit destructively. That doesn't mean you can't undo changes: most of these programs have multiple levels of undo, so you can use a keyboard shortcut like Ctrl-Z or Cmd-Z on the Mac and reverse changes you've made one by one. Multiple undo and nondestructive editing aren't quite the same thing, though: multiple undo retains a list of actions performed so you can reverse actions later if you change your mind. A program that does nondestructive editing always retains separate copies of original files.
| | Tip: When you save your work, most programs empty the undo buffer, so you won't be able to undo an edit that was made before you saved. |
DAWs use nondestructive edits to audio only in certain views. Many DAWs include integrated waveform editors in a "waveform view" or "audio file view." These editors allow you to make edits to individual audio files. Perform a fade-in or trim the end of a file, for instance, and the editor destructively makes that change to the audio file. You'll still be able to undo the change via the undo command until you save your project. You can make a duplicate of the file first if you want to retain an unmodified copy. (Some waveform editor views will even make the duplicate copy for you automatically.)
File management
In a multitrack audio project, you'll probably have many audio files that need to retain their associations with the project file. You might have files you imported from an external source, such as field recordings transferred from a portable recorder. You might also have files you recorded while creating the project, such as vocal or instrumental tracks you recorded onto your computer. You might even have additional audio that was recorded internally from the output of soft synths, if you recorded this audio to a track, or audio imported from a third-party CD-ROM or DVD.
Since the project file only points at these external files rather than including the audio content from them directly, it's important to keep all of the files organized. Most often, when you create a new project, your DAW will create a folder called something like "Audio Files" or "Clips" in which to store these files. Any new audio created in the project will be stored in this folder. You can also automatically copy imported files to the folder, although this feature is often turned off by default (check your DAW's preferences). When importing an audio file into a project, you may see a dialog box that asks if you want to copy it to the folder for the project.
If your audio application can't find associated audio files, it will display an error message and disable that audio content in your mix. (The error message usually reads "disconnected media," "can't find file," or some similar text.) To avoid such errors, make sure all the media in the project is located in the project's audio file folder, and that you move that folder when you move the project. Some applications automatically search for missing files, but of course it's better to keep them organized to avoid this extra step in the first place.
Although keeping track of audio files that are used in your project is important, you may want to unload audio files that aren't used. You might record or import audio that doesn't wind up in your mix, or your audio application might produce redundant copies of an audio file while editing. Most DAWs include file management tools that identify unused audio. Usually, you'll employ these tools when a project is nearly done, so you can delete those files to save hard drive space.
Arrangement View and the Timeline
Audio files and MIDI data form the component parts of a mix. In an arranged song, these are assembled into a whole musical structure. For instance, you might have recorded audio files for a violin part and a piano part and a multitrack mix combining the two. Waveform audio views and MIDI edit views, as discussed in previous chapters, let you work with the components . An arrangement view displays a multitrack overview of your mix project, showing how all of the parts fit together over time ( Figure 10.2 ).
Figure 10.2. An arrangement view (1) displays an overview of different tracks, with MIDI and audio data, as shown here in Cakewalk SONAR. The timeline (2) at the top indicates metrical and/or clock time in the project. (Image courtesy Twelve Tone Systems, Inc.)

Different software, as usual, uses different names for this view. Apple Logic Pro calls it the Arrange window, whereas Pro Tools calls a similar view the Edit window. The features of these windows vary as well. Some applications allow in-line editing of individual MIDI notes, for instance, while others do not. There are more similarities than differences, however. Generally speaking, any window that displays audio and MIDI side-by-side in tracks that run horizontally across the screen and allows basic editing, arranging, and mixing can be considered an arrangement view. Since you can see an overview of your mix, you'll do most of your large-scale arranging in this window, even if you occasionally switch to a more detailed editing window to fine-tune changes.
The timeline is the reference to metrical and/or clock time displayed at the top of the arrangement window. It gives a linear structure to your song or other composition. This timeline also shows changes in meter that occur during your song. Changes in tempo are also displayed in the timeline in some programs.
Most digital audio software lets you view and edit your music in familiar, musically meaningful units like beats, bars, and larger sections with names you supply yourself, such as "intro," "verse," and "chorus." You can edit these larger sections to change the overall structure of your music or work at a microscopic level, like individual beats, for finer editing. In this chapter we'll start small and work up to the level of bigger "chunks" of the musical structure.
Slices and Beats in Audio
Let's start by considering audio slices and beats. There are various reasons you might want to work at the level of beats, even when you're arranging your music. You might want to work with beats to match loops for DJ-style beat juggling, remixing, mash-ups, and groove creation. You might want to tighten up an existing performance, for example, to change the rhythmic feel of a bassline or repair slightly inaccurate rhythms in a recorded performance. You might want to reorder the rhythms in a drum part for a creative effect or slice up spoken word vocals. You might want to chop up and reconceive an instrumental part one beat at a time.
Regardless of the aim, working with beats in audio has some special requirements. It's easy to work with beats and bars when you've recorded MIDI to a metronome or when you're working with preformatted loops that contain beat information. (See Chapter 5 for a discussion of loop formats like Apple Loops, REX, and ACIDized WAV, and how they can be used in music.) But even if it has been recorded to a metronome, audio in a DAW is usually displayed as whole waveforms, so slicing individual beats requires manual work. And on occasion the organic rhythms contained in imported audio or other recorded audio will lack a clear reference to a metronome.
Automatic beat detection features
Audio data isn't inherently organized into specific note or beat events, so the only way to match the flexibility with which MIDI data can be edited is to slice up audio into rhythmic subdivisions and then work with those. To accomplish this, many audio applications can recognize and manipulate beats inside audio using several related features:
-
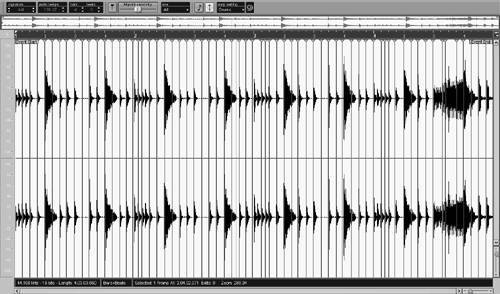
Beat detection/analysis: The software detects transients (as would be generated by a drum hit or the attack of a bass note) or other features that indicate likely beat locations. Based on the locations of the transients and other types of analysis, the software "guesses" where beats are located in a segment of audio ( Figure 10.3 ).
Figure 10.3. Beat analysis, as shown here in Cubase SX, identifies beat locations by applying a detection algorithm to audio. You can then fine-tune the results if needed. Once the beats are identified, you can manipulate audio with as much rhythmic flexibility as MIDI notes.
-
Beat matching: By aligning beats within the audio to a grid, moving individual beats forward and backward to conform them to tempo, you can match different pieces of audio to a single tempo, irrespective of their original tempo. This feature is commonly used with loops, particularly for DJ-style beat matching, but can be used with nonlooped audio as well.
-
Beat slicing: Once these beats are identified, they can be ( optionally ) sliced apart so as to be independently manipulated and/or moved ( Figure 10.4 ).
Figure 10.4. Slicing audio based on automatic beat detection can save time editing. In Digital Performer, for instance, the Create Soundbites From Beats command converts each identified beat into a separately editable slice, a technique as useful for audio like spoken word recordings as it is for percussion.

-
Audio quantization: Some programs can apply rhythmic quantization to the sliced beats from a MIDI track or another audio track, or create a groove quantization template from the unique rhythmic feel of an audio track that can then be applied to other regions. (See Chapter 8 for more on groove quantization.)
As beat detection, matching, slicing, and audio quantization have grown in popularity, they have become meshed with the audio features in various DAWs. These features tend to be named differently in different software applications: in Digidesign Pro Tools they're located in a separate window called the Beat Detective, in Steinberg Cubase they're collectively called Audio Warp, in Cakewalk SONAR they're grouped into a Loop Construction View, and in MOTU Digital Performer they're called the Beat Detection Engine and located on the Audio menu and in the Soundbite window.
Ableton Live has a unique take on the concept via what is termed Warp Markers and (for automatic analysis) Auto Warp, which are both displayed at the level of clips, although Live lacks audio-to-MIDI and MIDI-to-audio quantization.
Integrated beat detection is growing in popularity, but some stand-alone tools are powerful, too. One of the most popular tools for detecting beats and slicing audio is Propellerhead's ReCycle application (www. propellerheads .se). ReCycle lets you prep audio in advance for use in another application via the REX file format (as discussed in Chapter 5). Many DAWs can load and play REX files. What makes REX files unique is that each individual slice is associated with a MIDI note, so you can play the slices like a drum kit or reorder and arrange them using MIDI pitches. This affords some unique possibilities, like transposing a MIDI pattern in order to generate a completely different drum pattern. Rather than use ReCycle on a Mac or Windows to create your own prepped audio, you can purchase vast libraries of REX soundware content. ReCycle was the first app to popularize the idea of beat detection and slicing, and some of the tricks that can be done with REX files are not easy to duplicate with any other technology.
How "warping" works
One major advantage of beat detection and slicing is that it enables easier and more accurate "warping" of audio to tempo. Warping is also called "time-stretching."
Changing the tempo of MIDI data is easy: all your audio software has to do is transmit the individual MIDI messages more slowly or more quickly. A MIDI note, for instance, consists of two messagesa note-on followed by a note-off. If the note-on and note-off are ¼ second apart at 120 bpm, at 60 bpm they'll be separated by ½ second. Changing the tempo of audio is much more difficult, however. As discussed in Chapter 5, it's possible to stretch out the audio digitally without changing pitch (unlike tape players and turntables, for which speed and pitch are interdependent). One problem is that you'll stretch out the whole sound, so the hits on a drum pattern will become stretched out and will lose their distinctive , sharp attack. Another problem is that stretching a whole audio wave file at once doesn't discriminate between its individual, internal beats, so those beats may not line up with the tempo of the project. (The beginning and ending of the audio file may be in the right places, but the internal beats may be out of time.)
Warping algorithms slice up the audio, maintaining the transient hits of percussive notes and more accurately time-stretching individual beats. This also means that you can control the lengths of individual beats: by marking the location of each beat, you can move internal beats around or stretch them independently, and the software can accurately match them with the tempo of the music.
Using warping with music
Although the audio warping features of various programs work in slightly different ways, they do share some commonalities:
| | Slicesnot just for drum loops: Despite the beat-oriented names, audio slicing features work well for other instrumental parts, too. You can also try applying your loop construction/beat marker tool to spoken word or vocals for dividing words into slices or (using the Strip Silence function illustrated in Figure 10.7 ) regions. Once the slicing is done, you can easily reorder, regroove, edit, and arrange. |
-
Set meter, length: It's easy for human musicians to listen to music and recognize meter and phrase length, but not for software. Generally, you'll have to specify that a given audio sample is four beats long and contains musical content in 4/4 time.
-
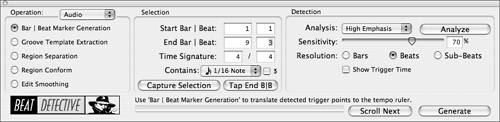
Recognize beats: The next step is to automatically detect the beats; the software will detect percussive transients and add a marker to each beat ( Figure 10.5 ).
Figure 10.5. Automatic beat detection and audio warping features can sometimes make guesses about tempo, but additional controls let you produce more reliable results or correct the application's guesses. Pro Tools' Beat Detective, for instance, provides options for method, for sensitivity, and for specifying information about the content of the audio being analyzed .

Hands on with audio warping in Ableton Live: Try out audio warping on the disc, using a sample drum loop for manipulation. See the Live Drum Lesson in the Extras folder.
-
Adjust for accuracy: Some applications let you adjust the sensitivity of this operation to fine-tune its accuracy. Nearly all will let you manually move markers around, relocating marker positions to make sure they accurately fall on beats.
-
Work with beats: Once the analysis is done, the fun can begin. You can shift beats forward and backward in time, "beat-match" loops originally in different tempi to a single tempo, or (in some programs) quantize MIDI to audio and vice versa. Since the audio already has the beats marked , these operations can be performed fairly seamlessly. For instance, you can apply a quantization command to audio as if it were MIDI data, or increase the tempo of the project and automatically speed up warped loops to match.
There are a number of creative applications of this technique:
-
Tighten up performances : Is the drum take nearly perfect, with just a couple of hits that are a little early or a little late? By slicing up the audio segment in which the hits occur and adjusting them, you can perform delicate surgery on a recording.
-
Change a rhythmic feel: With an application that supports groove quantization based on audio, you can apply the feel of an audio sample to any other audio or MIDI materials. In the reverse direction, you can apply a groove quantization to audio in the same way you would to MIDI notes.
-
Match loops and other audio materials: For remixes, resampling, live sampling, or a variety of other applications, warping beats to conform to a synchronized tempo lets you combine audio materials that otherwise would clash rhythmically. Audio files that originally had different tempi, or even audio files that have the same tempo but different grooves or rhythmic feels, can be matched. (See Chapter 13 for more on how you can use these techniques in live performance.)
-
Create regions and markers for arranging: There are other reasons you might want to slice up audio that have nothing to do with mapping to meter and beat. For instance, you might need to separate the words of a dialogue track. Once the words are defined as regions, you can easily manipulate them individually, applying effects, making certain words louder or softer, or performing whatever other edits you want to make.
Regions
Regions are blocks of data (audio, MIDI, or both) within your larger project. For instance, your project might have several recordings of a horn section, different drum licks, a couple of piano solos, and so on; each of these is a region within the larger project.
If you've worked with looping software, you've already worked with regions. The loops and patterns discussed in Chapter 5 are simply phrases of audio or MIDI notes that are automatically repeated. Apple's GarageBand even calls these blocks of sound or notes "regions," not loops, indicating that they don't necessarily have to be looped. Mackie Tracktion and Ableton Live call these units "clips"; Cubase calls them "parts." Other programs call them sequences or patterns. Here, we'll use the generic term regions .
If you're working with audio, each region will usually contain, initially, a single audio file. Each time you record a take or drag an imported audio file into your arrangement, you'll see a rectangular graphic on the screen representing the data, as shown in Figure 10.6 . To rearrange the audio files, you can drag the edges of the rectangle to stretch, compress, or loop the audio, drag the center of the rectangle to move it forward or backward in time, or drag it up or down to a different track. The exact methods you'll use for these operations will depend on the software you're using.
Figure 10.6. A typical display showing two audio regions in Apple Soundtrack Pro (1). This type of interface is now so commonplace it's easily taken for granted. By moving regions forward or backward on the screen, and cutting, copying, and pasting regions, you can more fully control your arrangementespecially with the addition of a razor blade tool to cut regions into smaller segments when needed (2).
Most applications have a razor blade tool or some equivalent for dividing regions into smaller pieces. (Even though few people today have edited analog tape, slicing it with a razor blade, the old analog image remains.) The razor blade tool "slices" the region into two independent sections that can be moved separately.
With audio, razor blade "cuts" are nondestructive. Thus, you could take a recording of someone singing the words "Since my baby left me," divide the audio into the individual words, and create a stuttered track that sounds like "since since since since my my my my . . . ." and so on. Each region would use the data stored in the original audio file of the vocalist singing , and the file would not be changed by your edits, even though you'd see a series of audio regions in the timeline.
| | Nondestructive editing: Nondestructive editing stores audio files separately from the project arrangement; regions in the arrangement define where these files are played . |
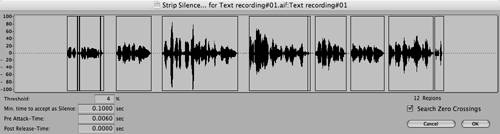
Another way to define audio regions is to use a Strip Silence command, which defines portions of an audio source as "gaps" by establishing a minimum dynamic threshold and length for a pause in the material ( Figure 10.7 ). For instance, you might use a strip silence command to find pauses in a spoken word recording, and then tighten up the gaps between them. Stripping silences can not only close the gap between portions of recordings like vocals, but can also create new regions based on the material between gaps for further editing.
Figure 10.7. The Strip Silence function in Logic Pro creates new regions from an audio file by identifying areas below a threshold as silences.
| | Don't get disconnected: Because arrangements simply point to files somewhere on the hard drive, it's essential that your arrangement not get disconnected from its files. Make sure your application is set to automatically copy files to an audio folder in your project folder, and don't move them once they're there. (This is even more important when you move files around; see "Sharing full projects and collaboration" later in the chapter.) |
For MIDI data, you can either set rigid metrical points to define regions in terms of beats and bars, or flexibly adjust where regions begin and end. (Some applications, like MOTU Digital Performer, will even let you adjust an automatic sensitivity fader to guess where phrases begin and end so you can make selections more easily.) Once you've defined a region's start and end points, MIDI regions function similarly to audio regions in most programs. You can slice them, move them, copy them, and reshape them at will. The one critical difference is that edits to MIDI regions are usually destructive. If you slice them up or move notes around, you're editing the actual MIDI data, so you may want to copy a MIDI recording to a muted track to serve as a backup before undertaking major edits if you're concerned you might change your mind about the edits later.
Markers and Grids
There are likely to be blocks of time in your project that are significant, like a verse or chorus in a song, an instrumental break, a movement in a string quartet, or a cue in a film score. Other blocks of time will be more relative, like those two bars that you want to fix where your drummer got behind the beat. As your project develops, you'll often be working within these specific blocks of time. To work with shorter sections within your overall project timeline, several basic techniques are at your disposal:
-
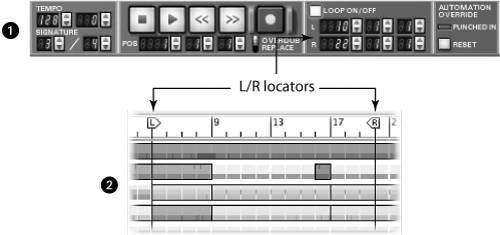
In/out/cycle: Using the in and out or "punch" settings on the transport control, you can not only record materials into a specific location, but also edit events within that area. Most applications also let you loop (cycle) the playback of certain time regions, marking them to be repeated temporarily while you make edits and recordings. (The beginning and ending of the looped region are sometimes called in and out points, sometimes left and right locators, as shown in Figure 10.8 .)
Figure 10.8. Punch in/out controls aren't just for recording: in many programs, they double as a means of defining editing areas. The Left and Right locators on Reason's transport controls (1) can be used for punch recording or for defining an edit selection area in the timeline (2).
-
Snap to grid: Using your cursor, you can select specific blocks of time by bars, beats, rhythmic values (like eighth -notes), seconds, frames , or other divisions using the snap to grid function of your arrangement view or editor. (Depending on the application you're using, this may or may not be available in certain views.) With snap turned on, dragging your cursor to create a selection will increase or decrease a selection by the unit selected, and selected events will snap to the nearest grid location when dragged left or right along the timeline. With snap turned off, selecting is usually accurate to the onscreen pixel, which may be a larger or smaller amount of time depending on how far the view is zoomed in or out. (Some programs display a numerical value as you drag or let you enter numerical values for a selection. Entering values by typing numbers can be slower, but in some situations the additional accuracy makes it worth the effort.)
-
Cursor position: Another way to get an accurate selection is to set your cursor position to a specific location (usually by clicking your playback cursor), then either drag or use keyboard shortcuts to create a selection relative to that point. For instance, you might set your playback cursor to bar 4, beat 1, and then add the beats after that point to a selection. Most programs also have a nudge command or other incremental selection that lets you move a selection or expand/contract it by a small increment, such as a metronome tick or a video frame.
-
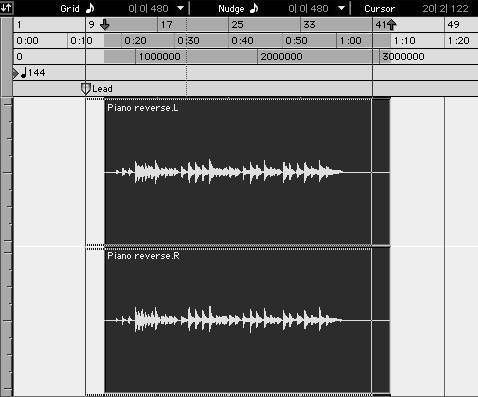
Markers: Rather than manually entering certain cursor positions over and over again, you can use markers to define critical moments in your project and quickly move the editing/playback cursor to them. Markers are often called locators , and moving the cursor to a marker is often referred to as "locating" to the marker. Some programs let you snap editing movements to markers, so you can drag chunks of audio and MIDI data so they start at the markers even if the markers aren't on standard rhythmic subdivisions. You can also define selections by using markers ( Figure 10.9 ).
Figure 10.9. With snap-tomarker turned on in your DAW, you can drag regions so their start points line up with a marker, saving some manual labor. (Notice the various time references on the timeline at the top of the Pro Tools Edit window.)
Markers also serve a key role when combining sound and video. Since video time uses minutes, seconds, and frames rather than metrical divisions like bars and beats, you'll need to mark moments in the video as landmarks to figure out where critical juxtapositions of sound and image occur. For details of these techniques, see Chapter 12.
Tempo Track
If your songs never change meter, speed up, or slow down, you won't need a tempo track. You can set a tempo (like 120 bpm) and a meter (like 3/4 time) when creating a song and never worry about either again. But lots of music speeds up or slows down, or changes meter for variety. This is less common in pop songs and dance music than in filmscores, but it happens more often than you may think. A tempo track is a track containing only tempo and meter changes. These changes apply globally to all tracks in a song. (If tempo changes were specific to individual tracks, you'd wind up with different racks running at different tempos or different meterspossible in the occasional avant-garde piece, but unlikely in the vast majority of music.)
Tempo tracks are often called "conductor tracks" because they perform a similar role to that of a conductor. A conductor leading a group indicates when to speed up and slow down, and indicates the meter with baton patterns, just as the tempo track affects these parameters for all tracks in a song. Tempo tracks are also sometimes called "global tracks" or "master tracks"; in this case they might also contain other global settings like master volume.
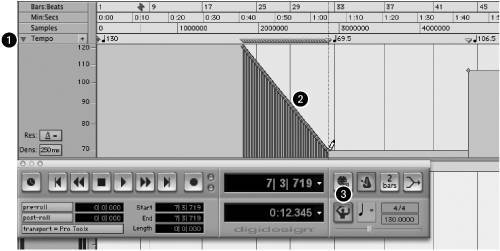
To add tempo and meter changes to a tempo track, you can either manually insert events, or, in many programs, create them graphically with the mouse using envelopes (a technique described in "Mix Automation and Envelopes," later in this chapter). Abrupt changes will appear visually as vertical lines. To create a gradual change in tempo (for an accelerando or ritardando ), you can create a ramp ( Figure 10.10 ).
Figure 10.10. In Pro Tools, the tempo track is normally hidden, but click its disclosure triangle (1) and you can edit tempo changes for your project. You can create abrupt changes or draw gradual ramps (2). The conductor icon (3) determines whether the project follows the tempo track or ignores it and lets you set tempo manually.
Tempo tracks take on a special significance when they're used to align sound and musical material to the timing of video, as explained in Chapter 12.
Arrangement Markers and Reordering
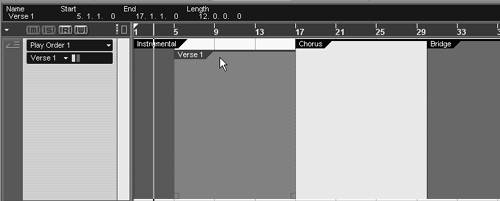
Many applications have means of organizing the overall order and arrangement of a piece of music. Steinberg Cubase SX, for instance, has a Play Order track, which lets you draw different orderings into a dedicated track to create an arrangement ( Figure 10.11 ). When you decide on the best ordering of sections, you can "freeze" the play order, making it permanent.
Figure 10.11. Cubase's Play Order track lets you experiment with song arrangements by drawing and dragging different sections. Like the tempo track, it's a separate track that controls the playback of the arrangement.
Other applications may use some kind of arrangement marker or consider different sections subsequences , self-contained mini-sequences that are combined to form the overall mix or arrangement. Just as with Cubase's Play Order track, you'll define these larger sections based on the structure of your project, so the chunks might be a "verse" and "chorus" or some other meaningful subdivisions. Like regions, these sections define chunks of data, but unlike regions, they apply to all tracks at once, and represent bigger pieces of the structure. (Some programs even let you use subsequences as a means of organizing multisong sets.)
Ableton Live takes a slightly different approach to this feature using Arrangement Locators. You can add locators to the mix's arrangement in strategic positions (like the beginning of a verse or chorus), then trigger those at any time. This will change the order in which sections of the piece are played, but only during real-time playback; it's not an editing tool. Alternatively, you can form scenes in the Session View comprising different clips and trigger the scenes to create your arrangement. In an onstage situation, this could let you flexibly move through arrangements, improvising as you play. See Chapter 13 for more on creating live arrangements for performance.
| | Jump sections with Arrangement Locators: By mapping Live's Arrangement Locators to MIDI or keyboard keys, you can easily jump to specific sections for editing, or jump through the song structure during playback (from a verse to a chorus, for instance). |