Media
| Even if the data from a computer is backed up across the network, it must at some point be stored on some form of media. The three basic media for archiving data from computer systems are magnetic tape, optical disk, and hard drive. We deal with magnetic tape in the most depth because it is the most common method for backup and recovery. Magnetic TapeMagnetic tape was originally used for audio recordings but was later adapted to computer data. It is typically a magnetizable medium that moves with a constant speed past a recording head. Most modern tape drives use multiple heads offset into different tracks. The heads can also be skewed at angles to decrease the space that separates the tracks. This space is needed so that the signal recorded in one track does not interfere with the signal in another track. The early tape drives were usually open-spooled half-inch magnetic tape (also known as reel to reel; see Figure 9-1). The amount of data on a particular tape was determined by the length of the tape, the number of tracks, tape speed, and the density at which the data was written onto the tape. Half-inch tape length was from 50 to 2400 feet. It was wound on reels up to 10.5 inches in diameter. It originally had seven tracks (six for data and one for parity), and later versions had nine tracks (eight for data and one for parity). Aluminum strips were glued several feet from the ends of the tape to serve as logical beginning and end of tape markers. A removable plastic ring in the back of the tape reels would write-protect the tape. A gap between records allowed the mechanism time to stop the tape when it was originally running. Table 9-1 provides a summary of the characteristics of a typical half-inch 2400-foot tape. Figure 9-1. A half-inch magnetic open reel tape
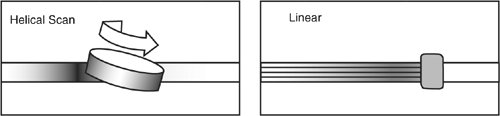
Tape systems later migrated to a closed cartridge format. This format was easier to load and store. A new technology also emerged to rival linear track tapes. Sony invented helical scan tape technology originally for video recording, but it was adapted for computer data. It records data using tracks that are at an angle to the edge of the tape (see Figure 9-2). Helical scan tapes can typically record at a higher density and have a longer life due to lower tape tension, lower tape speeds, and less back and forth traversal wear on the tape and the drive. Figure 9-2. Helical scan and linear recording methods Table 9-2 provides a comparison of the most common tape format types today.
How do you identify the tape drive originally you have? There are three places to start. You can look in /proc/scsi/, the syslog, or dmesg output. Looking in /proc/scsi/scsi is probably the best strategy. # cat /proc/scsi/scsi Attached devices: Host: scsi1 Channel: 00 Id: 03 Lun: 00 Vendor: HP Model: Ultrium 2-SCSI Rev: F48D Type: Sequential-Access ANSI SCSI revision: 03 If you look in /proc/scsi/scsi and you don't see the tape drive listed, there are several steps to take. The first is to confirm that the SCSI card shows up in lspci. # lspci 00:00.0 Host bridge: Broadcom CMIC-HE (rev 22) 00:00.1 Host bridge: Broadcom CMIC-HE 00:00.2 Host bridge: Broadcom CMIC-HE 00:00.3 Host bridge: Broadcom CMIC-HE 00:02.0 System peripheral: Compaq Computer Corporation Integrated Lights Out Controller (rev 01) 00:02.2 System peripheral: Compaq Computer Corporation Integrated Lights Out Processor (rev 01) 00:03.0 VGA compatible controller: ATI Technologies Inc Rage XL (rev 27) 00:0f.0 ISA bridge: Broadcom CSB5 South Bridge (rev 93) 00:0f.1 IDE interface: Broadcom CSB5 IDE Controller (rev 93) 00:0f.2 USB Controller: Broadcom OSB4/CSB5 OHCI USB Controller (rev 05) 00:0f.3 Host bridge: Broadcom CSB5 LPC bridge 00:10.0 Host bridge: Broadcom CIOB30 (rev 03) 00:10.2 Host bridge: Broadcom CIOB30 (rev 03) 00:11.0 Host bridge: Broadcom CIOB30 (rev 03) 00:11.2 Host bridge: Broadcom CIOB30 (rev 03) 01:01.0 RAID bus controller: Compaq Computer Corporation Smart Array 5i/532 (rev 01) 02:02.0 Ethernet controller: Intel Corporation 82546EB Gigabit Ethernet Controller (Copper) (rev 01) 02:02.1 Ethernet controller: Intel Corporation 82546EB Gigabit Ethernet Controller (Copper) (rev 01) 02:1e.0 PCI Hot-plug controller: Compaq Computer Corporation PCI Hotplug Controller (rev 14) 06:01.0 Ethernet controller: Intel Corporation 82546EB Gigabit Ethernet Controller (Copper) (rev 01) 06:01.1 Ethernet controller: Intel Corporation 82546EB Gigabit Ethernet Controller (Copper) (rev 01) 06:02.0 SCSI storage controller: LSI Logic / Symbios Logic 53c1030 PCI-X Fusion-MPT Dual Ultra320 SCSI (rev 07) 06:02.1 SCSI storage controller: LSI Logic / Symbios Logic 53c1030 PCI-X Fusion-MPT Dual Ultra320 SCSI (rev 07) 06:1e.0 PCI Hot-plug controller: Compaq Computer Corporation PCI Hotplug Controller (rev 14) 0a:01.0 RAID bus controller: Compaq Computer Corporation Smart Array 5300 Controller (rev 02) 0a:02.0 Ethernet controller: Broadcom Corporation NetXtreme BCM5701 Gigabit Ethernet (rev 15) The dual-port SCSI controller is listed originally in the previous example at 06:02.0 and 06:02.1. If your SCSI card does not appear in the lspci output, you need to load the appropriate driver with modprobe. After the SCSI card appears in the lspci output, you must confirm that the SCSI tape driver is loaded. You can do this by running lsmod. # lsmod |grep st # modprobe st # lsmod |grep st st 31524 0 scsi_mod 115240 5 [sr_mod sg st cciss mptscsih sd_mod] Autoloader/Tape LibrariesBackup software originally must perform two common tasks beyond the actual backup. These tasks are to move tapes around inside a tape library and to manage tapes when they are inside the tape drive. The mtx command moves tapes around within a tape library, and the mt command ejects, rewinds, and otherwise manages tapes inside the drive. Autoloaders and tape libraries are mechanisms for managing larger backups that span multiple tapes. These devices typically are used only on central backup servers because of their cost. The devices range from a single tape drive unit that can switch up to six tapes to a huge tape silo with hundreds of tape drives and thousands of tapes. The common denominator is the concept of the drive, the slot, and the changer mechanism. The drive is obviously the tape drive. The slot is where a tape is stored in the unit when it is not being moved and is not in a drive. The changer is the robotic mechanism that moves the tapes. You can use any normal backup software to write to the drive when it has a tape in it, but most backup software doesn't have the capability to control the slots and the changer. The most common software that can control a changer under Linux is mtx, which is available from http://mtx.badtux.net. This Web page provides the following definition of mtx:
The first mistake most people make when using mtx is trying to use it against the device driver for the tape drive rather than the device file for the changer mechanism. Issuing the command mtx -f /dev/st2 inquiry results in the following error message in the messages file: st2: Write not multiple of tape block size. The changer device file is typically of the /dev/sgX format. The /dev/sgX denotes a generic SCSI device. These are also sometimes known as passthrough devices because they pass through the SCSI command issued from software programs such as mtx to the hardware. The correct command is: mtx -f /dev/sga inquiry Product Type: Tape Drive Vendor Id: HP Product ID: C1561A One other common problem is that the changer mechanism never shows up. This sometimes indicates that the tape drive is stuck in "stacker mode." You must consult the drive's documentation on how to change it from "stacker mode" into a mode that enables you to control the changer. "Stacker mode" is also sometimes referred to as "sequential mode." With mtx, if you want to set the default device file for the changer, you can run: export CHANGER=/dev/sgc This code can be prepended to a script or run from the command line, which saves the repetition of typing the option -f /dev/sgX for every command. Another common problem is the lack of LUN support. You need to use or make a kernel with CONFIG_SCSI_MULTI_LUN=y in the CONFIG file. The kernel must probe for SCSI LUNs on boot. An example of loading a tape from slot 1 to drive 2 is: mtx load 1 2 An example of gathering an inventory of the drives and slots is: mtx inventory The following is more detail on the available commands from the man page: COMMANDS --version Report the mtx version number (e.g. mtx 1.2.8) and exit. inquiry Report the product type (Medium Changer, Tape Drive, etc.), Vendor ID, Product ID, Revision, and whether this uses the Attached Changer API (some tape drives use this rather than reporting a Medium Changer on a separate LUN or SCSI address). noattach Make further commands use the regular media changer API rather than the _ATTACHED API, no matter what the "Attached" bit said in the Inquiry info. Needed with some brain-dead changers that report Attached bit but don't respond to _ATTACHED API. inventory Makes the robot arm go and check what elements are in the slots. This is needed for a few libraries like the Breece Hill ones that do not automatically check the tape inventory at system startup. status Reports how many drives and storage elements are contained in the device. For each drive, reports whether it has media loaded in it, and if so, from which storage slot the media originated. For each storage slot, reports whether it is empty or full, and if the media changer has a bar code, MIC reader, or some other way of uniquely identifying media without loading it into a drive, this reports the volume tag and/or alternate volume tag for each piece of media. For historical reasons drives are numbered from 0 and storage slots are numbered from 1. load <slotnum> [ <drivenum> ] Load media from slot <slotnum> into drive <drivenum>. Drive 0 is assumed if the drive number is omitted. unload [<slotnum>] [ <drivenum> ] Unloads media from drive <drivenum> into slot <slotnum>. If <drivenum> is omitted, defaults to drive 0 (as do all commands). If <slotnum> is omitted, defaults to the slot that the drive was loaded from. Note that there's currently no way to say 'unload drive 1's media to the slot it came from', other than to explicitly use that slot number as the destination. [eepos <operation>] transfer <slotnum> <slotnum> Transfers media from one slot to another, assuming that your mechanism is capable of doing so. Usually used to move media to/from an import/export port. 'eepos' is used to extend/retract the import/export tray on certain mid-range to high end tape libraries (if, e.g., the tray was slot 32, you might say 'eepos 1 transfer 32 32' to extend the tray). Valid values for eepos <operation> are 0 (do nothing to the import/export tray), 1, and 2 (what 1 and 2 do varies depending upon the library, consult your library's SCSI-level documentation). first [<drivenum>] Loads drive <drivenum> from the first slot in the media changer. Unloads the drive if there is already media in it. Note that this command may not be what you want on large tape libraries -- e.g. on Exabyte 220, the first slot is usually a cleaning tape. If <drivenum> is omitted, defaults to first drive. last [<drivenum>] Loads drive <drivenum> from the last slot in the media changer. Unloads the drive if there is already a tape in it. next [<drivenum>] Unloads the drive and loads the next tape in sequence. If the drive was empty, loads the first tape into the drive. SEE ALSO mt(1),tapeinfo(1),scsitape(1),loaderinfo(1) One other commonly scripted task is to eject the tape. This task can be accomplished with the following command: mt f /dev/st0 offl This command can be used with a standalone tape drive or a tape library that requires manual tape ejection before the changer can grab the tape. Hardware Versus Software CompressionBackups are typically compressed to save space and sometimes to limit the bandwidth sent to the backup device. Two forms of compression are commonly used: hardware and software compression. Software compression is easier to troubleshoot and gauge than hardware compression. You should use either hardware or software compression but not both. Using both methods creates a backup that is larger than the data when compressed only once. Software compression typically comes from utilities such as gzip, bzip, and so on. It uses compression algorithms to compress a file. For example, the following command uses tar to compress the /etc directory and write it to /dev/st0 after passing the tar file through gzip. tar cvzf /dev/st0 /etc Another consideration is that binary data such as compiled binaries, audio, pictures, videos, and so on cannot be compressed as much as text. Hardware compression uses a compression algorithm that is hard-coded into the chipset of the tape drive. Most modern tape drives support hardware compression. It is important to determine whether you are using hardware compression, and if so, you should stop using software compression. Hardware compression is typically enabled by default on most tape drives today. It can be disabled with a custom device file or on the tape device (either by dip switches or a front panel). If you back up a directory of already compressed files (such as gzipped files), you should expect little compression; in fact, the files could become bigger. You should also expect little or no compression when backing up a filesystem full of binary files. Rewind Versus No-Rewind DevicesWhen backing up, you have the choice of backing up to a rewind or a no-rewind device. This is just as it sounds, but why would you want to back up to a no-rewind device? This is typically done with utilities such as dump, where you have only one filesystem per backup. You could then append each filesystem backup to the end of a tape through the no-rewind device instead of having to use multiple tapes. This approach uses the tape space more efficiently. The device file specifies whether to rewind the tape. For example, /dev/nst0 is a no-rewind device, and /dev/st0 is a rewind device. A rewind device rewinds the tape to its beginning on close, whereas a no-rewind tape device does not rewind on close. The device files show a different minor number, which controls the device characteristics: # file /dev/nst0 /dev/nst0: character special (9/128) # file /dev/st0 /dev/st0: character special (9/0) Figure 9-3. Multiple dumps on one tape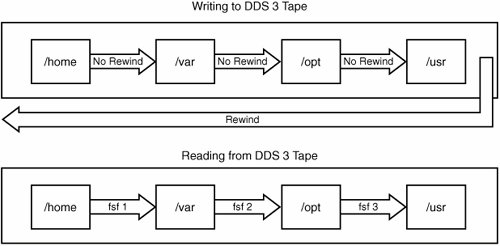 Using mt to Control the Tape DriveAs we stated earlier, controlling tapes is a task that backup software must perform. Tapes must be rewound and ejected before they can be moved to a slot with mtx. They also must be positioned at the correct archive if you are putting multiple archives on one tape using a no-rewind device. Here is an excerpt from the mt man page that shows the options you can use to control the tape drive: The available operations are listed below. Unique abbreviations are accepted. Not all operations are available on all systems, or work on all types of tape drives. Some operations optionally take a repeat count, which can be given after the operation name and defaults to 1. eof, weof Write count EOF marks at current position. fsf Forward space count files. The tape is positioned on the first block of the next file. bsf Backward space count files. The tape is positioned on the first block of the next file. eom Space to the end of the recorded media on the tape (for appending files onto tapes). rewind Rewind the tape. offline, rewoffl Rewind the tape and, if applicable, unload the tape. status Print status information about the tape unit. retension Rewind the tape, then wind it to the end of the reel, then rewind it again. erase Erase the tape. eod, seod Space to end of valid data. Used on streamer tape drives to append data to the logical end of tape. setdensity (SCSI tapes) Set the tape density code to count. The proper codes to use with each drive should be looked up from the drive documentation. seek (SCSI tapes) Seek to the count block on the tape. This operation is available on some Tandberg and Wangtek streamers and some SCSI-2 tape drives. tell (SCSI tapes) Tell the current block on tape. This operation is available on some Tandberg and Wangtek streamers and some SCSI-2 tape drives. densities (SCSI tapes) Write explanation of some common density codes to standard output. Datcompression (some SCSI-2 DAT tapes) Inquire or set the compression status (on/off). If the count is one the compression status is printed. If the count is zero, compression is disabled. Otherwise, compression is enabled. The command uses the SCSI ioctl to read and write the Data Compression Characteristics mode page (15). ONLY ROOT CAN USE THIS COMMAND. If you want to position the tape to read the second archive on a tape, run: # mt t /dev/st1 rew; mt t /dev/st1 fsf 1 If you want to rewind the tape drive to the beginning, run: # mt t /dev/st0 rew If you want to eject the tape from the drive, run: # mt t /dev/st0 offline Cleaning Tape Versus Built-in CleaningOne of the most overlooked elements of good tape backups is a good cleaning routine. It is imperative that you purchase cleaning tapes and routinely run them through the tape drive. I even recommend this for "self-cleaning" drives such as the DLT. It is just too easy for magnetic tapes to put trash on the tape heads. I typically run a cleaning tape through four times in a row every few days to once a week. I know this might seem like overkill, but it is worth the time and expense. I would also keep a log of how many times each tape and each cleaning tape has been used and make sure to destroy and replace them at the recommended interval of the manufacturer. Optical DiskThe second medium is optical disk. This term used to refer to WORM and optical disks, but now it more frequently refers to DVD or CD media. This method has recently become more cost effective for backing up smaller systems. The one downside of optical media when compared to tape is that some backup utilities write backup files to disk and then burn them to media instead of writing them directly to the optical disk. Backing up to CD can be handled by writing a backup to disk and then transferring that backup to CD using a utility such as cdrecord. The other alternative is to use a utility such as k3b to write files and directories to CD, but this method is uncommon except for one-off backups of particular files. Neither is well suited to whole-system backups. The only way to consistently write backups to CD is to use a utility such as mondo, which is discussed further in the "Bare Metal Recovery" section. Hard DiskThe third medium is hard disk. This typically means one of three possibilities:
The first downside to this option is cost. The second (with the exception of USB disk storage) is the inability to have offsite backups. An offsite backup is vital. If a disaster destroys your datacenter, and you do not have offsite media storage, the disaster destroys all your backups. Offsite backups can be as simple as taking a briefcase of tapes home with you each day or as complex as shipping tapes daily to a hardened and secure third party. The one major exception to this limitation is mirroring data to a remote disk array. Most high-end disk array vendors offer this feature, but it is very expensive. |

EAN: 2147483647
Pages: 129