| 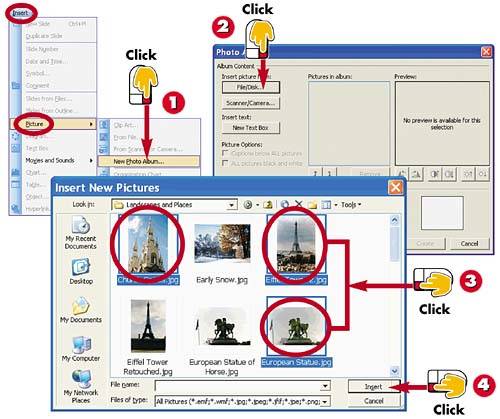 -
 | Click Insert, Picture, New Photo Album . | -
 | The Photo Album dialog box opens. Click the File/Disk button. | -
 | The Insert New Pictures dialog box opens. Locate and select all the photos you want to include. (Press and hold the Ctrl key while clicking photos to select multiple files.) | -
 | Click Insert . | INTRODUCTION PowerPoint offers you a unique way to display photographs in a presentation: You can turn them into a photo album. The Photo Album feature takes the selected photograph files and turns them into slides. | TIP Locating Photos You can click the Look In drop-down arrow in the Insert New Pictures dialog box to look for photos in another folder or drive. | 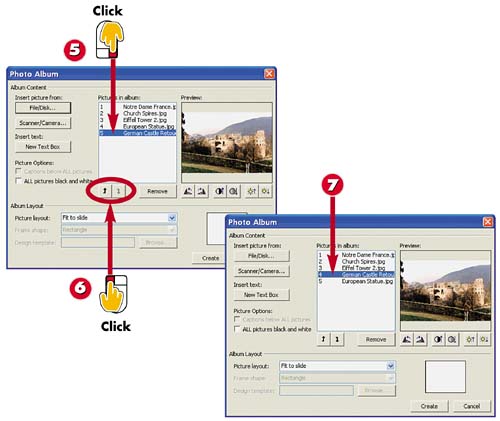 -
 | PowerPoint lists the names of the selected pictures. To move a picture in the list, first click the name to select the picture. | -
 | Click the Up or Down arrow to rearrange the selected picture in the list order. | -
 | The picture changes location in the list. Repeat steps 5 and 6 as needed until your photos appear in the desired order. | TIP Removing a Photo from the List If you accidentally selected pictures in the Insert New Picture dialog box that you do not need, you can easily remove them using the Photo Album dialog box. Click the name of the picture in the Pictures in Album list, and then click the Remove button to remove the picture. | TIP Adjusting the Picture In the Photo Album dialog box, you can adjust crooked pictures using the Rotate Counterclockwise or Rotate Clockwise buttons . Select the crooked image in the Pictures in Album list, and then click the button. | 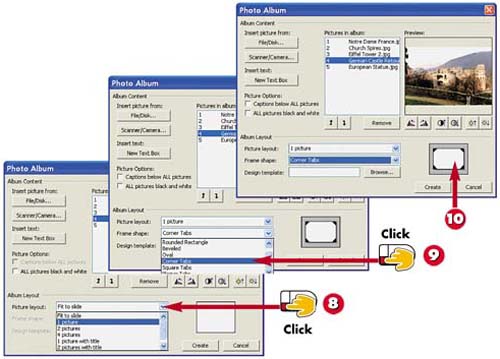 -
 | To specify how many pictures appear on each slide, click the down arrow next to the Picture Layout field and select the desired option (here, 1 Picture ). | -
 | To add a frame to the pictures in your photo album, click the down arrow next to the Frame Shape field and select a frame style (in this case, Corner Tabs ). | -
 | The preview area displays how the pictures will appear on each slide, along with any special frames you select. | TIP No Preview ? If you selected the Fit to Slide option for the picture layout, you will not see a preview of your layout or frame selection in the preview area. | HINT Frame Styles You can only apply one frame style for the entire album. | 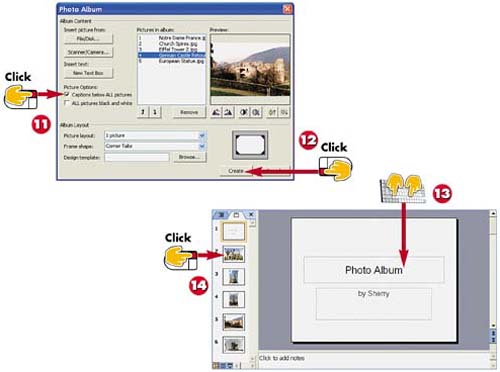 -
 | To include a caption for each image, click the Captions Below ALL Pictures check box. | -
 | Click Create . | -
 | PowerPoint creates the album, along with a title slide. To fill in the title slide placeholder, click the Photo Album text box and type another title, if desired. | -
 | The Slides tab lists all the photo slides. To view a photo, click a slide in the Slides tab area. | TIP Adding Captions If you chose to add captions below your photos, click the slide you want to add a caption to in the Slides tab, then click the caption area and type a new caption for the photo. | TIP Saving the Album You can save a photo album just like you save other presentations you create in PowerPoint. See Part 2 to learn more about saving PowerPoint files. | TIP Editing the Album To make changes to the pictures in your album, select Format, Photo Album to open the Format Photo Album dialog box. Here, you can change the picture order, frames, layout, and more. |  |