Quicken's Guided Setup Wizard 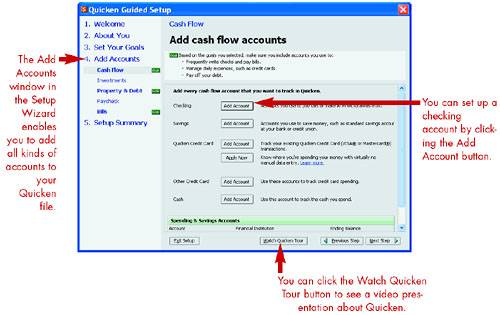 Completing New User Setup 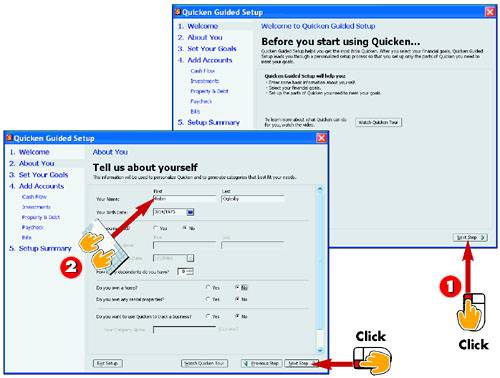 -
 | Start Quicken and click Next Step at the Quicken Guided Setup Welcome window. | -
 | On the About You page, fill in the personal information fields and then click Next Step . | INTRODUCTION When you start Quicken for the very first time, the Quicken Guided Setup Wizard opens to walk you through the process of setting up your financial accounts. Quicken collects a variety of information about you to generate categories to suit your financial situation. After you finish entering personal information, the Guided Setup Wizard can help you set up your basic accounts. |
TIP No Desktop Shortcut? If you don't see the Quicken 2004 desktop shortcut icon, you also can choose Start, Programs, Quicken, Quicken 2004 from the Windows desktop to open Quicken. |
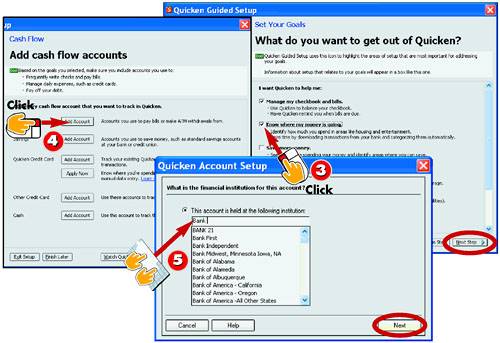 -
 | On the Set Your Goals window, select the check boxes for the areas in which you want to track information and click Next Step . | -
 | Click the Add Account button next to the checking account option. | -
 | Type the name of your bank or select the bank name from the list that appears when you start typing in the field. Then click Next to continue. | HINT More Setups You'll encounter the Quicken Guided Setup Wizard any time you create a new data file. To learn more about creating new files, see Part 13, "Managing Quicken Data Files." |
TIP Take a Tour If you are new to Quicken, you can click the Watch Quicken Tour button on the Welcome window to see a video tour about the program. |
HINT Where's My Bank? If your bank doesn't appear on the Financial Institution drop-down list in step 5, you can type the name of your bank into the text box. The bank you choose here determines which online banking features you'll be able to use in Quicken. |
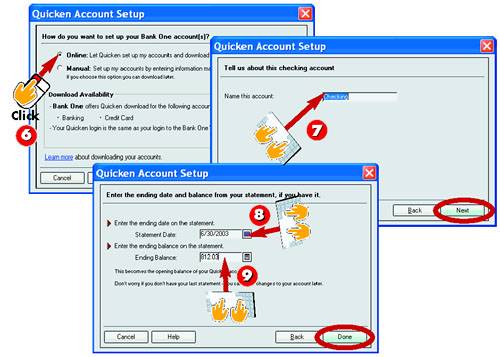 -
 | If your bank offers online options, click the Online button to allow Quicken to set up your checking account; otherwise , choose to set up the account manually. Click Next . | -
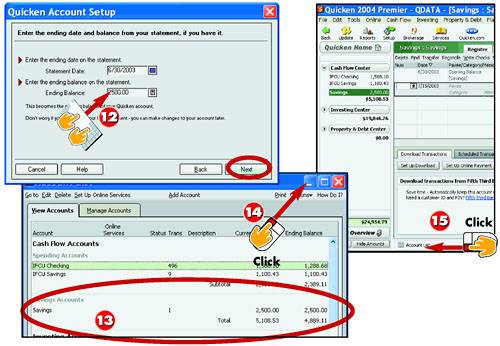
 | Enter a descriptive name for the account and then click Next . | -
 | Enter the ending date found on your most recent bank statement into the Statement Date field. | -
 | Type in the statement Ending Balance and click Done . Repeat steps 5 “10 to set up additional accounts, if needed. | INTRODUCTION Depending on what goals you select, Quicken's Guided Setup Wizard offers additional windows for setting up your accounts. To make the setup process easier, you might want to start with just a checking and a savings account, and then add other accounts later. The last portion in the setup process is to review a summary of all the accounts you created. |
HINT Download If you want to download your latest bank statement, be sure to log on to your Internet connection first and then follow Quicken's instructions. |
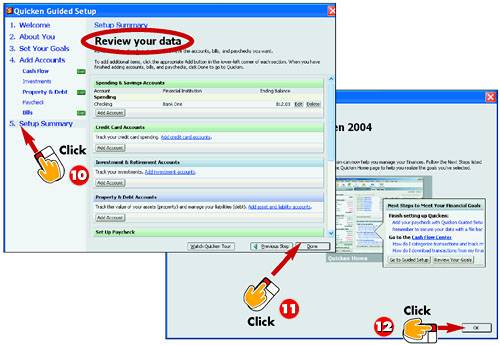 -
 | When you are finished setting up accounts, click Setup Summary . | -
 | A summary window appears, listing all the accounts you created. Verify the account information and then click Done . | -
 | Quicken tells you that the Setup Wizard is complete. Click OK and Quicken opens the account. | HINT No Statement? If you don't have your last bank statement and did not enter a balance in step 10, Quicken enters as the starting balance. You can later edit the Deposit column entry for the Opening Balance transaction in the register. |
TIP Oops! If you entered a wrong amount when setting up an account, you can correct the amount in the Summary window. |
TIP Register Me If Quicken displays the Product Registration dialog box, click the Register button and follow the prompts to register your copy of the software. Registration has many benefits, including free product updates available from Quicken.com. |
Viewing Accounts 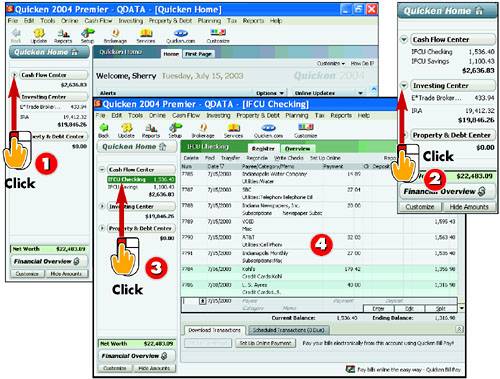 -
| | To expand a center, click the Expand arrow. | -
| | To collapse a center, click the Collapse arrow. | -
| | To view an account register, click the account name. | -
| | Quicken displays the account register. | INTRODUCTION The Account bar lists your accounts in the appropriate center group along with the account's total amount. For example, checking and savings accounts appear under the Cash Flow Center, investment accounts appear under the Investing Center. You can expand and collapse the account listing displayed in the Account bar. With a simple mouse click, you can also display the register for any account. |
TIP The Cash Flow Center To learn more about using the Cash Flow Center to view information about your cash flow accounts, see Part 7, "Tracking Your Cash Flow." |
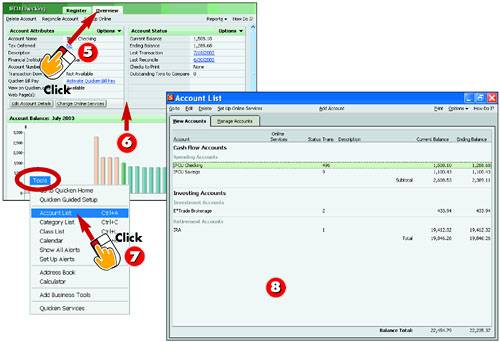 -
| | Click the Overview tab. | -
| | Quicken displays an overview page for the account showing the account's attributes and status. | -
| | Click Tools, Account List . | -
| | Quicken displays the Account List window, which also lists all the accounts in your data file. To view an account, click the account name. | HINT Click a Link You can also open an account register by clicking the account name link on the Cash Flow Center page. |
TIP Customize It You can customize where the Account bar is located in your Quicken program window. See Part 1, "Getting Started with Quicken," to learn more about customizing Quicken features. |
Customizing an Account Register 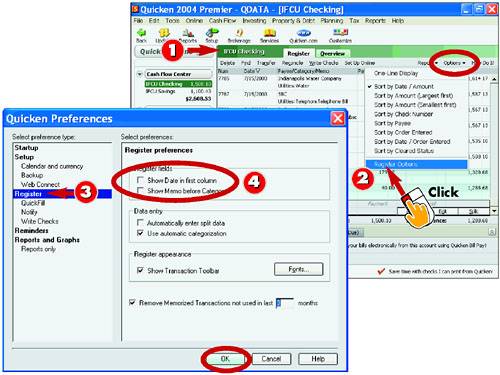 -
| | Open the account register you want to customize. | -
| | Click the Options button and choose Register Options . | -
| | The Quicken Preferences dialog box opens and displays the register preferences. | -
| | Select or deselect the register option you want to change and then click OK to apply the changes. | INTRODUCTION You can customize an account register to change the way that you enter transaction data as well as change the way the data appears. For example, you may prefer to enter the check number first, followed by the date. Or you might want to hide the transaction toolbar. |
Editing Account Details 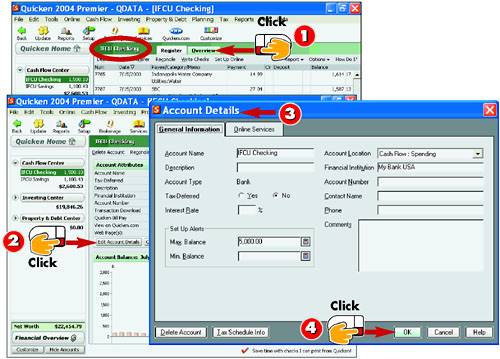 -
| | Open the register for the account you want to change and click the Overview tab. | -
| | Click the Edit Account Details button. | -
| | The Account Details dialog box opens. Edit the account details as needed. | -
| | Click OK to apply the changes. | INTRODUCTION You can make changes to the details of an account, such as changing the name of the account, the account description, or inserting an account number. You may need to change the account details if you switch banks, for example. |
Adding an Account 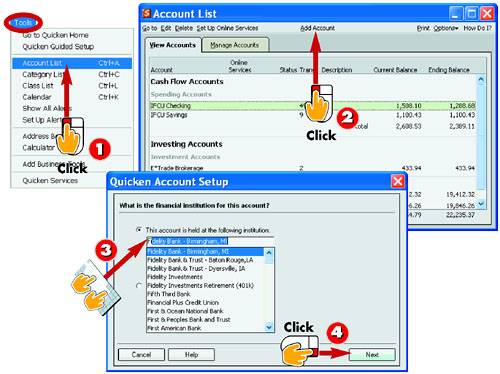 -
| | Click Tools, Account List . | -
| | The Account List window opens. Click the Add Account button. | -
| | Type the name of your bank or select the bank name from the drop-down list that appears when you click in the field. | -
| | Click Next to continue. | INTRODUCTION You can add new accounts to your Quicken data file for other types of financial data you want to track. You can use various methods to add a new account; this task shows you the manual method. Depending on the type of account, the options for setting up the account may vary slightly from the steps shown in this task. |
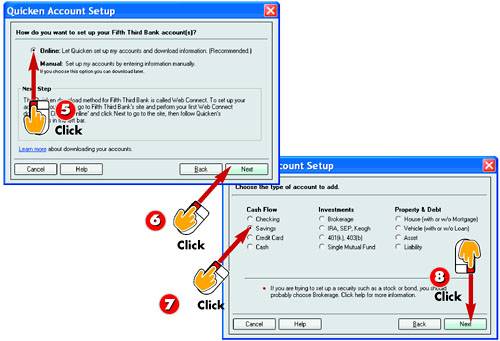 -
| | If your bank offers online options, click the Online option to allow Quicken to set up your checking account; otherwise, choose to set up the account manually. | -
| | Click Next to continue. | -
| | Select the type of account, such as Savings or Cash. | -
| | Click Next to continue. | TIP Need a New File? Quicken adds all new accounts you create to the current QDATA file. If you want to keep another person's financial information completely separate from yours, create another data file, as described in Part 13. |
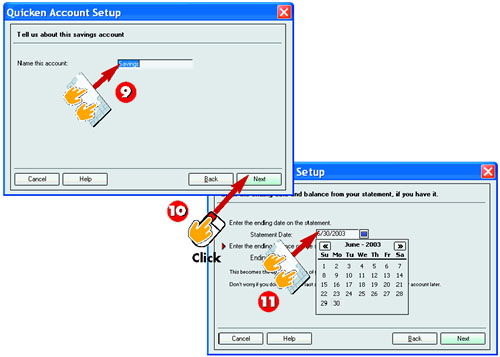 -
| | Type a descriptive name for the account. | -
| | Click Next to continue. | -
| | Using your most recent bank statement, locate the statement ending date and type it into the Statement Date field. You can also click the Calendar icon to select a date. | INTRODUCTION You can create a variety of account types, including checking, savings, credit card, and cash accounts. You can also create accounts to track your investments, property, and debt. For example, you might want to add an additional savings account, a money market account, or an account to track credit card debt. |
 -
| | Type in the statement Ending Balance and then click Next . | -
 | The account is added to the Account List window. | -
| | Click the Minimize button to minimize the Account List window to view the register for the new account. | -
 | The Account List window appears as a button at the bottom of the program window. Click the button to display the list again. | WARNING Remove an Account You can also remove accounts you no longer need to track in Quicken. See the task "Deleting an Account" later in this part to learn more. |
Creating Categories 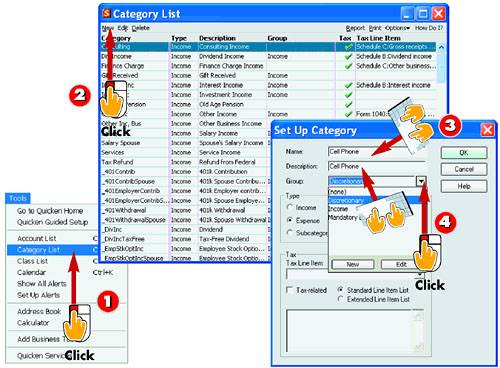 -
| | Click Tools, Category List . | -
| | The Category List window opens. To add a new category, click the New button. | -
| | The Set Up Category dialog box opens. Type in a name and description for your new category. | -
| | Optionally, to select a group for the new category, open the Group drop-down list and click a choice. | INTRODUCTION To help you organize and track your spending, you can assign categories to the transactions that you record in your account registers. You can assign income or expense categories. Income categories include entries such as salary, interest income , and gifts received . Expense categories include entries such as rent, groceries , and utilities . Or you can create a subcategory . A default set of categories is created when you set up a new account, but you can add new categories to suit your own financial tracking needs. |
TIP About Groups Groups classify similar categories and subcategories . Groups are primarily used for budgeting purposes, so assigning a group to a category is optional. |
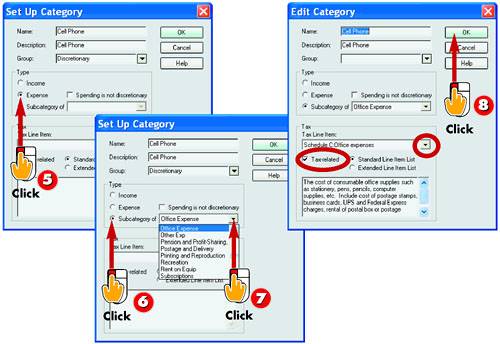 -
| | Click either Income or Expense to identify the category's purpose. Also, if appropriate, check Spending Is Not Discretionary . | -
| | To turn the new category into a subcategory of an existing category, click the Subcategory Of option button. | -
| | Click the down arrow to open the drop-down list, and then select the category. | -
| | For a tax category, check Tax- Related , open the Tax Line Item drop-down list, and select the appropriate tax form. Click OK to finish creating the category. | TIP Subcategories Categories can be broken down into subcategories to define a transaction even further. To create a subcategory, select the Subcategory Of option in the Set Up Category dialog box and choose a main category. |
HINT New Groups To create a new group, click the New button at the bottom of the Group drop-down list and then enter a Group Name in the Create Category Group dialog box and click OK . |
Editing Categories 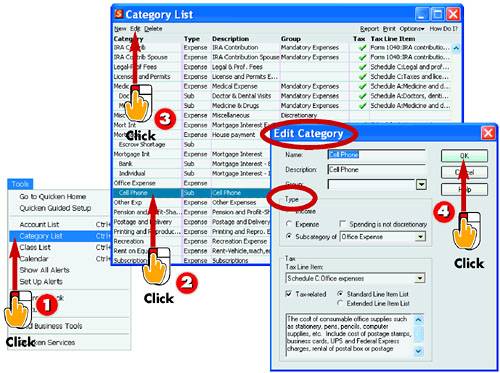 -
| | Click Tools, Category List . | -
| | The Category List window opens. Select the category you want to edit. | -
| | Click the Edit button. | -
| | The Edit Category dialog box opens. You can make changes to the settings as needed. Click OK to apply the changes. | INTRODUCTION You can fine-tune Quicken's categories list to include just the categories you use the most. By default, Quicken sets up a number of predefined categories. You can remove categories you do not need or edit existing categories to suit the way you want to record account information. |
HINT Deleting Is Permanent! If you delete a category you have already used throughout your account register, all transactions that referenced the category will be uncategorized, making them difficult to track for reports . |
 -
| | To remove a category entirely, select the category and click the Delete button. | -
| | The Delete Category dialog box appears. Leave the Delete Category option selected and click OK . | -
| | If you are deleting a subcategory, a different prompt box appears. Click Yes to merge the subcategory with the main category, or click No to delete. | -
| | Quicken removes the category from the list. Click the Close button to close the Category List window. | HINT Watch Out for Subcategories You cannot delete a category that has associated subcategories. You can, however, delete a subcategory. |
TIP I Need That Category! If it turns out you do need a category that you previously removed, you can add it using the steps shown in the previous task. |
Creating Classes  -
| | Click Tools, Class List . | -
| | The Class List window opens. Click the New button. | -
| | The Set Up Class dialog box opens. Type a name and description for the class into the corresponding fields. | INTRODUCTION You can use classes as optional identifiers for your account transactions. If you have an expense or bill that includes more than one identifier, you can set up a class for each. For example, you might have two vehicles in which you pay expenses. You might create a class for your car and your truck. This way, when you record a transaction related to vehicle expenses, you can identify exactly which vehicle the transaction applies to. |
 -
| | Optionally, if you have more than one use for the class name, enter a copy number. | -
| | Click OK . | -
| | Quicken adds the class to the list. | -
| | You can add more classes or click the Close button to close the window. | TIP Copy Number Although optional, the Copy Number setting in the Set Up Class dialog box allows you to separate a class into two or more items. |
HINT Assign a Class Record a transaction as you normally do, and assign a category. With the category field still active, open the Class List window and double-click the class you want to assign. |
Deleting an Account 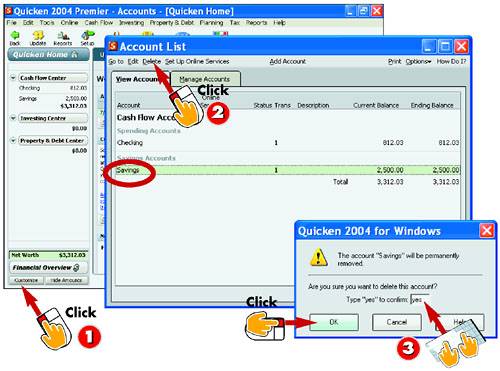 -
| | Click the Customize button at the bottom of the Account bar to open the Account List window. | -
| | Select the account you want to remove and click the Delete button. | -
| | Type Yes and click OK . Quicken removes the account. | INTRODUCTION You can delete an account you no longer use. Just remember, when deleting accounts, all the transactions you recorded in the account's register are permanently removed. |
HINT Menu Method Another way to open the Account List window is to click the Tools menu and click Account List . You can also press Ctrl+A on the keyboard. |
Hiding an Account 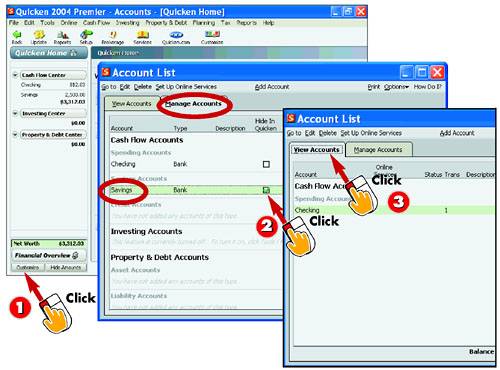 -
| | Click the Customize button at the bottom of the Account bar to open the Account List window. | -
| | Click the Manage Accounts tab, select the account you want to hide, and click the Hide In Quicken check box. | -
| | Click the View Accounts tab to see that the account is no longer listed. | INTRODUCTION You can hide an account so that it is no longer in view in any list in Quicken in which it would normally appear. You might use this feature to hide accounts you no longer use regularly. Unlike deleting an account, hiding it keeps all recorded transactions intact. |
TIP View It Again To view a hidden account in the Account List window, click the Options button and choose View Hidden Accounts . |
|