|  Starting Quicken 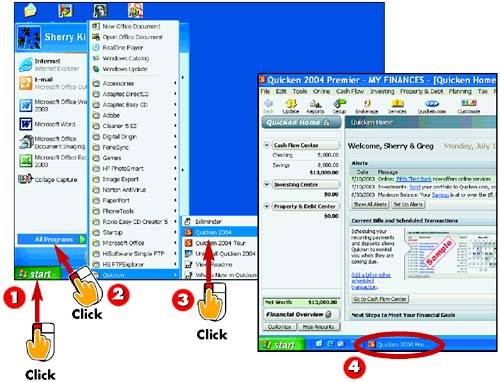 -
 | Click Start . | -
 | Click All Programs . | -
 | Click Quicken , and then click Quicken 2004 . | -
 | Quicken opens and a taskbar button appears on the Windows desktop taskbar. | INTRODUCTION There are several ways to start Quicken. As you get more comfortable you might choose another method, but for now, just start Quicken using the Windows Start menu. |
TIP Starting Your First Account The very first time you open Quicken after installing the software, dialog boxes appear to help you set up your first account. See Part 2 to learn more about setting up your Quicken accounts. |
Exiting Quicken 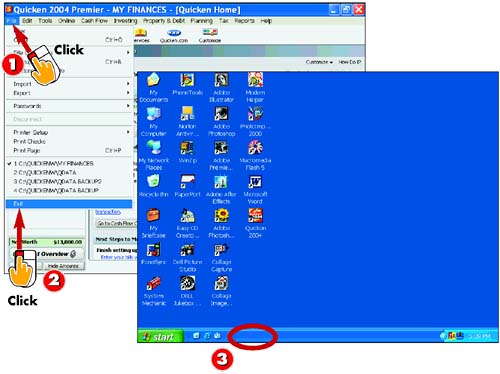 -
| | Click File . | -
| | Click Exit . | -
| | The Quicken window closes and the taskbar button for the program no longer appears on the Windows desktop taskbar. | INTRODUCTION You should close Quicken when you finish working on your accounts. Closing the application frees up system memory. If you leave too many programs open at a time, your computer's processing power slows down. |
TIP Close Shortcut You can also click the Close button located in the upper-right corner of the program window to quickly close Quicken. |
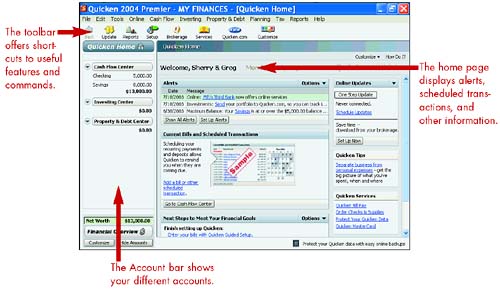
Understanding the Quicken Window 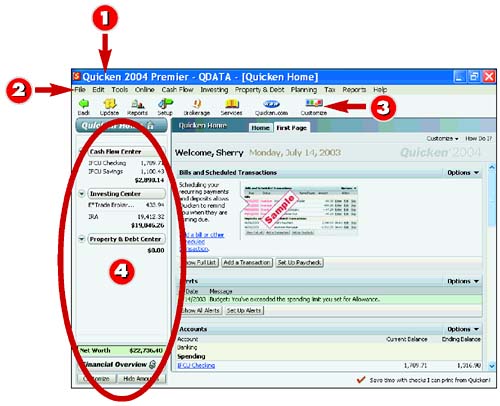 -
| | The title bar displays the name of the program and the name of the current file. | -
| | The menu bar displays menus that list all the commands available in Quicken. | -
| | The toolbar contains buttons for common tasks . | -
| | The Account bar lists each account. | INTRODUCTION The Quicken program window contains several elements ”some of which are unique to Quicken, such as the Account bar and home page. Other elements, such as the menu bar and toolbar, are common among most programs. The various onscreen elements enable you to quickly perform tasks and activate commands. |
TIP Quicken Feature Windows Many features you open in Quicken display in their own windows. Click the window's Minimize button to minimize the window to an icon that sits at the bottom of the Quicken program window. To view the window in full again, click the window name. |
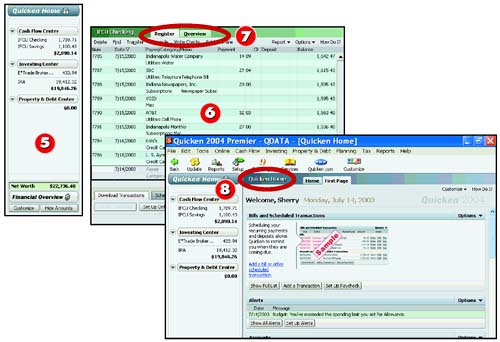 -
 | Quicken groups accounts into centers. You can click a center to see an overview of an account. | -
 | Depending on the account you are viewing, you can use the work area to display account registers and other information. | -
 | Switch between different views by using the tabs at the top of the page. | -
 | By default, the home page is displayed in the work area when you open Quicken; it offers links to frequently used features. | TIP Customize It The Quicken Home page appears whenever you open Quicken, but you can customize which window you see at startup. See the task "Setting Up Preferences" later in this chapter to learn more. |
TIP Your Window May Look Different Depending on your monitor's screen resolution setting, the arrangement of Quicken program elements on your computer may differ from those shown in this book. If you share your computer with other users, various features may be turned on or off by someone else. |
Working with Menus and Toolbars 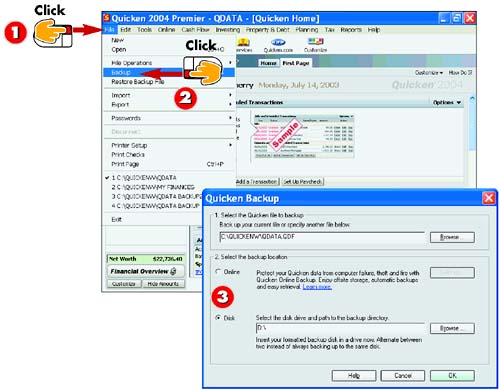 -
| | To view a menu, click the menu name. The menu drops down from the menu bar to reveal a list of commands. | -
| | To activate a command, click the command name. | -
| | Selecting a command sometimes involves selecting additional options from a separate dialog box. | INTRODUCTION Use Quicken's menus and toolbars to activate commands and tasks. The menu bar groups related commands and tasks under menu names . For example, the File menu includes commands to help you work with Quicken files. Toolbars contain clickable shortcuts to common features. |
TIP Keyboard Commands You can also use the keyboard to activate menu commands in Quicken. Press the Alt key along with the underlined letter of the menu to open the menu onscreen. Then press the corresponding underlined letter shown in the command name to activate a particular command. |
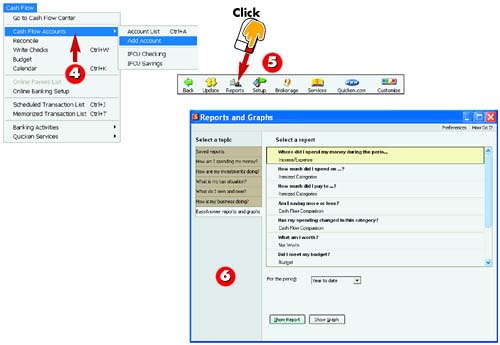 -
| | Some commands reveal an additional submenu of commands. Move the mouse pointer over the command to view a submenu. | -
| | To activate a toolbar command, click a toolbar button. | -
| | Quicken carries out the command, which may involve opening a new window. | TIP Shortcut Keys Look for various shortcut keys throughout the Quicken menus. Shortcut keys appear next to the command names and enable you to activate the feature without using a menu. |
TIP Shortcut Menus You can also right-click over various features in Quicken to display a pop-up or shortcut menu that lists commands related to the task at hand. |
Setting Up Preferences 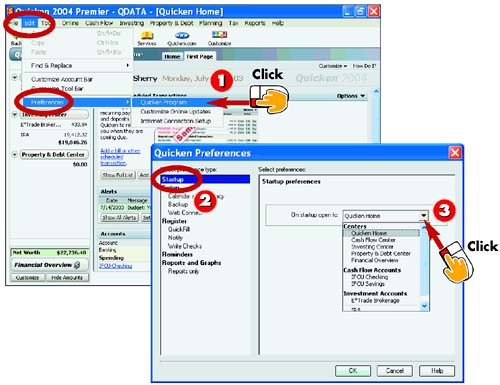 -
| | Click Edit, Preferences, Quicken Program . | -
| | The Quicken Preferences dialog box opens. The Startup preference is selected by default. | -
| | Click the drop-down arrow and select which window you want to view in the work area at startup. | INTRODUCTION The Quicken Preferences dialog box is used to customize how Quicken runs on your computer. You can use the Quicken Preferences dialog box to change which window appears at startup, turn off Quicken sounds, set reminders for backing up data, control how account registers are displayed, and more. |
TIP Can the Account Bar Be Closed? No. The Account bar is always onscreen; however, using the Setup preferences, you can choose on which side of the screen it appears. |
 -
| | Click another preference to customize. | -
| | Related customizing options appear. You can change an option as needed. In this example, the Setup Preferences appear. | -
| | You can continue selecting different preferences and editing the options. | -
| | When finished, click OK to close the dialog box and apply the new settings. | TIP Customize Online Updates Click Edit, Preferences, Customize Online Updates to open the Customize Online Updates dialog box, where you can customize the way in which online updates work in Quicken. |
TIP Change Your Online Connection If you ever need to change the way in which Quicken connects to the Internet and your online accounts, open the guided Internet Connection Setup Wizard. Click Edit, Preferences, Internet . |
Customizing the Quicken Home Page 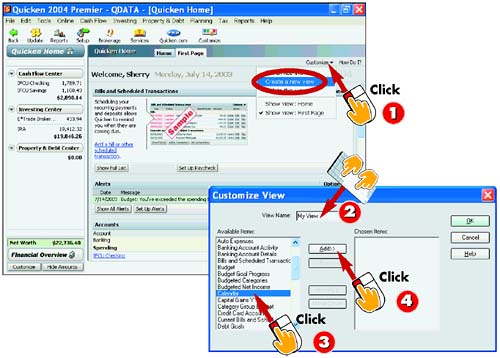 -
| | Click the Customize button on the home page, and then click Create a New View . | -
| | The Customize View dialog box opens. Type a name for the new view. | -
| | Select the feature you want to add to the new view. | -
| | Click the Add button. | INTRODUCTION The Quicken Home page offers you quick access to alerts, current bills and scheduled transactions, online updates, and more. Although you cannot edit the default home page, you can create a new view of the page and customize it to show only the features you use the most. Each view appears as a tab at the top of the work area. |
TIP Rearrange the Items With the Customize View dialog box open, you can use the Move Up and Move Down buttons to change the order in which items appear in the view. |
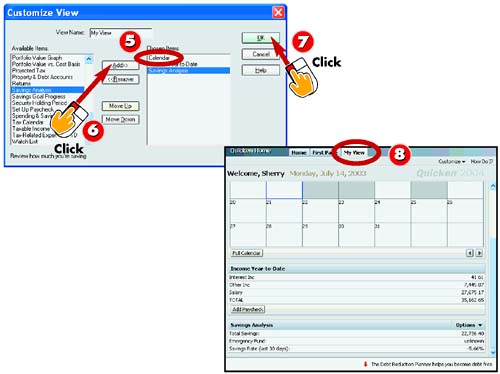 -
| | The item is added to the new view. | -
| | Repeat steps 3 and 4 to add more items to the view. | -
| | Click OK when finished. | -
| | Quicken creates the new view and displays a tab for the view at the top of the work area. | TIP Remove an Item To remove an item you no longer need, reopen the Customize View dialog box, select the item from the Chosen Items list and click the Remove button. |
TIP Remove a View To delete a view you no longer need, click the View tab to display the view, and then click the Customize button and select Delete This View . Click Yes to confirm the deletion, and the view is removed. |
Finding Help 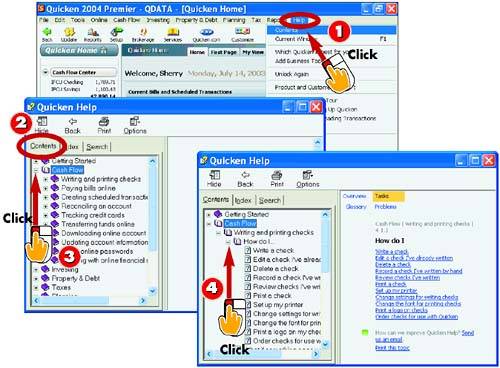 -
| | Click Help, Contents . | -
| | The Help window opens and displays the Contents tab. | -
| | Click a Help category to expand the list of topics. | -
| | Continue expanding the category until all the topics are listed. | INTRODUCTION From time to time, you may find yourself needing some additional help with the Quicken program. Quicken offers several ways you can look up information about a particular task or feature. For example, the Help menu lists a variety of features you can tap into to find assistance. |
TIP Find Help on the Web Click Help, Product and Customer Support to open the Product and Customer Support window. Click the Quicken Technical Support Home Page link to open your Web browser and view the Intuit Web site for additional help. You must be logged on to your Internet account to access this site. |
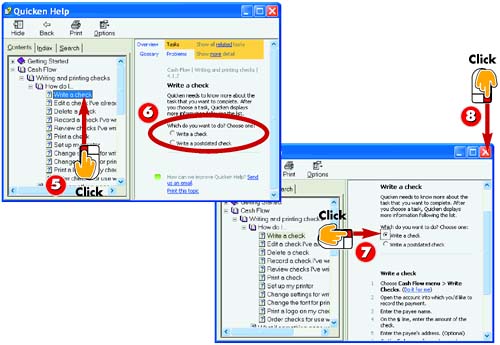 -
| | Click a topic. | -
| | Information on the topic appears in the right pane of the Help window. | -
| | Some topics include additional information. Simply click the option you want to read more about. | -
| | Click the Close button to exit the Help window and return to Quicken. | TIP Help at Hand Numerous Quicken features include a button for directly accessing help related to the topic at hand. Click the How Do I? button to quickly open the Help window to topics related to your current task. |
TIP Conduct a Search To look up a specific topic, click the Search tab in the Help window and type in the keyword or words you want to search for. Click the List Topics button and Quicken generates a list of possible matches you can search through. |
|