Section 67. About Keyframing
67. About Keyframing
68 About the Properties Panel
47 Add an Audio Transition 69 Add Motion to a Still 70 Pan and Zoom Still Images a la Ken Burns 73 Control Volume at Specific Points Although audio and video effects can also be controlled right on the Timeline, most of the time you will be doing your keyframing on the clip timeline in the Properties panel.
Keyframing The method used by Premiere Elements (as well as Premiere Pro and After Effects) for creating motion paths and transitioning effects. Points representing precise settings for effects or positions are placed on the Timeline, and the program automatically creates a movement or transition between those points. Whenever you select a clip on the main Timeline, all the applied audio and video effects, as well as any keyframing, are revealed in the Properties panel. (In fact, there is a wealth of tools, adjustments, and settings available in this panel, and they're discussed in even greater detail in 68 About the Properties Panel.) Keyframe points are set on the Properties timeline. 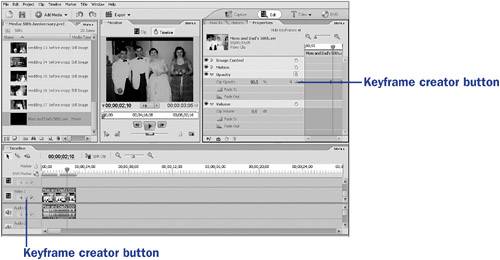 Select a clip on the main Timeline and look at the Properties panel. A list of properties appears in this panel by default for every clip or graphic. And, as you add effects, they are also added to the list. You'll also notice a stopwatch icon to the right of each property. This is the button you use to begin keyframing a movement or effect.
After you add keyframes to any property or effect, the stopwatch icon to the right of that property or effect shows a second hand. This indicates that specific, changing settings to the clip or still are linked to various keyframe points. Until keyframes are activated for a property or effect by clicking this stopwatch icon, any change in these settings applies to the entire clip or for the duration of a graphic. After you begin keyframing, keyframe points are added automatically to the Properties timeline whenever you reposition the CTI and change a setting. See 69 Add Motion to a Still for more information. On either side of the keyframe creator buttons (the little diamonds to the right of each property detail such as Scale, Position, and Rotation to which keyframes can be applied) on both the main Timeline and the Properties timeline are arrows pointing left and right. Click these arrows to jump to the previous or next keyframe point. After you jump to a keyframe point, you can tweak or adjust that point's settings. Also note the Properties panel timeline area to the right of the properties. (If you don't see it, click the Show Keyframes button at the top of the panel.) Like the main Timeline panel, this keyframe area contains a Properties timeline and a current time indicator, or CTI, that tracks along the clip as it plays, just as the main CTI tracks along your video project as it plays. In fact, if you move one CTI, the other also moves. Now click the triangles to the left of each property in the Properties panel to view the details for each of these settings.
All clips and graphics, by default, show the Image Control, Motion, Opacity, and Volume properties, as applicable. (An audio clip, of course, shows only audio properties, and a still photo does not show any audio properties.) As you add effects to your clip, these effects and their controls are also added to the Properties panel for that clip. Under the Opacity property, click the automatic Fade In button. Two small, diamond-shaped points appear on the Properties timeline to the right of this control. These are keyframes, and, as a result of your clicking the Fade In button, they appear one second apart on the Properties timeline at the beginning of the clip. Drag your CTI from the first to the second of these keyframe points and watch the Monitor: The clip's opacity goes from 0% at the first keyframe to 100% at the second keyframea fade in from black. The Fade In effect is therefore a keyframed effectthe length of the effect is controlled by the keyframe points on the Properties timeline.
Because the Fade In and Fade Out Opacity effects affect the clip's transparency, the effect is a fade in from or fade out to black only if there is no clip on a video layer below the affected clip. Otherwise, the Fade In or Fade Out effect appears to dissolve in or out of the clip on the layer below. Suppose that you've previewed your project and, for whatever reason, you don't feel your clip is fading in fast enough. How might you speed up the effect? If you slide the second keyframe point to the left, closer to the first point, the transition happens more quickly. Move it half the distance, and the clip fades in at twice the speed. Drag the second keyframe point to the right to lengthen the transition time. And that's basically all there is to keyframing. Just think in terms of time and effects settings. Keyframe points closer together result in faster transitions or motions; keyframe points farther apart result in slower transitions. By clicking the arrows to the right or left of the keyframe creator button (the little diamond), you can jump back or forward to a keyframe point and change the settings of the property to which it applies. If you don't like the results and you want to remove the setting completely, you can right-click the keyframe point and select Clear from the context menu to delete the point completely. Keyframing is used extensively throughout this book because it is the principle system Premiere Elements uses for coordinating movement and effects. You'll also find a simple demonstration of its use in creating movement in 69 Add Motion to a Still and an even more detailed explanation of a very popular use in 70 Pan and Zoom Still Images a la Ken Burns. Keyframes can be used with all but a few effects to control virtually any transition or movement. When you become comfortable with the interface, it will be hard to imagine a simpler or more intuitive tool for customizing and revising effects. |
 BEFORE YOU BEGIN
 SEE ALSO
 KEY TERM
EAN: 2147483647
Pages: 199