Section 57. Add an Interactive Marker
57. Add an Interactive Marker
27 Change Slides to the Beat of Music 29 About the Timeline and Video Tracks 33 Add or Move a Clip on the Timeline
107 Output a Windows Media (WMV) File 109 Output a QuickTime File 57. Add an Interactive Marker 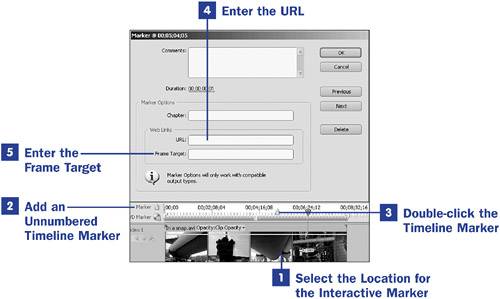 If you are a web master or just want to make your own website a little more interesting, the interactive markers might be just the thing. You can place markers in your video that, when displayed on a web page, will trigger various other events, such as opening a web page.
Interactive marker Marks a point in a video where an event should take place, such as opening a specified web page. If the website includes frames, your video can play in one frame while the events it triggers play in other frames. Suppose that you are selling various digital products; your main video is an introduction to your store. At points in the video where you mention particular products, you can open the manufacturers' websites in another frame. You could also have images of the equipment open, in different frames, at preselected points in the video. If the website does not include frames, the marker causes the viewer to jump from the site where the video is being viewed to the site defined by the marker. Markers can work well for a website intro that, when it finishes playing, automatically sends the user to the site's home page. You can also have a link to Skip Intro for the viewer's convenience.
|
 BEFORE YOU BEGIN
 SEE ALSO
 KEY TERM
EAN: 2147483647
Pages: 199
- ERP System Acquisition: A Process Model and Results From an Austrian Survey
- The Second Wave ERP Market: An Australian Viewpoint
- The Effects of an Enterprise Resource Planning System (ERP) Implementation on Job Characteristics – A Study using the Hackman and Oldham Job Characteristics Model
- A Hybrid Clustering Technique to Improve Patient Data Quality
- Relevance and Micro-Relevance for the Professional as Determinants of IT-Diffusion and IT-Use in Healthcare