51. Make a Clip Semi-Transparent  BEFORE YOU BEGIN BEFORE YOU BEGIN
30 Add, Delete, and Size Tracks 31 Set Video and Audio Track Display 33 Add or Move a Clip on the Timeline 43 About Rendering the Timeline
 SEE ALSO SEE ALSO
72 Control a Video Track's Opacity over Time 97 Create a Title Overlay for Your Video
Opacity is the opposite of transparency. So when we talk about a clip's opacity, we are talking about how transparent it is. There are many reasons for making a clip semi-transparent: You can lower the opacity of a clip to create a ghost-type effect or to allow clips on tracks below the current track to become visible. This task explains the quick and easy way to change the opacity of an entire clip. 1. | Select a Clip in the Timeline
Make sure you have one clip on video track 1 and another clip on video track 2, directly above the track 1 clip. Click any clip in the Timeline to select it. Zoom in to the clip so you can see the individual frames in the clip.
51. Make a Clip Semi-Transparent 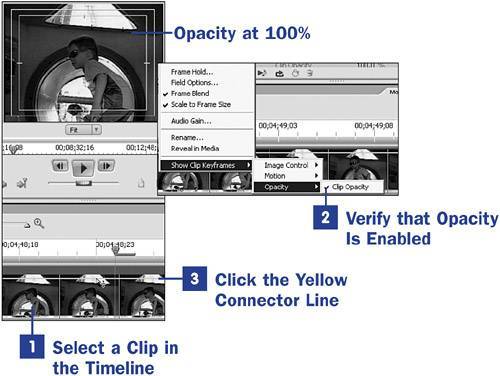 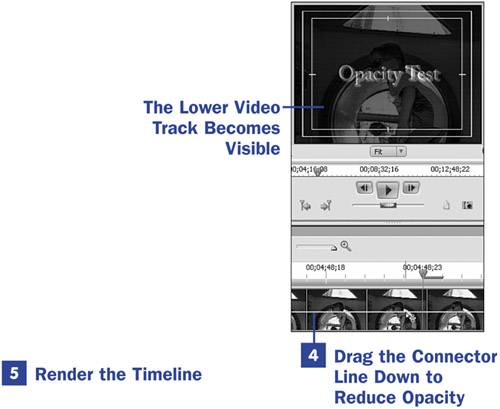
| 2. | Verify that Opacity Is Enabled
At the top of the selected clip you will see a yellow line; this line is the Keyframe Connector. Use this line to adjust the opacity of the clip. To ensure that the Opacity feature of the Keyframe Connector is enabled, right-click the clip to open the context menu. Select Show Clip Keyframes, Opacity and make sure that there is a check mark in front of the Clip Opacity option. This option specifies that the yellow connector will be used to control the opacity of the clip.
| 3. | Click the Yellow Connector Line
When the yellow connector line is at the top of the frame, the frame is showing at 100% opacity (that is, it has no transparency). To adjust the clip's opacity, click and hold the mouse pointer on the yellow connector line.
| 4. | Drag the Connector Line Down to Reduce Opacity
Drag the line down about half way, decreasing the opacity of the selected clip to 50%. You can set the opacity at whatever percent you desire. Notice that you do not see the opacity of the clip change in the Monitor panel until you release the mouse button. By lowering the opacity, you are making the lower clip (in this case, a title) visible. The lower the opacity of the track 2 clip, the more visible the clip on the lower track becomes.
| 5. | Render the Timeline
After changing the opacity of a clip, you should render that area of your Timeline. To do so, press Enter.
|
|