29. About the Timeline and Video Tracks  BEFORE YOU BEGIN BEFORE YOU BEGIN
4 About Video Capture 13 About the Media Panel 14 Add Media with the Adobe Media Downloader
Take a good look at the following figure; you will become very familiar with every feature, every nook and cranny, of this screen. This is the most important area of video editing; it is where you will set your movie apart from the rest.
The Premiere Elements Timeline panel. 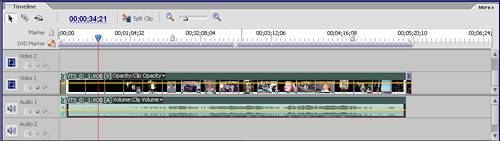  NOTE NOTE
To make viewing the Timeline a little easier for the following tasks, resize it to get a larger view. See 2 Customize Your Workspaces for details.
For this tour, the Timeline is split into three sections. Each section describes a number of features and menus. In the following tasks and chapters, you will use many of these features. The sections start on the left, where the tools and tracks are located; move on to the More button; and finish up in the middle work area. This is a brief tour; most of what you see here will be explained in detail in upcoming tasks. The left side of the Timeline contains some basic tools and the labels for the various tracks you can incorporate in your movie: KEY TERM Track The layers of audio or video clips on the Timeline.
Select tool Use this tool to select from available itemspanels, clips, menus, and so on. Some items might not be available if you have not clicked the Select tool first.
The left side of the Timeline. 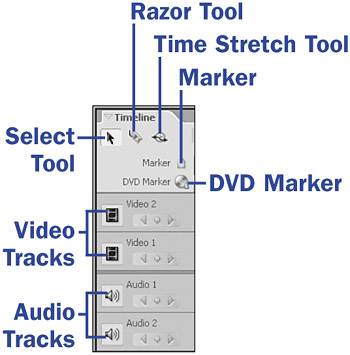
Razor tool This tool is used to cut an audio or video clip at any point. See 37 Remove a Section of a Clip for additional details. Time Stretch tool Select this tool to slow down or speed up your clips. See 40 Slow/Speed/Reverse Audio/Video for more information. Marker Clicking the Marker icon sets an unnumbered Timeline marker at the current CTI position. DVD marker Clicking the DVD Marker icon brings up the DVD Marker dialog box that allows you to set various options, including the type of DVD marker. You can also set the DVD marker at the current CTI position. Video tracks Video tracks are located below the DVD Marker icon. This is where you place the video clips from the Media panel. Audio tracks Audio tracks are located below the video tracks. This is where you place audio clips from the Media panel.
NOTE Right-click in the video or audio track control column area (the left end of the track area) to display a context menu that enables you to rename the current track, add unlimited numbers of new tracks, or delete empty tracks.
The More button (in the upper-right corner of the Timeline panel) provides additional options for the Timeline: Track Size This menu option has a submenu that includes a selection for the size of the video and audio track display. Read more about these options in 30 Add, Delete, and Size Tracks. Add Tracks This menu option performs the same function as the Add Tracks item in the track context menu. Delete Empty Tracks This menu option performs the same function as the Delete Empty Tracks item in the track context menu. Snap The Snap option is an important aid when moving clips on the Timeline. With the Snap function checked, you can move a clip on the Timeline and it snaps into place next to another clip when you drag it close to the other clip. With the Snap function unchecked, you can manually place the clip at any point on the Timeline. If you want your clips to automatically snap into position adjacent to another clip, use the Snap option. If you want to manually place a clip at a particular spot on the Timeline, not adjacent to another clip, uncheck this option.
TIP Having the Snap option enabled might cause problems if you are trying to overlay one clip with another. If you are planning to overlay, turn off the Snap function.
The main center portion of the Timeline is where you will do most of your work: Current CTI Position Indicator The time indicated to the left of the Split Clip button is the CTI time position on the Timeline. The time is listed in Hours: Minutes: Seconds: Frames format. The beginning of the Timeline is 00:00:00:00 and can extend to a time of 99:59:59:29 (99 hours, 59 minutes, 59 seconds, and 29 frames). That would be one long movie!
The Timeline work area. 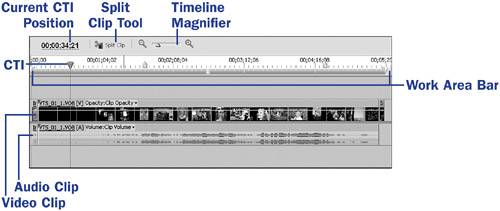 Split Clip tool This tool does just what it sayssplits a clip. This tool, unlike the Razor tool, splits the clip at the CTI position only. It is represented by an icon of a pair of scissors cutting a piece of film, just like they used to do it in the good old days. For more details on the Split Clip tool, see 36 Split a Clip. Timeline Magnifier Equipped with a + magnifying glass, a magnifying glass, and a slider, the magnifier tool can zoom in or out on the Timeline. You can go from a view of the entire Timeline to a view of just a few frames. As you work, you will do a lot of zooming in and out. Zoom in for fine edits, and zoom out to get a picture of your whole project. CTI The Current Time Indicator helps you keep track of where you are on the Timeline. When using the Split Clip tool, the clip is split at the position of the CTI. Work Area Bar The bar above the video and audio clips is known as the work area bar. This designates the working area of your project. The work area includes the video and audio tracksand the clips in themdirectly below the work area bar and is defined by the beginning and end of this bar. To learn more about the work area bar and its function, see 32 Define the Beginning and End of Your Project. Right-click in the work area or on a clip in the Timeline to display the work area context menu. This menu includes additional options for working with clips on the Timeline and their properties.
|