21. Grab a Still from Video  BEFORE YOU BEGIN BEFORE YOU BEGIN
4 About Video Capture 14 Add Media with the Adobe Media Downloader 19 Trim Clips in the Media Panel 20 About the Monitor Panel
 SEE ALSO SEE ALSO
23 Scale and Position a Still 116 Customize an Image as a Chapter Icon 118 Customize a Menu with Any Background
Eventually, you will look at captured video and decide it would be nice to grab a still image from the video footage. Sometimes you get a great shot with your camcorder and wish you would have used a camera. These great shots can be exported as still images with Premiere Elements in a few simple steps. The stills you capture from your video footage can be added to your project automatically and also saved to your hard drive.  NOTE NOTE
The still is saved as an interlaced 720480 pixel image in the format you select in step 4. The quality of video stills is a bit low for printingalthough a 4"6" photo print might be satisfactory. The resolution of the extracted still image also depends on the source of the clip (analog video from a VHS tape or video from a DV camcorder). If you want to print your still image, you might have to de-interlace it in Premiere Elements (as explained in 49 Control Interlacing and Field Options) or with photo-editing software such as Photoshop Elements. If you use the image in your project and burn it to a DVD, the interlaced image will look just fine when viewed on a TV screen. For computer viewing, just as with printing, the still image must be de-interlaced to get a clearer image.
1. | Place a Clip in the Monitor View
Select the clip from which you want to grab the still image. You can select a clip from the Media panel or one from the Timeline. Select the clip and click the Clip View button at the top of the Monitor, or simply double-click the clip. The clip appears in the Monitor view. Scrub through the clip to locate that one frame that is a keeper by using the VCR and shuttle controls. When the image you want to grab appears in the Monitor view, continue with step 2.
| 2. | Click the Export Frame Button
The image you see in the Monitor view is the image that will become your still. To grab this still, click the Export Frame button (the camera icon). The Export Frame dialog box appears.
21. Grab a Still from Video 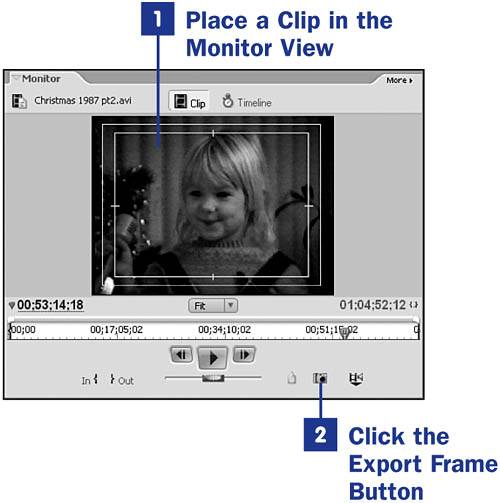
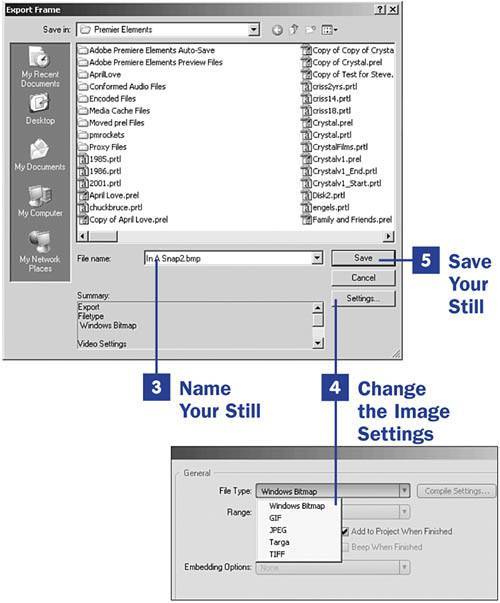
TIP Your video is a mass of frames; 30 frames per second to be exact. With 30 frames per second to choose from, there must be one that is "just right." Use the Step Forward and Step Back buttons in the VCR controls to move the clip one frame at a time until you find just the right one. | 3. | Name Your Still
Decide on a name for your clip and type it in the File name text box. You can also select the directory where you would like the image to be placed from the Save in drop-down list at the top of the dialog box.
| 4. | Change the Image Settings
Click the Settings button to open the Export Frame Settings dialog box. From the File Type drop-down list, select the format in which you want to save the still image: Windows Bitmap, GIF, JPEG, Targa, or TIFF. Depending on your selection, other options become available.
TIP If you save your image as a GIF, you will have the option of a transparent background. However, many videographers choose the TIFF format because it has less compression and holds its quality better after editing and copying. | 5. | Save Your Still
After you have made any desired changes in the Export Frame Settings dialog box, click the OK button and click the Save button in the Export Frame dialog box. Now your still image is preserved on your hard drive for this project (and possibly for future projects) as well as being added to the Media panel for this project.
|
TIP Still images grabbed from video clips and used in your project make great backgrounds for titles and DVD menus.
|