Section 12. About Troubleshooting Capture Problems
12. About Troubleshooting Capture ProblemsCapture is a vital part of a video editor's workflow. And there are few things as frustrating as not being able to start a project because you can't get your video into your computer. Unfortunately, capture, along with its companion process of output to tape, is one of the processes most prone to technical challengessome are related to the amount of power it demands and some are related to the way the operating system's drivers conflict or corrupt as they are affected by other programs installed on your computer. If you're experiencing challenges connecting your camcorder to Premiere Elements or capturing to the program, here are some troubleshooting suggestions. Your Camcorder Won't Connect to WindowsIf a connection is being made between your camcorder and computer, you'll hear a tone or sound of some sort from your computer registering the connection. Your camcorder will also appear as an icon on the right side of the taskbar at the bottom of the screen. If your computer isn't registering your connection, a closer look at your system can yield some clues as to why not. With your camcorder plugged in to your computer and turned on, right-click the My Computer icon on your desktop, select Properties from the context menu, click the Hardware tab at the top of the System Properties dialog box, and click the Device Manager button to open the Device Manager dialog box. Under the Imaging Devices category, you should see your camcorder listed. The Windows Device Manager lists your camcorder. 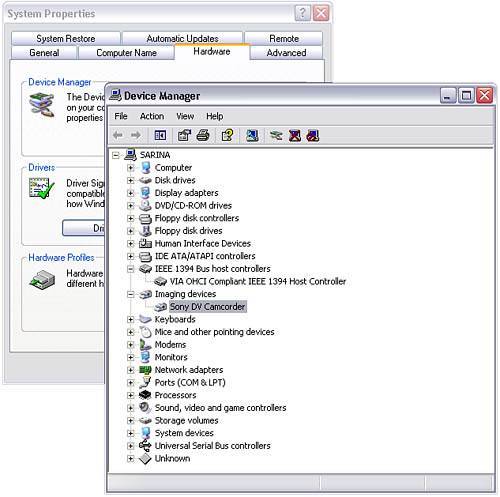 If your device does not appear, you are not making a proper connectionquite possibly the result of a defective or improperly installed USB, USB Video Class 1.0 or IEEE-1394 (FireWire) device. If an unfamiliar driver name appears, your capture driver might have been overwritten or customized by another piece of capture software. If you suspect that your drivers might be corrupted, there's an undocumented method for refreshing your drivers that, at the very least, won't do your computer or your operating system any harm. With your device connected and turned on, right-click on your device's listing in the Imaging Devices section of the Device Manager listing and select Uninstall. Your device listing temporarily disappears; a few moments later, Windows recognizes your device and installs fresh drivers for it. (If your camcorder or digitizing device came with a CD of its own driver software, be sure to install that software before refreshing your drivers. The hardware's website might provide even more recent driver updates.) If you are connecting your computer and camcorder using FireWire, check under the listing for IEEE-1394 Bus Host Controller to ensure that it is listed as an OHCI-Compliant IEEE-1394 Host Controller. Only OHCI-compliant IEEE-1394 FireWire units can be guaranteed to work with Premiere Elements.
USB Video Class 1.0 connections require Windows XP with Service Pack 2. Windows is only as good as the drivers it has in its library. Keep your drivers updated by installing any driver software that came with your camcorder or other digitizing device and regularly check the product's website for updates. Your Camcorder Connects to Windows but Premiere Elements Doesn't Show It As ConnectedUnfortunately, programs installed on your computer don't like to share. Video-editing programs are particularly greedy, each one vying for control over your video capture driver. If you have more than one video-editing program installed on your computer (particularly if you're running another version of Adobe Premiere), you might be experiencing a conflict. In most cases, the most recently installed editing program takes control of the capture drivers. However, sometimes the simple act of opening another editing program transfers control of those drivers back to the other editing program.
Unlike most video-editing programs, Windows MovieMaker seems to freely share capture drivers with other editing programs and virtually never causes a programming conflict. In fact, a good test to find out whether Windows is connecting to your camcorder is to attempt to capture your video in MovieMaker. Running a version of Adobe Premiere, especially an older version, on the same computer as you're running Premiere Elements has been known to cause capture problems. It's best to uninstall all but your current or preferred version of the software. If this seems to be your situation, try re-installing Premiere Elements. You can also try re-installing Premiere Elements without uninstalling it, which will give you the option of running the repair utility. If this doesn't solve your problem, you might have to uninstall the conflicting program(s), refresh your drivers (as described in the preceding section), and re-install Premiere Elements as your only DV-AVI editing program. It might also be worth your while to make sure that all is well in your Device Manager, as described in "Your Camcorder Won't Connect to Windows" earlier in this task. Also refer to the "You Can't Control Your Camcorder in Premiere Elements" section, later in this task. Your Digitizing Device Doesn't Operate with Premiere ElementsMost third-party digitizing devices, particularly those sold to capture footage for export directly to DVDs, do not capture directly into Premiere Elements. These devices usually come with proprietary software and work ideally with that software. In most cases, the files (usually MPEGs) produced by these devices can then be imported into Premiere Elements using the Media Downloader. However, only digitizing devices capable of saving video as DV-AVIs capture directly into Premiere Elements. (See 8 Capture Analog Video.) On the other hand, many USB-connected digitizing devices work with the Media Downloader. (See 14 Add Media with the Adobe Media Downloader.) To ensure your device is properly set up in Premiere Elements, see the following section. You Can't Control Your Camcorder from Premiere ElementsOnly camcorders connected directly to Premiere Elements by a FireWire or USB Video Class 1.0 connection can be controlled by the program. If your camcorder is connected to Windows but you aren't making a proper connection with Premiere Elements, go to the Capture workspace (click the Capture button in the upper-right corner of any workspace) and, in the Monitor panel, click the More button and select Device Control. Check the Devices drop-down menu to make sure that your connection method (DV/HDV Device Control or USB Video Class 1.0 - Device Control) is selected. If so, click the Options button to open the Options dialog box. From the Device Brand drop-down list, choose your camcorder or digitizing device. If the specific brand is not listed, select Generic. Then open the Device Type drop-down list and, if available, choose the model number of your device. If you are using Generic or Alternative drivers, you might have to experiment with different settings from this second menu. Check the Device Control page of the Premiere Elements Preferences dialog box to make sure that the correct capture device is selected. 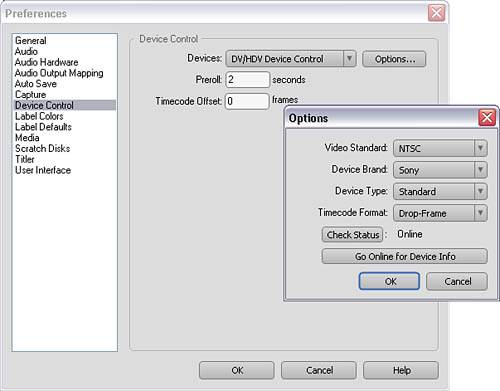 If your device is turned on, Windows is registering it as being connected, but its status in this menu is still listed as Offline, click the Check Status button. If your device is still listed as being Offline, check to ensure that you have a proper connection as described in "Your Camcorder Won't Connect to Windows," earlier in this task. Premiere Elements Doesn't Break Your Footage into Clips During CapturePremiere Elements breaks your captured footage into clips based on points at which your camcorder was paused during recording. It is a time codebased process, and only works with DV that was captured using a FireWire or USB Video Class 1.0 connection. Capture options in the Premiere Elements Preferences dialog box.
In the Capture Monitor panel, click the More button and ensure that the Scene Detect option is enabled. Capture Continually AbortsYour capture aborts for one of three reasons: The data flow cannot be sustained, a process has interrupted the data flow, or Premiere Elements believes you are dropping frames. Your system might not be able to sustain the necessary data flow for video capture for a variety of reasons, all related to hardware. If your hard drive is too full (if it has less than 1020GB of free space, for instance), the program has likely run out of space to write its relatively large video files. If this is the case, you might have to clear considerable data off your hard drive or add a larger drive for your captures. (See the "You Receive a Disk Full Error" section, later in this task.) Processes interrupting your data flow can be more challenging. Most new computers can handle the intensive data flow required for video capture. However, computers operating at less than 2GHz or without enough RAM might find background processes and even spyware choking their captures. Some recommendations for streamlining this process are listed in 4 About Video Capture. Your capture might also abort because of an indication of dropped frames. To override this, use the steps described in the following section. Capture Continually Shows Dropped Frames WarningDropped frames can occur when a process or some other stoppage interrupts your capture. But you can also get a dropped frames warning when the program just can't quite figure out what's going on with your capture. These warnings are quite common when you're trying to capture analog video using a passthrough or DV bridge (See 8 Capture Analog Video). They don't always mean, however, that your captured video will be unusable. Play back your captured video (see 11 View Captured Clips). If you find that the video is full of dropped frames and is unacceptable in terms of quality, you might want to turn off some background processes and/or increase your hardware resources (see 4 About Video Capture). If you find that your captured video looks acceptable despite these warnings, you can turn off the dropped frame warning by clicking the More button in the Capture Monitor panel and selecting Device Control. In the Preferences dialog box that opens, click the Capture category in the list on the left side and disable both the Abort Capture on Dropped Frames and Report Dropped Frames options. You Cannot Capture to an Internally Installed Second Hard DriveA second drive, one dedicated to your video files, can greatly improve your performance, especially during capture and output to tape. But if you're continually finding your captures aborted or if your captured files look corrupted, your drive is likely set up improperly. There is some debate about whether it is better to install your second hard drive as a slave channel with your C drive as the master, or whether you should install your second drive as the master on a second channel with your DVD burner as the slave. In our experience, either is acceptable and both should provide for an easy data flow during capture and output to tape. Of greater importance is that your second drive is properly installed in your BIOS. In most cases in which capture to a second internal drive is problematic, an improper installation in the BIOS is the problem. When you first boot up your computer, follow the instructions at your logo screen, before Windows starts up, to access your BIOS setup. (Usually you press the Esc or F1 key.) If your drives are set up properly, you should see them listed as drives in this setup area. Otherwise, follow the necessary steps to set up your hardware. Remember that your hardware must be set up hereregardless of whether it is set up in your operating systemfor it to function properly. You Cannot Capture to an External Hard DriveThe challenges of capturing to an externally connected drive usually have to do with the limitations of the connection. An external drive that is connected to your computer with a FireWire connection might have problems maintaining the data flow of a video capture because it is sharing the line with your camcorder's incoming video data. This is definitely the case if you are using a router of some sort so you can have both devices attached to the same FireWire card at the same time. As a rule, it's not a good idea to have both your camcorder and an external drive attached to your computer by FireWire. You might be able to capture your camcorder's video over a FireWire connection to an external drive connected to your computer by USB 2.0. A USB 1.0 connection for your external drive, however, is not able to handle the necessary throughput to accept video files as they are being captured. You Receive a Disk Full ErrorAlthough you might believe you still have room on your hard drive, it's techni-cally impossible to literally fill a disk. Your operating system and other programs are continually writing temporary files to and reading temporary files from your disk. And huge files, such as video captures, often require large, contiguous blocks of space. Try to keep at least 1020GB of space available on your hard drive to ensure smooth operation of your system. (Encoding for DVD output can require much, much more. See 124 About Troubleshooting DVD Output.) In short, the less free space you have on your hard drive, the more likely you are to run into processing errors. If you find the free space on your disk getting a bit lean, move or delete some of your files to make more room or install a larger hard drive. Giving your programs and your operating system lots of breathing room, especially when working with extremely large files, will definitely save you a lot of heartache in the long run. |
 NOTES
NOTES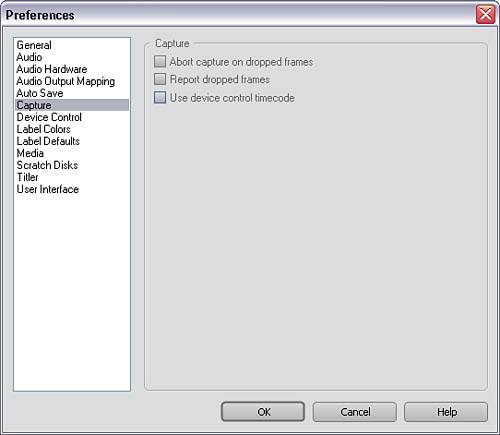
EAN: 2147483647
Pages: 199