121. Add Audio to a Menu  BEFORE YOU BEGIN BEFORE YOU BEGIN
111 About Burning to DVDs 114 Set DVD Chapter Markers 115 Auto-Generate Scene Markers 117 Customize a DVD Menu Screen Template 118 Customize a Menu with Any Background
 SEE ALSO SEE ALSO
120 Add Video to a Menu Background 122 Preview and Test Drive a DVD Movie 123 Burn Multiple Copies of a DVD 124 About Troubleshooting DVD Output
121. Add Audio to a Menu 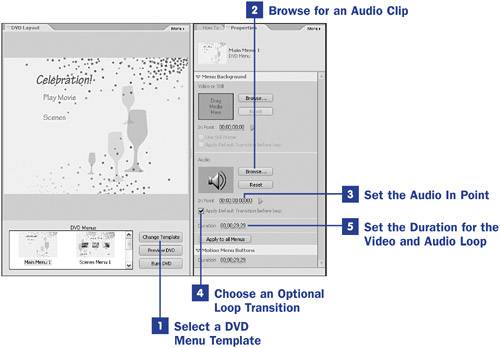
In addition to being able to customize the background of your DVD menu template (as explained in 118 Customize a Menu with Any Background and 120 Add Video to a Menu Background), Premiere Elements 2.0 gives you the option of adding your own custom audio loop. (Note that some templatesthose marked with an (A) or a (AV)have default audio loops. These templates, nonetheless, give you the option of replacing the default audio with a custom audio clip.) 1. | Select a DVD Menu Template
Open a movie project that contains a DVD menu you want to customize. Select a DVD menu template for the project as explained in 117 Customize a DVD Menu Screen Template.
 TIP TIP
The order in which you customize the DVD menu background video and audio affects how the template is ultimately customized. In other words, if you add a video background after you add customized audio, the audio from the video clip overwrites the audio selection. To override this effect, select or reselect your audio loop after you've selected your video background. | 2. | Browse for an Audio Clip
After you select a template, the Menu Background listing appears in the Properties panel, offering an option for changing or adding an audio clip.
Click the Browse button in the Audio section of the properties panel and browse to the audio clip of your choice.
| 3. | Set the Audio In Point
To change the point in the audio clip at which the menu background audio begins, click the green arrow (play) button or change the timecode.
You can manually change the timecode numbers, but it's more intuitive to drag the mouse across them. As you do, the numbers scroll up and down and the audio clip advances or retreats.
In the audio timecode 00;00;00;00000, the first set of numbers represents hours and the second set of numbers represents minutes (both pretty unlikely settings for your audio loop). The third set of numbers represents seconds, and the last set of numbers represents audio samplingsa standard 48,000 per second.
If you are locating the In Point by playing the audio clip, click the yellow pause button when you reach the desired In Point.
| 4. | Choose an Optional Loop Transition
Enable the Apply Default Transition Before Loop check box option to apply the audio dissolve transition between your loop's end and its restart.
| 5. | Set the Duration for the Video and Audio Loop
At the bottom of the Menu Background options in the Properties panel are the settings for the duration of the audio loop, listed as a video timecode. The time you set here determines how long the audio clip plays before it restarts.
In the video timecode 00;00;00;00, the first set of numbers represents hours, and the second set of numbers represents minutes (both pretty unlikely settings for a background audio loop). The third set of numbers represents seconds, and the last set represents frames (25 frames per second of time in PAL and approximately 30 frames per second in NTSC). This setting applies to both video and audio background loops for this menu.
|
|