84. Create a Split-Screen Effect  BEFORE YOU BEGIN BEFORE YOU BEGIN
20 About the Monitor Panel 33 Add or Move a Clip on the Timeline 61 Add and Customize an Effect 68 About the Properties Panel 74 About Advanced Effects
 SEE ALSO SEE ALSO
43 About Rendering the Timeline 63 Reset or Remove an Effect 67 About Keyframing 71 Make a Variable-Speed Pan and Zoom 77 Create a Picture-In-Picture Effect 87 Create a Brady Bunch Effect
It's easy to create a Picture-In-Picture effect, as explained in 77 Create a Picture-in-Picture Effect. But what happens when you want to balance the images in your video frame more evenlyor you want two or more clips to share the screen at once? With a combination of Premiere Elements's Crop and Motion effects, it's easy to shape and position any number of clips on your screen. 1. | Place Clip A on Video 1
Drag one clip from the Media panel to the Video 1 track on the Timeline. (See 33 Add or Move a Clip on the Timeline.)
| 2. | Place Clip B on Video 2
Drag another clip from the Media panel to the Video 2 track, directly above clip A.
 TIP TIP
When positioning your clips on the Timeline, view them in the Monitor. Be sure you have the safe margins turned on (click the More button in the Monitor panel to access the margin guides). The safe margins indicate both the possible and likely edges of your video frame that will be cut off by a typical television. Stay within these margins to ensure that you don't position the clip offscreen! (See 20 About the Monitor Panel.) 84. Create a Split-Screen Effect 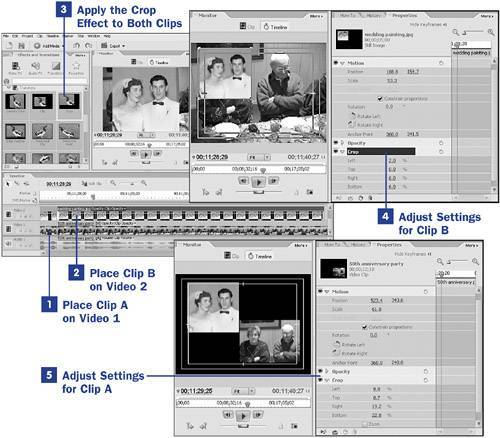
| 3. | Apply the Crop Effect to Both Clips
The Crop effect is located on the Effects and Transitions panel, in the Video FX collection, in the Transform category. (See 74 About Advanced Effects.)
Drag this effect to the clip on Video 1 and drag it again to the clip on Video 2. The effect initially shows no change to either clip.
| 4. | Adjust Settings for Clip B
With clip B selected, click the triangle to the left of the Crop listing in the Properties panel as well as the triangle to the left of the Motion listing to open each effect's control panel.
Use the Position, Scale, and Crop settings in the Motion control panel to position, size, and shape your clip. (See 61 Add and Customize an Effect.)
To change the settings for either effect, you can type in new coordinates or percentages for each setting; you can drag across the numerical settings so they increase or decrease, watching the results of the changes in the Monitor panel; or you can click the image in the Monitor panel and drag the sides in or position the image manually. Use the method that makes the most sense for you.
When you make adjustments by dragging the clip in the Monitor, make sure that the effect you want to adjust at the time is selected in the Properties panel. In other words, by clicking the Motion listing, you can change your clip's Position and Scale in the Monitor by dragging it and manipulating its corner handles. When you have the Crop effect selected, however, dragging the corner handles will crop your image instead of resizing it.
| 5. | Adjust Settings for Clip A
As you did with clip B, crop and position the image on Video 1.
Repeats steps 24 with as many clips on as many separate video tracks as you'd like. (See 87 Create a Brady Bunch Effect.)
You can even use keyframing for either or both effects so your clips keep moving and changing shape throughout the sequence. (See 67 About Keyframing.)
|
TIP As you know, virtually any time you apply an effect, the clip does not have to remain in one position, at one Crop setting, throughout its duration. Using the keyframing feature, you can keep the clips in your split screen in constantly changing shape and position (see 67 About Keyframing.)
|