Managing Security Policy
Levels of Security PolicyThere are four levels of security policy: application domain, user, machine, and enterprise. The application domain security policy is subordinate to the user security policy, which is subordinate to the machine security policy, which in turn is subordinate to the enterprise security policy. The Application Domain Security PolicyThe application domain security policy is the result of an evaluation of security policy when an assembly is loaded by the CLR. Application domain policy is not configurable; rather, it is the security policy set applied to an assembly after each of the other three policies is evaluated. The User Security PolicyThe user security policy is the lowest level of configurable policy and is maintained for each user. Again, using the analogy of federal versus state laws, user policy can restrict but not expand machine-level policy. The user security policy is literally maintained in %USERPROFILE%\Application data\Microsoft\CLR Security Config\[ version ]\security.config as XML, where [ version ] refers to a specific version of the CLR, for example, v1.0.3705. (Each version of the CLR has a security configuration file.) %USERPROFILE% is an environment variable. The value of an environment variable can be determined by typing set variable at a command prompt. For example, set USERPROFILE will typically display something like C:\Documents and Settings\ your_ user_ name . The Machine Security PolicyWhereas the user security policy sets the security policy for the user, the machine security policy sets the policy for the entire machine. The machine policy overrides the user policy. The machine policy is literally maintained in %WINDIR%\Microsoft. NET\Framework\[ version ]\Config\Security.config . The environment variable %WINDIR% is usually C:\WINNT . The Enterprise Security PolicyThe enterprise security policy is the highest-level policy. The enterprise policy can be found in %WINDIR%\Microsoft.NET\Framework\[ version ]\Config\enterprisesec.config . As the highest-level policy, if the enterprise policy defines a code access security permission, subordinate policies may not override it. When an AppDomain is created for one or more assemblies, the enterprise, machine, and user policies are combined to determine what the security policy is for a specific AppDomain. Modifying Security PolicyEnterprise security policy is not automatically disseminated to individual machines. If the administrator wants to establish an enterprise policy different than the default, the policy modifications must be disseminated to the individual machines. However, before the default policy is changed the default policy should be evaluated and desired new outcomes should be established. It is worth noting that modifying security policy can literally prevent Visual Studio .NET or .NET assemblies from loading and running. Consider making an incremental backup of each .config file before modifying it. This way if a specific policy change causes problems, just that change can be rolled back. Also, keep in mind that you can reset the policy to the default settings if you get stuck. Let's take a moment to talk about ways to modify the policy since there are several tools for doing so. Modifying Policy .config FilesYou can modify policy files by using any text editor, like Notepad.exe . However, you need to be very comfortable with XML configuration files and security policy management in general. This approach is not recommended but is available. Modifying Policy by Using caspol .exe.NET ships with a command-line utility for managing security policy, caspol.exe . To modify security policy using caspol.exe , open the Visual Studio .NET Command Prompt, and run caspol.exe , passing the parameters that describe the new policy configuration information. This may be a good way to go if you need to automate policy settings as part of a custom configuration process. However, a better way to automate policy changes is to create a .msi Windows Installer package that modifies policy settings.
You can get more information on caspol.exe from the Visual Studio .NET integrated help or by typing caspol.exe /? at the Visual Studio .NET Command Prompt. Table 18.1 contains a few commands that will provide you with quick information. We haven't talked about things like code groups and permission sets specifically . We will in a few minutes. First let's wrap up the utilities available for setting security policy. Modifying Policy with the Microsoft .NET Framework WizardsIf you want to quickly modify policy to trust a specific assembly, you can run a wizard. Using Windows XP, select StartControl PanelAdministrative ToolsMicrosoft .NET Framework WizardsTrust an Assembly. (The steps are similar in other Windows operating systems.) This wizard will walk you through a step-by-step process that will permit you to trust an assembly for a particular user or the machine, modifying the appropriate policy .config file as a result. I provided a specific example that demonstrates this approach in Chapter 10. (Refer to that chapter's subsection titled Adjusting Security Policy for Application Assemblies if you need assistance with the Trust an Assembly wizard.) Table 18.1. Helpful caspol.exe Commands
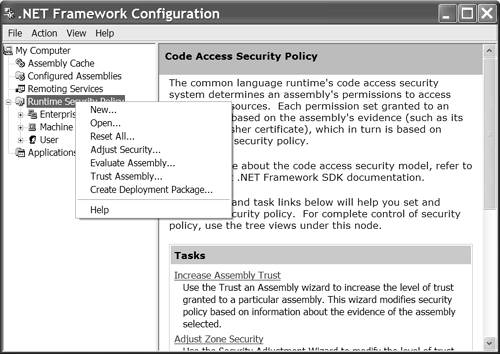
Modifying Policy with the .NET Framework Configuration ToolPerhaps the easiest and most reliable way to manage security policy is by using the Microsoft .NET Framework Configuration tool. To open this tool select StartControl PanelAdministrative ToolsMicrosoft .NET Framework Configuration or type mscorcfg .msc at the Visual Studio .NET Command Prompt. The Configuration tool is a Microsoft Management Console plug-in that offers a graphical way to modify every aspect of code access security policy. It provides a list of options relevant to a specific group or permission, as well as general operations that facilitate security management. To view a list of general security policy options expand the Runtime Security Policy node and right-click on that node (Figure 18.1). The New and Open menu items permit you to create a new security policy or adjust an existing policy, respectively. Reset All resets all policies to their original configuration values. Adjust Security runs the Security Adjustment wizard. The Evaluate Assembly item evaluates a specific assembly and tells you what the application domain policy will be for that assembly. (For example, select System.Windows.Forms.dll and the permissions granted will be unrestricted.) Trust Assembly runs the Trust an Assembly wizard, and Create Deployment Package exports policy settings to a Windows Installer package for deployment. Figure 18.1. The Runtime Security Policy node of the Microsoft .NET Framework Configuration tool. By expanding the Runtime Security Policy node you can quickly see that security policy is organized by enterprise, machine, and user policies. Expand any of these nodes in turn and you will see that each of the policy levels is further subdivided into code groups, permission sets, and policy assemblies. The code groups define criteria that code must meet to be part of a group. The criteria are determined by the assembly's evidence, which is comprised of assembly metadata including the application's installation directory, cryptographic hash, software publisher, host site, cryptographic strong name, URL, and zone, such as intranet zone. If an assembly meets the criteria for membership in a particular code group, the policy for that group is applied to the assembly. The permission sets contain grouped permissions by name. Policy assemblies are .NET assemblies that contain custom permissions or membership conditions and dependent assemblies that define the custom policy. As suggested, it is preferable to ascertain whether or not existing policies are suitable for your assemblies before modifying policy settings. When you do begin to experiment with these settings, be sure to make backup copies of the .config files. Note that the most recent prior version of a policy file is stored with a .config.old extension. For example, if you modify the enterprisesec.config file with the Microsoft .NET Framework Configuration tool, the previous values will be stored in enterprisesec.config.old . It is also worth noting that changes are stored in the policy files as soon as you have modified the policy in the Configuration tool. Creating a Windows Installer Package to Manage Security PolicySuppose you have the responsibility of administering enterprise policy. You can fine-tune the enterprise policy section on a specific machine and create a .msi Windows Installer file to deploy that policy to other machines in the enterprise. To create a deployment package for the enterprise policy follow these steps.
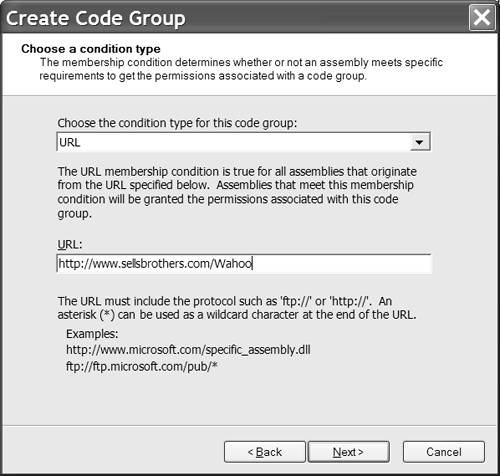
After you complete the steps above, a Windows Installer file will be created at the specified location. Running this installer package will update the security policy for the level selected. In our example, the enterprise policy will be updated to coincide with the policy exported to the deployment package. Permitting Downloaded Assemblies to RunA practical problem you are likely to run into is an inability to run .NET assemblies downloaded from the Internet. Microsoft modified the default policy settings in .NET Service Pack 1 to prohibit code from the Internet to run directly. For example, if you browse to http://www.sellsbrothers.com/wahoo/wahoo.exe to play the Tetris-like Wahoo! game, you will likely get a PolicyException dialog similar to that shown in Figure 18.2. (If you don't get an exception it may be because you have not installed .NET Service Pack 1, you ran the Windows Installer from that site while working through Chapter 10, or your security policy was adjusted to be more lax.) The exception occurs because the Wahoo.exe evidence resulted in the code being placed in the Internet zone. Figure 18.2. The PolicyException dialog indicating that an assembly's evidence contradicts an action desired by the assembly. We could run the Windows Installer from the Wahoo! page to update the security policy. However, this won't help us understand how to configure security for ourselves . Instead we will modify the security policy manually to gain some experience. Our object is to permit wahoo.exe to run. Of course, we could make security wide open by allowing applications in the Internet zone to run. However, remember that policy is accumulative. As a result, all the changes we make over time add up to make our systems more or less vulnerable. It is preferable to open the smallest gap necessary to achieve our specific purpose. In the case of the Wahoo! game this might mean that we permit only a single, specific version of wahoo.exe to run for a single user. To demonstrate a possible alternative, let's adjust the policy to allow assemblies from a specific URL to run. Follow the numbered steps to permit assemblies from http://www.sellsbrothers.com/wahoo/ to execute for a specific user.
After you have made the adjustments to the security policy above you should be able to navigate to the permitted http://www.sellsbrothers.com/wahoo/wahoo.exe URL and run the Wahoo! game. (The Security permission set has now granted Enable Code Execution, permitting wahoo.exe to run.) It would be impossible to cover all potential security configurations. Security tuning requires patient experimentation based on desired outcomes. When you find that you have made an error, you will need to modify the policy to tighten or loosen it as required. |
EAN: 2147483647
Pages: 215