Implementing a Hello, World Thin Client
Implementing a Hello, World! Thin ClientA good first start for any application is the easiest to implement. They don't get any easier than the Hello, World! sample application tradition started by Brian Kernighan and Dennis Ritchie of C fame. Our sample application starts with a simple form with a single button. Clicking the button downloads a class library and executes the code. This all occurs with no intercession on the part of the user (apart from the button click).
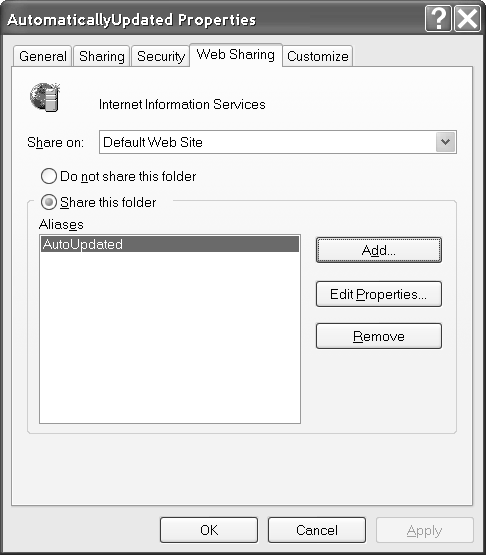
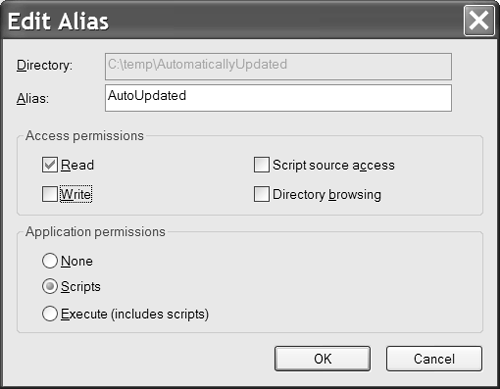
To get started with as few obstacles as possible, let's assume that both the initial client and the downloaded extension will be run on the same workstation. However, the workstation is running Internet Information Services (IIS) and the class library is being served by that instance of IIS. The biggest obstacle for thin client updates is .NET security permissions. We'll cover those later in the chapter. Building our thin client application requires a Windows Forms application and a second DLL in a Web shared directory. The ingredients we'll use have been introduced in several places throughout the book. To summarize, these include Reflection, an activator, an assembly, an object's type information, the .NET Framework, and a class library. Listing 10.1 contains the code for the thin client Windows Forms application. Listing 10.1 The Thin Client Windows Forms Application 1: Imports System.Reflection 2: 3: Public Class Form1 4: Inherits System.Windows.Forms.Form 5: 6: [ Windows Form Designer generated code ] 7: 8: Private Sub Button1_Click( _ 9: ByVal sender As System.Object, _ 10: ByVal e As System.EventArgs) Handles Button1.Click 11: 12: Dim AnAssembly As [Assembly] = _ 13: [Assembly].LoadFrom( _ 14: "http://localhost/AutoUpdated/bin/AutomaticallyUpdated.dll") 15: 16: Dim MyType As Type = _ 17: AnAssembly.GetType("AutomaticallyUpdated.AutoUpdated") 18: Dim Instance As Object = Activator.CreateInstance(MyType) 19: 20: End Sub 21: End Class This straightforward code is consistent with code you are likely to find in even advanced thin client, smart updating Windows Forms applications. We need to import the System.Reflection namespace for its capabilities that support dynamic type discovery. Lines 12 through 14 represent the smart update behavior. First we declare and initialize an Assembly object. Assembly is the name of a class and a reserved word. The reserved word doesn't do anything yet, but we need to indicate we mean the class rather than the reserved word by adding the brackets around the word Assembly . (Place any reserved words used in code as variables in brackets.) Lines 13 and 14 download a copy of the assembly we referred to by the URL if the assembly is not already in the browser's application cache. If the assembly is already in the cache, the file date and time, not the assembly version, is used by the browser to determine whether an updated assembly is needed. If the file date and time of the assembly on the server has a more recent date, the newer assembly is downloaded; otherwise the assembly from the cache is used. From the assembly we can use Reflection to obtain the type information for a named object. This happens in line 17. Notice that the namespace and the class name is used in the GetType method. With the type information we can use several techniques to create an instance of the type. The example uses Activator.CreateInstance (line 18). CreateInstance is roughly analogous to the Application Programmer's Interface (API) method CreateObject used to create COM objects in pre-.NET applications. The code in Listing 10.1 loads an assembly, gets the type information for a class, and constructs an instance of the class. That's enough for now. Listing 10.2 contains the code for the downloaded assembly. Listing 10.2 A Simple Class Library for an Automatically Updating Smart Client Imports System.Windows.Forms Public Class AutoUpdated Public Sub New() MessageBox.Show("Hello Thin Client World!") End Sub End Class When an instance of AutoUpdated is created, a message box is shown. This is why we need to create only the instance in Listing 10.1 to see the dialog box. When we build industrial-strength smart client applications, we need to access all the members of the clients updated over a network. We will come back to this feature in a moment. In order to update the client using the http:// moniker we can create a Web shared directory. The easiest way to create a virtual directory is to use Windows Explorer options. Follow the numbered steps to create a virtual Web directory.
After you compile both assemblies in HelloThinClientWorld.sln , you will be able to run HelloThinClientWorld.vbproj , clicking the button to download and execute the code in the AutomaticallyUpdated folder. This simple example works without much configuration because both the executable and the DLL reside on the same workstation. .NET security permissions are not going to trip us up when the URL is part of the local Intranet. The basic idea is that your own code should be trustworthy. Smart clients are an excellent choice for private business applications running on an internal network because they offer a rich client experience and you can easily provide smart updating. All you really need is to have the .NET Framework on all your clients. There should be no intellectual argument against this single precursor since having the .NET Framework is no different than having Java classes, other DLLs like the Windows API, and applications and their runtime libraries. (Most applications have supporting DLLs, which is precisely what the framework is.) Smart clients are also a good choice for commercial applications. The only difference between the implementation of commercial applications and private ones is that you will need to perform some extra configuration if customers will be updating your applications over the Internet. Client workstations may not have the .NET Framework, and default security permissions are much more rigorous for applications downloaded from the Internet. We will cover client and server precursors for smart client applications next . |
EAN: 2147483647
Pages: 215