Converting a Data Source to an XML Document Using XMLSPY
|
A popular use of XML in industry today is that of an intermediary format to enable information sharing between software applications. Data and content stored somewhere in a native format can be converted to an XML format. After it is in XML format, any other external program that understands XML can use the data, possibly converting it back to its own native format if required. To help make this conversion possible, XMLSPY includes data conversion utilities that can help you move information stored in text files and databases and various other formats into XML documents. Conversely, XMLSPY can convert XML documents into text file or databases formats. You can access all XMLSPY data conversion utilities from the Convert menu. In this section, you experience first-hand how Grid view can be very helpful for performing data conversions.
Text files
With XMLSPY, you can import text files to an XML document, as well as export XML documents to text files. To convert a text file into an XML document, choose Convert → Import Text file, which opens the Text Import dialog box.
As an example, configure the Text Import dialog box by following these steps:
-
Click the Choose File button, select C:\Program Files\Altova\XMLSPY\ Examples\xmlspyhandbook\ch2\products.csv, and then click Open. XMLSPY loads the file and returns you to the Text Import dialog box. The configurable options become editable.
-
In the File Encoding field, choose Codepage 1252 (Western).
-
In the Field Delimiter section, choose the Comma option button.
-
In the Text Enclosed In section, click the double quotation mark (“) option button.
-
Click to select the First Row Contains Field Names check box.
Before finishing the import operation, suppose that you would like the ProductID field to appear as an XML attribute rather than an XML element. Click the ProductID header so that an equal sign (=) instead of empty brackets (<>) appears adjacent to the ProductID field. Finally, click the OK button. The imported data, now in XML format, is displayed to the screen in Grid view. Notice that as you change the various options in the Text Import dialog box, a preview of the output is displayed in real time, in the bottom pane, as shown in Figure 2-28.
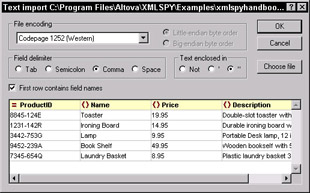
Figure 2-28: Converting text files to XML with XMLSPY.
Now, examine the XML document that was created by XMLSPY as a result of this import from text file operation. By default, the imported XML document has a root element called <Import>, and each imported row is called <Row>. As previously discussed, you can rename these fields simply by double-clicking the table headers in Grid view. You can then give the imported data more meaningful element names, such as Catalog and Product, as shown in Figure 2-29.
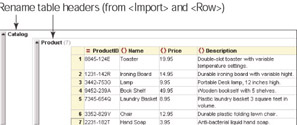
Figure 2-29: Modifying the newly imported XML data in Grid view.
The resulting well-formed XML document is shown in Listing 2-3. You can see that the Text File Import utility combined with Grid view makes for a very powerful combined data integration tool.
Listing 2-3: Generated XML File from the Import Text File Operation
<Catalog> <Product Product> <Name>Toaster</Name> <Price>19.95</Price> <Description>Double-slot toaster.</Description> </Product> <Product Product> <Name>Ironing Board</Name> <Price>14.95</Price> <Description>Durable ironing board.</Description> </Product> <Product Product> <Name>Lamp</Name> <Price>9.95</Price> <Description>Portable Desk lamp.</Description> </Product> <!-- ... Products omitted for brevity. --> </Catalog>
Exporting an XML file to a text file is a slightly more involved process than importing a text file to an XML format. This is because a text file typically requires a tabular structure, whereas an XML document is tree-like in nature. To overcome this potential issue, XMLSPY (as you probably guessed by now) makes use of semantic tables to (optionally) generate multiple output files, each corresponding to a semantic table from the Grid view. In this next example, you export the ![]() OrgChart.xml file, which you can find in the Ch2 folder in the Project window or on your system at C:\Program Files\Altova\XMLSPY\Examples\xmlspyhandbook\OrgChart.xml, to several text files. Choose Convert → Export to Text Files/Database. Notice that this menu option is unavailable unless you have an open XML document within the XMLSPY editing environment.
OrgChart.xml file, which you can find in the Ch2 folder in the Project window or on your system at C:\Program Files\Altova\XMLSPY\Examples\xmlspyhandbook\OrgChart.xml, to several text files. Choose Convert → Export to Text Files/Database. Notice that this menu option is unavailable unless you have an open XML document within the XMLSPY editing environment.
Choosing Convert → Export to Text Files/Database causes the Export to Text Files/Database dialog box to appear (see Figure 2-30).
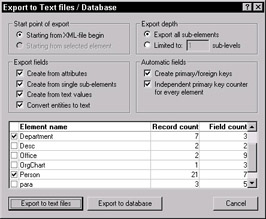
Figure 2-30: The Export to Text Files/Database dialog box.
Exporting an XML document to a text file is a highly configurable process in XMLSPY. The configuration options are explained in the following list:
-
Start Point of Export: Using Grid view, you can highlight a section of an XML document to be exported to a text file as opposed to exporting the entire XML document.
-
Export Depth: Specify the number of nodes deep you wish to export, relative to the starting point.
-
Export Fields: Allows you to specify the appearance of Export Fields.
-
Automatic Fields: XMLSPY will optionally generate primary and foreign keys for each row exported to the text file. A primary key is a field whose value uniquely identifies a row in a table; a foreign key is a field that refers to the primary key of an external table. XMLSPY determines the value of the primary and foreign key fields by determining the row’s position within its semantic table representation. Primary and foreign keys are commonly used in relational database theory.
In this example, you want to export data only from the Department and Person elements. You can do this by unselecting all the other elements in the list displayed in the bottom pane of Figure 2-30. Next, click the Export to Text Files button to open the Export to Text Files dialog box shown in Figure 2-31.
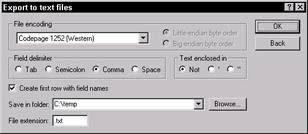
Figure 2-31: The Export to Text Files dialog box.
In this example, you are using the default file encoding. Specify tabs to be the field delimiter. Do not enclose text in quotation marks. Insert the field names in the first row. Then specify the output folder and click OK. This should generate two files—Department.txt and Person.txt. The Department.txt file is shown in Listing 2-4.
Listing 2-4: The Department.txt File
PrimaryKey,ForeignKey,Name, 1,1,Administration, 2,1,Marketing, 3,1,Engineering, 4,1,IT & Technical Support, 5,2,Administration, 6,2,Marketing, 7,2,IT & Technical Support,
The PrimaryKey field shown in Listing 2-4 has been determined by the position of the Department element relative to the other Department elements. The ForeignKey field has been calculated by determining the relative position of a Department’s parent element (that is, its corresponding Office element). For example, the first four Department elements belong to the first Office. Therefore, they have a ForeignKey equal to one; the last three Department elements belonged to the second Office element, and so their foreign key is equal to two.
Relational databases
XML technologies, compared to a conventional relational database, can potentially improve information reuse for certain forms of structured content. But don’t forget that the vast majority of corporate information and data (by most estimates, in excess of 80%) is stored in relational databases. Relational databases are extremely well-suited for storing and working with tabular data and will remain very widely used regardless of how successful XML technologies are. Therefore, it is important to have data conversion utilities that can work directly with relational databases to convert relational data into XML and also convert XML back into relational data.
XMLSPY’s data conversion utilities can import database tables into an XML document, as well as export XML documents to relational databases. It does this for all commercial databases including Oracle, Microsoft SQL Server, IBM DB2—or any other database that supports Open Database Connectivity (ODBC), a widely supported means for programmatic database access. In this section, I assume that you have Microsoft Access installed on your computer. Microsoft Access, a widely installed database product, is easy to use and is ideal for demonstrating XMLSPY’s database import/export capabilities. Look at a sample Microsoft Access database called Altova.mdb, located in c\Program Files\Altova\XMLSPY \Examples\Import. The database tables and their primary and foreign key relationships, as well as the degree (or cardinality) of the relationships, are displayed in Figure 2-32.
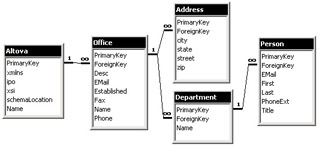
Figure 2-32: A sample database schema showing relationships and cardinality.
To convert any one of the database tables of Figure 2-32 to an XML document, choose Convert → Import Database Data.
The Database Import dialog box appears as shown in Figure 2-33. Click Choose File, select the Altova.mdb file located in C:\Program Files\Altova\XMLSPY\ Examples\Import, and click Open. Next, click the Choose Table button and select the Person table. A default query (SELECT * FROM [Person]) appears in the Selection Statement section. Click the Preview button.
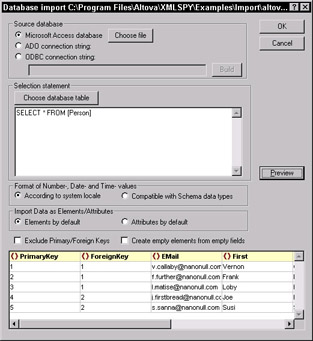
Figure 2-33: The Database Import window.
The process of importing database tables is highly configurable in XMLSPY. The options are shown in the following list:
-
Format of Number: Allows you to specify how imported database data (in particular, date and time values) should be formatted. For now, choose According to System Locale. With this option selected, whatever setting you have set in the Windows Control Panel is used.
-
Import Data as Elements/Attributes: Allows you to specify how imported data should be represented in an XML document by default. Choose Elements by Default. Of course, you can represent imported data as a mix of both elements and attributes by manually clicking a column header in the preview window. For example, convert the PrimaryKey and ForeignKey fields to attributes by clicking their respective column headers, which toggles the element symbol (<>) to an attribute symbol (=).
-
Exclude Primary/Foreign Keys: You can choose to exclude the importing of primary and foreign keys because this information is often implied if you examine the element’s location within an XML document. In this example, simply leave the option box unchecked so that primary and foreign keys are included.
-
Create Empty Elements from Empty Fields: A database table might specify that a particular row was allowed to have null values. This option box allows you to specify if an empty or null value should be represented as an empty element or empty attribute value. For this example, leave it unchecked.
By default, the imported XML document has a root element called <Import>, and each imported row is called <Row>, as was the case when you imported data from text files in the previous section. Again, you can rename these fields simply by double-clicking the table headers in Grid view and giving the imported data more meaningful element names, such as <Person> (see Figure 2-34).
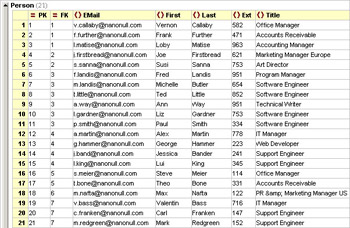
Figure 2-34: Data imported from a relational database table.
XMLSPY can convert XML documents into relational database tables, but this is a slightly more involved process than importing a database table into an XML document. It is, however, virtually the same process as exporting XML to a text file that was discussed in the previous section. The only differences are that after you make all your selections in the Convert → Export to Text Files/Database window, you must remember to unselect Create Primary/Foreign Keys in the Automatic Fields section if the data you are exporting already has an explicitly specified primary key field. Of course, you must also press the Export to Database button instead of the Export to Text File button. This causes the Export to Database window (shown in Figure 2-35) to appear.
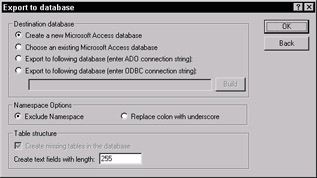
Figure 2-35: The Export to Database window.
Now, you have the option of inserting the exported data into an existing database or having XMLSPY automatically create new database files. Choose Create a New Microsoft Access Database and click OK. You are prompted to specify a filename and a directory in which to save the database files. XMLSPY automatically generates new Microsoft Access files, as shown in Figure 2-36.
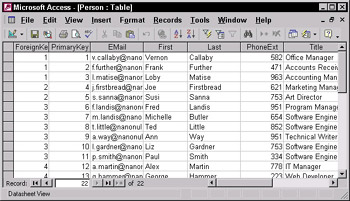
Figure 2-36: Exporting the OrgChart.xml file to a Microsoft Access database table.
Converting Microsoft Word documents to XML
XML is not limited to representing data stored in text files and database tables. In fact, one of XML’s greatest strengths is as a format for storing content such as books, encyclopedias, stories, poems, newspaper articles, and research papers. In this section, you look at converting Microsoft Word documents to XML by using XMLSPY. Follow these steps:
-
Choose Convert → Import Microsoft Word Document. A file explorer appears asking you to choose a Microsoft Word document.
-
Choose any Word document on your system. XMLSPY imports the contents of the Word document into XML format. Listing 2-5 shows the format of the converted Microsoft Word document.
Listing 2-5: Converted Microsoft Word Document
<Word-Document> <HTML:STYLE> ... <!--Abbreviated --> </HTML:STYLE> <Normal> <p>xmlspy urgently needs your vote</p> <p>best editor for xml, schema, xslt</p> <p>new features include debugging soap</p> <p>please vote for xmlspy asap</p> </Normal> </Word-Document>
In addition to the poem’s content, XMLSPY has also imported the stylesheet associated with this Word document (abbreviated in the preceding listing). If you are wondering about the context of the poem, it was a plea for votes in the Web Services Journal Readers’ Choice Awards, which originally appeared in the June 2002 Altova Developer Connection newsletter.
|