Creating Your First XML Document with XMLSPY 5
|
Launch XMLSPY 5 from the Windows taskbar by choosing Start ? Program Files ? XMLSPY 5 Enterprise Edition ? XMLSPY 5. Upon installation, XMLSPY 5 optionally becomes the default resource associated for various XML-related file types (.xml, .xsl, .xsd, .xhtml, .wsdl, .fo, and so on). Simply double-clicking any of these associated file types from the Microsoft Windows Explorer automatically launches XMLSPY 5. After you have launched XMLSPY 5, you see the screen shown in Figure 2-1.
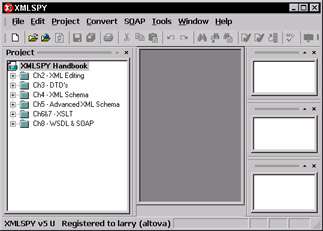
Figure 2-1: XMLSPY 5 upon start-up.
On the CD By default, the special XMLSPY 5 version included on the CD-ROM that accompanies this book opens a project folder with example files corresponding to the chapters of this book. The Project window has several folders: Ch2, Ch3, Ch4, and so on. You can find these example files in C:\Program Files\Altova\XMLSPY\Examples\xmlspyhandbook. If the version of XMLSPY that you are using is not the same as the one included on the CD (for example, if you downloaded it from the Web), you can still follow along by copying the XMLSPY Handbook.spp file and all subdirectories (such as Ch2, Ch3, and so on) from the CD to your local file system. Then choose Project ? Open Project and select the XMLSPY Handbook.spp file. XMLSPY’s project management features are covered toward the end of this chapter.
To create a new XML file, choose File ? New, and the Create New Document dialog box appears as shown in Figure 2-2. Choose XML Document from the list and click OK.
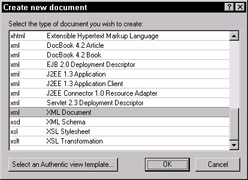
Figure 2-2: The Create New Document dialog box.
| Tip | XMLSPY 5 supports editing of any XML document. As a convenience, XMLSPY includes built-in menu options for creating some of the most common types of XML documents, including Mathematical Markup Language, Wireless Markup Language, various Java configuration files, and many other popular XML document types. |
When you click the OK button in the Create New Document dialog box, another New File dialog box (see Figure 2-3) appears, asking whether the new XML document is intended to be validated based on a Document Type Definition (DTD) or an XML Schema. The XML documents are generally used in conjunction with a content model, which is defined in either a DTD or an XML Schema. I discuss XML Schemas and DTDs in Chapter 3, so for now simply click Cancel.

Figure 2-3: XMLSPY can assign a DTD or an XML Schema to an XML document.
By default, the newly created XML file is displayed in Enhanced Grid view as shown in Figure 2-4. For more details, see the section “Enhanced Grid View” later in this chapter.
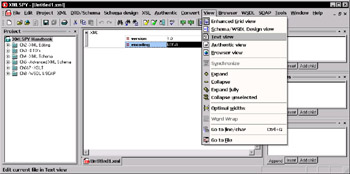
Figure 2-4: Creating a new XML document in XMLSPY.
The principal benefit of using XMLSPY over a regular text editor is that it offers multiple views for editing XML documents. I’ll start with Text view, which is the most basic of all available XML editing views. To view an XML document in Text view, you need to switch views either by choosing View ? Text view (refer to Figure 2-4) or by clicking the Text View icon on the main toolbar (see Figure 2-5).
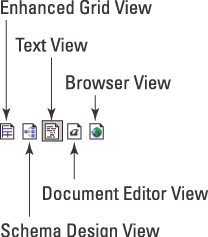
Figure 2-5: The main toolbar contains buttons to quickly switch between different views.
After switching to Text view, you should see the newly created XML document as shown in Figure 2-6. In the next few sections, you learn the basic XML constructs using Text view.
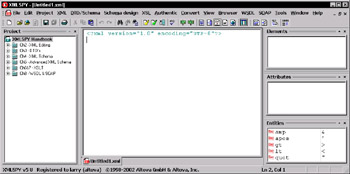
Figure 2-6: A new XML document in Text view.
Elements and attributes
XML uses basic constructs: elements, attributes, and their associated values to form an XML document. An XML element (or just element) is the most basic building block of an XML document. An element’s body can contain either one or more nested elements or text-based content. Element occurrences are specified by opening and closing tags—also referred to as start tags and end tags, respectively. Opening tags begin with the less-than sign (<), followed by the element name, and terminate with a greater-than sign (>). Closing tags look very similar to opening tags, except that a closing tag has a forward slash (/) immediately after the (<) of the closing tag. This is illustrated in Figure 2-7. An element name can be just about anything (although clear, descriptive names make the most sense), provided that the following naming guidelines are met:
-
Element names must begin with a letter or underscore character, and can be preceded by any number of additional letters, digits, underscores, hyphens, and periods.
-
Unlike HTML, element and attribute names are case-sensitive; this is a common source of errors.
An element’s content (also referred to as its value) appears nested between the opening and closing tags, as shown in Figure 2-7. To start your first XML document, use Text view to type the document fragment shown in Figure 2-7 into the new XML document, which you have just created.
![]()
Figure 2-7: An XML element.
| Note | XMLSPY’s Text view has numerous editing features that can help you write XML documents. For example, XMLSPY automatically inserts the closing tag for any XML element that you define. It also color codes XML elements and attributes to make them more readable. |
XML attributes (or simply, attributes) provide additional descriptive information about an element and are contained within an element’s opening tag. Attributes are specified by stating the name of the attribute, followed by an equal sign (=) and the attribute value within quotation marks (as shown in Figure 2-8). You can use either double quotation marks (“) or single quotation marks (‘) to delimit attribute values, provided that they are used in pairs. In other words, you cannot use a double quotation mark at the beginning of the attribute and a single quotation mark at the end. There is no limit to the number of attributes that an XML element can have; however, every attribute must have a unique name. The rules for naming attributes are the same as the rules for naming elements. Add an attribute to your XML document using Text view as shown in Figure 2-8. This figure is shown here in black and white, but on your screen, notice that XMLSPY applies a different color to attributes to distinguish them from elements.

Figure 2-8: A sample attribute declaration.
XML syntax guidelines
In Chapter 1, I defined XML as a standardized language for describing structured information. The standardized syntax guidelines of an XML documents allow it to be easily processed and understood by computer applications. The minimum requirement for an XML document to be used in an XML-processing environment is that the XML document must be well-formed, which means it must adhere to the constraints described in the following sections.
Every XML Document Must Have a Root Element
All XML documents must contain exactly one element, called the root element, which contains all other elements within the XML document (it is the parent of all child elements). This concept is illustrated in Figure 2-9.
![]()
Figure 2-9: The root element (<book>) contains all the child elements.
The only things in an XML document that may appear outside the root element are comments and processing instructions, both of which will be discussed shortly.
| Note | Because the structure of an XML document is hierarchical, I use the terms parent and child to describe an element with respect to another element. For example, in Figure 2-9, <book> is the parent element of <title>; conversely, <title> is a child element of <book>. |
Every Element Must have a Closing Tag
Every element must have a corresponding closing tag; in the case of empty elements (that is, an element containing no element content and zero-to-any number of attributes), you can optionally use a shorthand, equivalent notation of the closing tag as shown in Figure 2-10.
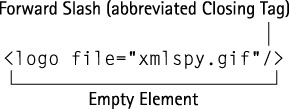
Figure 2-10: An empty element whose closing tag uses a shorthand notation.
Elements Must be properly nested
Simply put, this means that if element A contains element B, you must close element B before you close element A (see Figure 2-11).
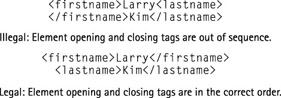
Figure 2-11: Illegal and well-formed XML fragments.
Attributes must be enclosed within Quotation Marks
Unlike HTML, XML strictly requires that all attribute values be enclosed in quotation marks—most commonly, a pair of double quotation marks (“) is used to delimit attribute values; however, a pair of single quotation marks (‘) is also acceptable.
Checking well-formedness with XMLSPY
XMLSPY can help you check whether the XML document you are working on is well-formed. Simply click the yellow check-mark button on the main toolbar or choose XML ? Check Well-Formedness. Now type into a single XML document all the XML document fragments that I just discussed and verify that it is, indeed, well-formed (as illustrated in Figure 2-12). Congratulations! Using XMLSPY, you have just completed an XML document that meets the criteria for being well-formed. You can save the newly created XML file by choosing File ? Save, by clicking the Save button on the main toolbar, or by pressing Ctrl+S.
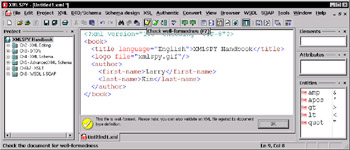
Figure 2-12: Using XMLSPY’s well-formedness checker in Text view.
| Note | You can also invoke the well-formedness checker by pressing the F7 key. If XMLSPY determines that an XML document is not well-formed, XMLSPY places the cursor on the line immediately after the line containing the error and provides an error message at the bottom of the main editing window. XMLSPY does a well-formedness check automatically whenever you open or save a file. |
Declaring the XML version
As I previously mentioned, XMLSPY automatically inserts the XML declaration, which states the XML version number and character encoding information for the current document, as in the following:
<?xml version=”1.0” encoding=”UTF-8”?>
In general, a tag that begins with <? and ends with ?> is called a processing instruction. These tags are used to specify document-processing variables to configure the behavior of the XML parser or application that is processing the XML document. For example, you could use a processing instruction to specify the filename of the XSLT stylesheet associated with the current document (see Chapters 6 and 7 to find out more about XSLT stylesheets). After you type the opening tag for a processing instruction (<?), XMLSPY auto-inserts the closing tag (?>).
| Note | At the time of this writing, the most current XML version is 1.0, which was adopted as an official W3C recommendation in October 2000. XML 1.1 currently exists as a candidate draft, but it may become a recommendation sometime in 2003. The default character encoding used in XMLSPY is Unicode (UTF-8), a preferred character encoding that supports many international character sets and is backward compatible with environments originally designed entirely around ASCII. |
Whitespace
XML processors, as well as applications that use XML documents, ignore whitespace (extra spaces, line breaks, and tabs)—just as Internet Explorer or Netscape browsers both ignore any whitespace in HTML code. You can have XMLSPY pretty-print your XML document by automatically eliminating any extra whitespace and nicely formatting it if you choose Edit ? Pretty Print-XML Text. This feature works only for well-formed documents.
| Note | XMLSPY’s pretty-printer also automatically substitutes for any empty elements. As an example: <image></image> is substituted with the equivalent shorthand-notation, <image/>. You can disable this automatic concatenation of empty elements on a per–file-type basis if you choose Tools ? Options ? File Types. |
XML comments
Although you may think that your XML document is easy to understand, it is always helpful to annotate XML documents by using XML comments to improve the readability of your work. An XML comment works the same as an HTML comment: you type <!-- to begin your comment and --> to end the comment. Whatever you type inside the body of a comment is completely ignored by an XML parser. Although a double dash (--) is used to delimit the start and end of comment tags, a double dash is forbidden within the comment itself. The XML processor would read the second set of dashes as the beginning of the end-of-comment delimiter.
XMLSPY automatically changes the appearance of XML comments to a light shade of gray to prevent the reader from mistaking it for an XML element. You can easily customize the look of comments by choosing Tools ? Options ? Text Fonts.
Entities
By default, XML includes five entities, which are substitute notations for the special characters shown in Figure 2-13.
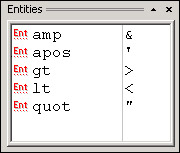
Figure 2-13: Default XML entity definitions and values are displayed in XMLSPY Text view.
Here are some reasons why you may need to use an entity:
-
An element or attribute’s value requires a quotation mark (“) that an XML parser could confuse with a string delimiter
-
An element or attribute’s value requires an angle bracket (< or >) that an XML parser could confuse with an opening or closing tag delimiter
-
An element or attribute’s value contains an ampersand character (&) that an XML parser could confuse with an entity declaration (the ampersand is the character used to specify an entity)
To use an entity, simply type the ampersand character &. XMLSPY provides a drop-down box displaying the list of defined entities. Select the desired entity using the up and down arrow keys and press the Enter key. Remember to terminate the entity with a semicolon (;). As an example, the entity for an ampersand character, when expressed using an identity, should look like &. Entities are also often used as a macro or a substitute for text that frequently occurs throughout an XML document.
Cross-Reference In Chapter 3, you learn how to define custom entities.
Character Data (CDATA)
Sometimes, you may need to write out sections of an XML document as plain text. In this case, you don’t want the XML parser to process the section as it regularly would. Suppose that you are writing a book on XML and saving the chapters as an XML document. You may want to treat the sample XML files in the book as plain text, despite the fact that the sample files contain XML markup. You can do this easily by enclosing that portion of the XML document within a Character Data (CDATA) section, which instructs the XML parser to simply treat the section as meaningless raw character data regardless of any markup inside. To start a CDATA section, simply type
<![CDATA[
and terminate the section by typing
]]>
Within a CDATA section you can type just about anything as long as you don’t break these rules:
-
Do not use XML entities within a CDATA section. Entities are special characters that must be processed and interpreted by the XML processor in order to work properly. Special characters (entities, elements, attributes, comments, CDATA sections, and so on) have no special meaning inside a CDATA section as far as the XML processor is concerned; therefore, they do not work.
-
Do not nest CDATA sections, for example:
<![CDATA[ ignore this text <![CDATA[ illegal nested cdata section ]]> ]]>
Not only is it redundant to tell the XML processor to “ignore” the special meaning of a block of text that is already being treated that way due to the first CDATA section block, but the closing ]]> of the nested CDATA section has the unintentional effect of terminating the CDATA section.
|