Objective 4.2: Designing an Access Control Strategy for Files and Folders
One of the fundamental elements of data security is controlling access to information. The first step is authorizing users to gain access to the network. The second step is controlling what data those users can access via the use of access control mechanisms built into Windows Server 2003. Objects, including files and folders, can be managed via their access control lists (ACLs) that designate which users and groups can access the object (file, folder, printer, etc.) and in what manner. Managing network resources through access control adds a critical layer of security to a network. To use access control functions in Windows Server 2003, you need to format disk volumes with the NTFS file format, which provides the ability to control access to files at a very granular level and enables the ability to audit access to those files. The FAT or FAT32 file format does not provide this functionality and is therefore generally not suitable for a business environment. In this section, we ll take an in-depth look at designing and managing access control strategies for files and folders in Windows Server 2003.
Analyzing Risks to Data
One of the first steps in securing network resources is assessing the risks to your data. Every company is different and the risks will vary from one organization to another. However, there are common elements that should be reviewed and analyzed as part of a comprehensive security plan. These include:
-
Physical loss of data
-
Data corruption
-
Data modification or corruption from viruses and other attacks
-
Security breaches due to incorrectly configured permissions
-
Auditing practices
Physical Loss of Data
Physical loss of data can occur for many reasons ”from power outages to disk crashes to system failures. Physical loss of data is typically a result of events that cannot be easily anticipated, such as a power outage or even a bad sector on a hard disk. Routine maintenance can help spot trouble early, but often these events occur without warning and you must have a solid recovery plan in place. The risk of physical loss of data can be greatly reduced through the use of disk volumes such as striped sets with parity, mirrored volumes, and other dynamic disk configurations. These disk configurations reduce single points of failure, creating a more stable environment. Analyzing system volumes for errors and fragmentation is a good preventive course, and naturally, routine (and reliable) backups are essential. We ll discuss data recovery later in this chapter.
| Test Day Tip | Make sure you ve reviewed disk management concepts before the exam. These concepts include RAID-0 through RAID-5. RAID-0, RAID-1, and RAID-5 are supported in Windows Server 2003. RAID-0 is a stripe set without parity. Data is written across multiple disks without a parity stripe. This is a very fast configuration but provides no fault tolerance. If one disk fails, you must recover from a backup to restore the disk set. RAID-1 is mirrored volumes (formerly called a mirrored set in Windows NT 4.0). A mirrored volume is an exact replica of another volume. If one drive fails, the mirrored volume can instantly be used because all data is identical to the failed volume s contents. RAID-5 implements a striped set with parity. In a striped set with parity, data is written across several drives . A parity stripe contains information about the data stored in the set. If one drive fails, the parity stripe is used to recreate the data once the failed drive is replaced . Another important point to remember is that RAID-5 is best used in an environment where data is more often read than written (written once, read many times). Conversely, RAID-1 is best suited to situations where data is constantly changing. It offers better performance than RAID-5 in those situations. With the cost of disk drives continuing to fall, RAID-0 is a more affordable solution than it was five years ago. |
Data Corruption
Data corruption can happen for a number of reasons. Some corruption can happen due to bad sectors on the disk where the file was stored or unusual events that occur while working on the system that cause a file or folder to stop working. Data corruption can also occur as a result of viruses, worms, and other executables run on the system either intentionally or unintentionally. As with physical loss of data, these events can sometimes be random events that cannot be anticipated. However, checking the disk for errors, defragmenting when needed, and backing up critical data frequently is important for recovering from data corruption.
Viruses, Worms, and Other Software Attacks
Viruses, worms, and other software attacks can also corrupt or modify data. Configuring virus protection programs that monitor systems and e-mail programs for viruses as well as keeping the virus signature file up to date is crucial. In addition, the manner in which you manage access to the network can also mitigate virus risks. For example, ensuring that all user computers run the latest virus software and get regular signature file updates automatically will help reduce risk. Tightly controlling what can and cannot be downloaded from the Internet will also help reduce risk of virus attack. Managing noncorporate computer connections to your corporate network is also an element of mitigating risk, since laptops brought in by others outside your company can introduce viruses to the network if they are given access. Educating users is also important, since preventing attacks can be easier than protecting against them and recovering from them.
Security Breaches
Another risk to data is the risk of a security breach. Throughout this book, we ve discussed various risks to security. One of the end goals of hackers is data (the other being system control). Security can be breached in a number of ways, but in this chapter, we re focusing on how to secure data. In Windows Server 2003, this is accomplished through managing users ability to log on to the network and then through managing users access to data once they ve been authenticated. Strong authentication and access policies and procedures provide a strong line of defense against intentional attack. Access control is discussed in more detail in the next section and it s sure to be covered in the exam. Although a hacker might intentionally attack a system, the other type of security breach can occur when users are unintentionally given incorrect permissions. This typically happens due to simple administrative error, intentional administrative privilege abuse, or because the system of granting access is too complex and the inherited permissions did not behave as intended. In any case, developing a consistent method for managing user access will greatly enhance security by reducing error administrative work as well.
Auditing Practices
Finally, auditing practices can help keep data secure. Carefully defining auditing policies can improve security by monitoring access to various objects. If an object is being accessed inappropriately, the administrator can take steps to resolve the problem whether the cause is inadvertent access (wrong permissions) or intentional access (hacker). Auditing file access or use of privileges can provide clues to inappropriate network activity and provide you with valuable information to help uncover the problem and resolve it. We ll discuss auditing later in this chapter.
Reviewing Access Control and Access Control Lists
When designing a resource strategy, you must determine how to grant and manage appropriate access to users, groups, and computers. This entails designing a strategy that will provide a systematic way of applying and managing access to resources. In this section, we ll briefly review access control and resource authorization methods .
Access control defines which users, groups, and computers can access particular network resources. Once a user is authenticated, access settings determine what that user can do on the network. Access control is comprised of permissions, user rights, and object auditing.
Permissions
Permissions define the type of access given to a user, group, or computer. Permissions can be granted to any user, group , or computer. To use groups and manage permissions efficiently , administrators should use the practice often referred to as AGDLP. This acronym is used to remember how permissions should be granted. Add user accounts (A) to global groups (G), add global groups to domain local groups (DL), and then add domain local groups to the security properties of the resource for which you want to grant permissions (P). This AGDLP strategy provides flexibility while reducing the complexity and administrative burden of managing permissions across the enterprise.
Although it is not often a good idea to assign explicit access rights and permissions to individual user accounts, it can be done. It might be appropriate if there is a compelling reason to do so and if no other method provides a feasible alternative. For example, you might have several remote servers and you want only one person to have the ability to manage them. Rather than adding a group or creating a group for that person, you can simply add the user account to the appropriate ACL for the server. However, it s almost always easier to use the AGDLP method for managing permissions.
Permissions can be applied to any security objects, including Active Directory objects, files, folders, or Registry objects. The types of permissions available vary depending on the object. For example, there are different permissions available for Registry keys than there are for files or folders.
When an object is created, the creator is the owner and has full permission of that object by default. The owner can always change the permissions on the object, regardless of how the permissions on the object are set. The owner can grant other users and groups access to the object.
In addition, permissions can be assigned to special identities. Special identities include the creator owner, interactive, local system, network, and service, among others. The creator owner has full permissions on the object. The interactive group includes all accounts for users logged on locally or through Remote Desktop connections to a particular computer. The local system is an account used by the local operating system. As you might expect, the network group includes all users logged on via a network connection. The service group is a group that includes any security principals that have logged on as a service. This is an automated, behind-the-scenes function and access is controlled by the operating system.
Permissions can be inherited, and this is the primary way of managing permissions. The administrator can automatically cause objects within the container (for example, all files in a folder or all subfolders in a folder) to inherit all inheritable permissions of that container. Only permissions marked to be inherited will be inherited.
User Rights
User rights grant specific privileges and logon rights to users. Rights such as Log on locally or Back up files and directory are assigned by default to certain user groups. Users can be added to these groups to grant or deny permissions based on group membership. User rights can be assigned on a per-user basis, but this quickly becomes difficult to manage. The preferred solution is to add users to group and grant or deny permissions to that group (AGDLP). In this way, if users change positions or leave the company, permissions based on group membership are revoked when they are removed from the group. This is the preferred method for managing user rights both to ease administrative overhead and to maintain security on the network.
Object Auditing
You can use object auditing to view user s access to various objects. You should define auditing policies so that you frequently monitor sensitive resources and regularly monitor less sensitive resources. As an example, you might want to monitor access to the Registry more often than you want to monitor file access to commonly used files and folders.
Access Control Lists
Each resource has an ACL that controls the access to that resource. There are two types of ACLs: Discretionary (DACL) and System (SACL). The DACL is the part of the ACL that grants or denies permissions to specific users and groups. Only the owner of the resource can change the permissions ”it is at the owner s discretion, thus the name . The SACL is the part of the object s description that specifies which events are to be audited per user or group. Auditing examples include access, logon attempts, or system shutdowns.
Access Control Entry
Each ACL is comprised of various access control entries (ACEs). An ACE is an entry in an ACL that contains the security ID (SID) for a user or group as well as an access mask that specifies which actions are granted, denied , or audited. An example of an ACL with ACEs for a document called securedocument.txt is shown in Figure 9.1. An example of an access mask is shown in Figure 9.2. In an ACE, various permissions are represented by one or more bits called an access mask. This functions in a manner similar to a subnet mask in networking. When access to an object is requested , the access request is compared to the mask. Bits that match are the permissions that are permitted. The example shown in Figure 9.2 is a simplified example of how a user s access token is compared with an object s access mask to determine what, if any, rights the user has. In this example, the user is granted generic read access for the object (leftmost bit is the only bit that matches).
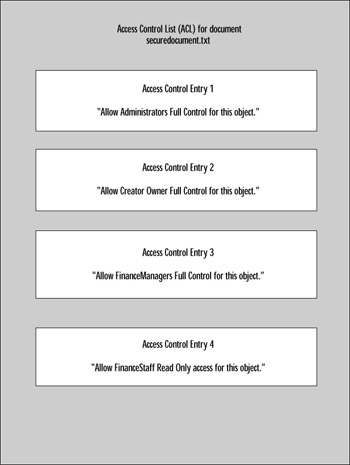
Figure 9.1: Access Control List with Access Control Entries
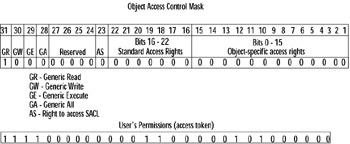
Figure 9.2: Access Mask Compared with Access Request
Groups
To fully understand access control, it s important to understand the definition of various groups. In Windows Server 2003, there are two types of groups available to you when using Active Directory. A security group is used to define, grant, or deny security settings including access control. These groups can be defined for a forest, domain, or local computer. A distribution group is used for a mailing list only and has no security function. Our discussion will be limited to security groups.
An account group is a security group whose members are user accounts or computer accounts that require the same permissions for a resource. For example, suppose your Finance department staff all require the same access to the Finance share on Server1. You would add users from the Finance department to an account group that you have created called FinanceUsers. FinanceUsers will all be given the same access to Finance resources on Server1. An account group is a security group that is not specifically associated with any particular object like a server or a file. Instead, it is used to group users who have similar access needs.
A resource group is a security group that has been added to the ACL of a resource and has been granted (or denied) specific permissions. Unlike an account group, a resource group is associated with a specific resource such as a server, file, or folder. Resource groups can be used to define specific sets of permissions for accessing an object. For example, support you have a file that contains sensitive information. You can create several resource groups for that object. You can create one group that has full control, one group that has read and write permissions only, and a third group that has read-only permissions. Then, you can add account groups to these resource groups. Using the same example, you might add the Executives account group to the full control resource group, you might add the FinanceManagers group to the read and write resource group, and you might add FinanceStaff group to the read-only resource group. In this way, you can closely manage permissions for the resource and add or delete account groups to these resource groups. This keeps the access for the resource well defined while allowing flexibility by being able to add or remove account groups rather than change the permissions for the resource.
Security Groups
Security groups are groups created to manage access and other security- related functions for ease of administration. Security groups contain user accounts, computer accounts, and other group accounts. Following best practices, permissions are granted or denied to security groups rather than individual accounts. Security groups can be organized by their scope, and the available groups in Windows Server 2003 are defined here. Although this chapter assumes a basic understanding of these groups and their scope, a brief review is included here to refresh your memory.
-
Local Members of the local group can include groups and accounts from the domain, but permissions are restricted to the computer on which the group is defined.
-
Domain local Members of domain local groups can include other groups and accounts from any Windows Server 2003, Windows 2000, or Windows NT 4.0 domain. Members of these groups can be assigned permissions only within the domain.
-
Global Members of global groups can include other groups and accounts, but only from the domain in which the global group is defined. These global groups can be assigned permissions in any domain in the forest.
-
Universal Members of universal groups can include other groups and accounts from any domain in the domain tree or forest. These universal groups can be assigned permissions in any domain in the domain tree or forest.
Some features, such as universal groups and group nesting, are available only on Active Directory domain controllers (DCs) and member servers.
| Test Day Tip | Make sure you re comfortable with groups and permissions. Although a full discussion is outside the scope of this chapter, it s important that you re very comfortable with permissions because you ll find many questions that directly or indirectly test your understanding and ability to apply your understanding of permissions. |
Access to Resources
In Windows Server 2003, there are essentially four methods for controlling access to resources: User/ACL , Account group/ACL , Account group/resource group , and role-based authorization . Each method provides benefits in certain settings and each comes with limitations that must be considered .
User/ACL
In this method, users are added directly to the ACL for the resource. Each user is then granted specific permissions for that resource. This is commonly used when someone wants to share access to a file or folder. Since the owner has a vested interest in the files and folders, he or she is likely to manage permissions to the resources effectively if only a small number of resources are involved. However, this method is generally not effective for an organization because it becomes unmanageable quickly. Table 9.1 summarizes the benefits and limitations of this method.
| Benefits | Limitations |
|---|---|
| Easy to implement. | Access to resources is inconsistent since it is set on a case-by-case basis. |
| Owner is likely to manage resources appropriately. | IT staff must deal with requests for permission changes to resources. |
| Might be appropriate for resources on which security must be very tightly controlled. | Difficult to manage access since it is at the resource level. |
| Difficult to revoke permissions for staff who move or leave the company. | |
| In large organizations, poorly managed (or unmanaged) security descriptors can waste disk space. |
Account Group/ACL (AG/ACL)
This method uses groups instead of individual accounts. A security group is created and users are added to the group. The group is then granted permission to the resource. When you want to change permissions for that resource, you simply change permissions for the security group or groups for that resource. This is a fairly scalable solution because you can use nested groups if you re running Windows 2000 or Windows Server 2003 in native mode. This is helpful if groups from multiple domains or forests require access to resources using identical permissions. In this case, they can be grouped together into one security group and assigned to the resource ACL. The downside of this method is that it requires more effort on the part of the resource owner, since each group has to be added to the ACL separately and permissions must be set for each group. Table 9.2 summaries the benefits and limitations of this approach.
| Benefits | Limitations |
|---|---|
| Scalable ”security groups can be nested if the domain is running in Windows 2000 native mode or Windows Server 2003 functional level. | Can be more difficult to administer if different groups each require different permissions. For each different set of permissions, a different group must be added to the ACL. |
| Easier to administer if groups require similar permissions. | If the domain is configured as a Windows 2000 mixed functional level, the resource owner has more administrative work, since group nesting is more limited. In this case, the best option is likely AG/RG, discussed next. |
| More secure ”when users leave the organization, removing them from the domain security group removes their permissions for all objects to which that group had permissions. Useful if permissions require frequent changing. |
Account Group/Resource Group
You can manage access to resources by assigning users with similar access needs to account groups. Account groups can be added to resource groups, which are then added to resource ACLs. Permissions on the resource are then set on a resource group basis. This method is sometimes appropriate for larger companies with many shared resources. It s highly scalable and does not depend on the mode in which you re running Windows (native or mixed). It works with Windows 2000 in mixed mode and with Windows NT 4.0 domains. Table 9.3 summarizes the benefits and limitations of the AG/RG method. It takes more work initially to set it up, and if resources require frequent permission changes, it can be cumbersome.
| Benefits | Limitations |
|---|---|
| Very scalable and maintainable at all domain functional levels. | Not recommended if resources require frequent changes to permissions. |
| Helpful if a group of related resources are being shared to multiple account groups. | More initial administrative overhead than other methods. |
| Easier to revoke or change permissions for users who move within the organization, leave or join the organization. | |
| Works in a mixed domain model. |
Role-Based Authorization
The fourth method of providing permissions is when users with similar roles are authorized to perform tasks based on scripts called authorization rules . You can finely control access in this method, but you must be running Windows Server 2003 and your applications must support this method. There are four domain functional levels available in Windows Server 2003, which are used to enable features of Active Directory depending on the domain s (or forest s) capabilities. The four levels are Windows 2000 mixed (default), Windows 2000 native, Windows Server 2003 interim, and Windows Server 2003. While a discussion of these is outside the scope of this chapter, it s important to understand these concepts. For this discussion, it s important to understand that role-based authorization can be used if the application supports it, and if you re running in the Windows Server 2003 domain functional mode. Table 9.4 summaries the benefits and limitations of the role-based authorization access control method.
| Benefits | Limitations |
|---|---|
| Allows very granular tuning of permissions. | Application must support role-based authorization. |
| Must be using Windows Server 2003 domain functional level. |
Selecting Domain Local Groups or Local Groups as Resource Groups
When designing security via the access control methods just described, you can use resource groups. These resource groups can be either domain local groups in the computer s domain or local groups on the computer that controls the resource. The decision as to which group type to use depends on a number of variables . When a user wants to share a resource and assign permissions, he or she is likely to simply use the local group. However, a network administrator assigning permissions to resources across the domain must look at the pros and cons of each model.
Domain Local Groups
From an administrative point of view, using domain local groups is an easier solution for managing access. Domain local groups can be managed anywhere in the domain and those groups are visible in Active Directory. If the group is named in such as way that it indicates the function of the group, administrative tasks can be greatly simplified using this approach.
However, there are several significant downside aspects that must be considered. If a file server has many shares and there are three resource groups that define three different sets of access permissions, the number of groups displayed in Active Directory will be the number of shares times the number of resource groups. If there were 200 shares, there would be 600 resource group listings in Active Directory. If there are 800 shares, there would be 2,400 groups listed. However, that s assuming there is only one computer with this number of shares. Suppose there are 10 or 50 or 100? As you can see, this can become a problem, both in terms of simply loading the list into the Active Directory Users and Computers snap-in and in terms of sifting through the groups looking for the specific one you want to work with. You can easily imagine that, in this scenario, an administrator might inadvertently modify the permissions on the wrong group, creating a security hole. If there are many shares on a computer, the better choice might be to use local groups as resource groups.
Another problem with using domain local groups as resource groups is that it is more difficult to retire a group. As resources are moved or changed, the resource groups associated with it must be managed.
Finally, there is another challenge in using domain local groups. As you know, when a user logs on, a security access token is created that is built from the security IDs (SIDs) of the groups to which the user belongs. If a user belongs to many groups, the token size might exceed the standard size. With the default settings in Windows Server 2003 and Windows XP, a user can belong to about 120 groups before the buffer for the token is exceeded. This buffer size can be resized, so if you choose to use domain local groups and users belong to perhaps hundreds of groups, you ll want to do this. For more information on resizing the security access token buffer, take a look at Microsoft Knowledge Base article 327825 New Resolution Problems That Occur When Users Belong to Many Groups http://support.microsoft.com/_default.aspx?scid=kb;en-us;327825.
| Test Day Tip | One of the results of a token size exceeding the buffer size is that the user will be unable to log on or gain access to network resources. Keep this in mind when working with problems that involve access or logon issues. |
Local Groups
Local groups require the resource manager to create the groups on the computer where the resource resides. This is a disadvantage because it requires the resource manager to create groups on many different computers in order to manage access. Local groups are not going to display in Active Directory, which makes administration more difficult. The upside is that the resource manager is much more likely to properly manage permissions on a local computer than on a domain group via another administrator. If you are responsible for one server for your department, you are more likely to be actively involved with managing and more aware of the security needs for the data on that server. A remote administrator three states away is not as likely to be aware of the security needs for that server and the resources on that server. There is little danger of exceeding the token buffer size when using local groups as there is for domain local groups.
| Exam Warning | You re definitely going to get a question or two that involves access to resources because access control is the foundation of security. Be very familiar with the four types of access control and the limitations of the various methods when you prepare for the exam. |
Working with Security Groups
There are several critical elements you ll need to define in order to design secure access control for your network. Each of these elements is part of creating a sound, consistent policy for managing access to network resources. We ll look at each in more detail next.
-
Defining security group creation policy.
-
Defining a security group request process.
-
Defining a security group naming policy.
-
Defining a security group nesting policy.
-
Defining a security group retirement policy.
-
Delegating security group maintenance.
-
Delegating resource group maintenance.
Defining Security Group Creation Policy
In many organizations, it s more efficient to delegate responsibility for various administrative tasks. To delegate security for network resources effectively, you should begin by defining your policy. By default, the following groups have permission to Create Group Objects and Delete Group Objects :
-
Domain Admins
-
Enterprise Admins
-
Account Operators
If you would like to delegate permission to create and delete security groups to users who are not members of one of these three groups, you can create a separate security group and apply those permissions to that group. For example, you could create a group called Security Group Admins and add users to whom you want to delegate the ability to create and delete security groups.
Defining a Security Group Request Process
Now that you ve defined who can create and delete groups, your next task is to determine how users will request the creation of security groups. This is an important step because it centralizes and standardizes group creation so that redundant or unnecessary groups are not created. A request for the creation of a security group should include the following information:
-
Group owner
-
Purpose and scope of group
-
Proposed membership
-
Relationship to other groups
-
Expected lifetime of group
Ideally, these requests should be submitted in a manner that allows them to be stored in a database for later review and searching. This is particularly helpful in rooting out unused or obsolete groups, based on the expected lifetime information.
Defining a Security Group Naming Policy
The next step is to define a standard for naming security groups. It can be confusing and cause administrative errors when naming conventions are either not specified or not used. Errors are not just an inconvenience to users who might be accidentally moved or changed from a legitimate group. Errors can also place users in incorrect groups, granting them inappropriate access to sensitive information. If an unauthorized user gains legitimate access (via a group membership error) to payroll information or personal medical data, you not only have a security problem, you might also have a legal problem as well.
A sound naming policy should include these elements:
-
Include the group s scope, purpose, and owner in its name and description.
-
Conform to hierarchy structure beginning with the most general and ending with the most specific.
-
Name and description combined should be less than 256 characters .
-
Use abbreviations if practical. Only the first 20 characters are usually visible without resizing columns or scrolling. If you view the Properties dialog of the group, the first 50 characters are visible.
It s often helpful to use the business organization as the basis for the naming conventions. For example, some companies are organized by business units, others by geography, still others by function. A naming convention can use these or domain names or any other logical structure. A naming convention based on business unit might be Software (SW), Hardware (HW), Service (SVC), and Corporate (CP). Therefore, group names might begin with SW, HW, SVC, or CP. To drill down further, the name might next reflect the function within the units, so the names would develop in this manner: SWSALES, HWSALES, SVCSALES, and CPSALES. The next level might be a management level, so the names would continue: SWSALESMGMT, HWSALESMGMT, SVCSALESMGMT, and CPSALESMGT.
A naming convention based on geography might look something like this:
-
WEST-SEA-Floor7-Laser
-
WEST-SEA-Floor7-Inkjet
-
WEST-SEA-Floor7-HiSpeed
-
WEST-SEA-Floor8-Laser
-
WEST-SF-Floor1-Inkjet
-
EAST-NY-Floor38-Laser
-
EAST-NY-Floor38-Inkjet
-
EAST-NY-Floor38-HiSpeed
Another example is a naming structure based on the domain membership. If the domain is somecompany.com, you might have a naming structure that looks like this:
-
Some-sales-mgmt
-
Some-sales-staff
-
Some-service-support-mgmt
-
Some-service-support-users
-
Some-service- parts -mgmt
-
Some-service-parts-users
It s also important to note that there is no way to automatically enforce naming standards. Windows Server 2003 does not provide the ability to enforce standards, so clearly delineating standards, publishing standards, and educating users ( especially those to whom you ve given the permission to Create Group Objects) is important.
Defining a Security Group Nesting Policy
Nesting occurs when one security group is placed inside another security group. The nested group inherits all of the privileges and permissions granted to the parent group. As you learned earlier, unlimited nesting can cause problems with the user s security access token size. By default, a user should not belong to more than 120 groups to avoid the token buffer overflow issue. The buffer can be resized if group membership exceeding 120 groups cannot be avoided. Another challenge presented by nesting is that at some point, it becomes extremely difficult to determine what permissions are inherited by a group within a group many levels down. Clearly, then, defining a nesting policy will also help maintain a secure and logical structure.
Although you can create any framework that makes sense to you and your organization, one that follows a typical hierarchy structure will make it more logical and intuitive for all users that have the ability to create security groups. At the top, you might have the broadest group, ALL EMPLOYEES. Within that, you could create groups that represent different divisions of the company or different business units. From there, you can create addition groups within each division or business unit used for employees with different functions such as managers, supervisors, team members, and so forth.
With this type of structure, it s easy to see that when you hire a new employee as the sales assistant in the Keyboard division of the company, you simply add that employee to the team members account group and he or she is granted appropriate permissions all the way through the organization.
If you choose to use the AG/RG model, you will have some level of nesting, but you have to use care not to allow nested groups to get out of hand. Figure 9.3 shows an example of a nested hierarchy.
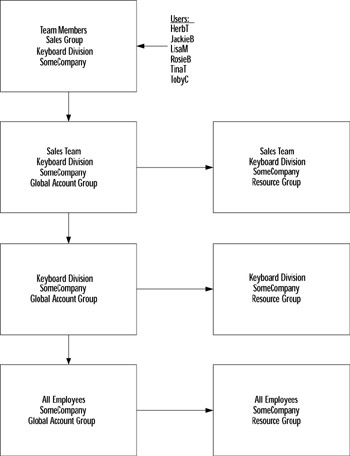
Figure 9.3: Nested Group Hierarchy
You can also modify the nesting to provide more global access to some users. For example, you might want division managers to have access to all resources in their divisions. This can be accomplished using a modified nesting hierarchy. Division managers user accounts could be added to a Division Manager account group. This account group could be added to all account groups within the division. In a sense, this process is the reverse of the one outlined earlier. It can be useful for granting broader permissions for selected groups. The downside, though, should be considered. First, since those higher in the organization are often the targets of attacks, any breach of their accounts provides broad access within the organization. Second, this method causes the user to be a member of hundreds or thousands of groups. As we discussed earlier, this can cause the user s security ID token to become too large. Large tokens cause slow logons or the inability to log on or access resources. Although this strategy might be useful in your organization, you should consider these two issues before implementing this structure.
Defining a Security Group Retirement Policy
When you create your security group policies, another important element is defining when a group should be retired and how this will be accomplished. Obsolete groups can create security holes and administrative clutter. There are two aspects to this task: identifying and deleting obsolete security groups.
Obsolete groups can often be spotted by the lack of changes to the group. Typical groups will have changes to membership over time. Any group that has not changed for a period of time might be obsolete. Earlier, we discussed setting expected lifetimes as one of the criteria for requesting a new security group. This data can be used to look for potentially obsolete groups. You can find this out by performing a query using the Lightweight Directory Access Protocol (LDAP) in the Active Directory Users and Computers snap-in in the Microsoft Management Console (MMC) as demonstrated in Exercise 9.01.
| |
In this exercise, we ll walk through creating a query to look for obsolete groups. While LDAP queries, per se, are outside the scope of this chapter, we will walk through a query so you become familiar with it. For more information on LDAP and LDAP queries, you can search the Help and Support Center in Windows Server 2003.
-
Click Start Administrative Tools , and then select Active Directory Users and Computers .
-
Click Saved Queries to select that node, click Action , and then select New Query . In the New Query dialog, type a name for the query such as Obsolete Groups . Type a description that will help you remember the purpose of the query, such as Search for groups that have not changed since specific date. Next, click the Browse button if the container for the query is not listed (should default to domain).
-
To search subcontainers, ensure the check box Include subcontainers is checked.
-
Click the Define Query button to define the LDAP query parameters.
-
In the Find Common Queries dialog box, click the drop-down arrow in the Find box. Select Custom Search from the list.
-
Click the Advanced tab to access the LDAP query function. In the text box labeled Enter LDAP query , type in the following string, exactly as shown here (note: there are no spaces in this string). Figure 9.4 shows this step.
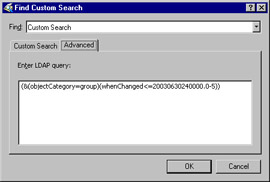
Figure 9.4: LDAP Query(&(objectCategory=group)(whenChanged<=20030630240000.0-5))
Note The syntax of the LDAP query string includes the date in this format: YYYYMMDD followed immediately by the time in this format: HHMMSS. The final part of the string to the right of the period is .0Z. Z is the time zone as it relates to Greenwich Mean Time. For example, California is “8, New York is “5, meaning that the east and west coast of the United States are 5 and 8 hours behind (earlier than) Greenwich Mean Time. Thus, the string shown in this exercise is for June 30, 2003 at midnight (240000) in New York (or the east coast ) at .0 “5.
-
After you enter the string, click OK to return to the New Query dialog. Click OK to run the query.
-
The results are shown in Figure 9.5. Each group can now be examined to determine if it is obsolete.
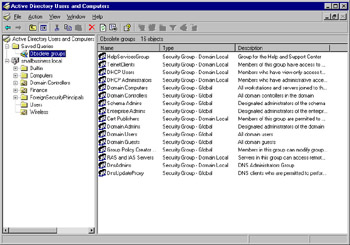
Figure 9.5: Result of LDAP Query
| |
Keep in mind that some groups might have very stable membership, so you should closely examine any groups you believe to be obsolete before taking action. After you ve identified obsolete groups, you can disable or delete them. However, keep in mind that group deletion is a one-way process; there is no Undo function. This is because when a group is created, it is given a unique SID. If a group is inadvertently deleted, it must be recreated and incorporated into the hierarchy.
Rather than deleting a group, you can choose to disable the group for a specified period of time in order to determine if the group truly is obsolete. This can be done by temporarily changing the group into a distribution group. This retains the group s unique SID as well as membership and other variables. If you audit changes in users access permissions and do not receive any notifications that a user s access has changed, you can safely assume the group is no longer in use. You can change the group from a security to a distribution group by using the dsmod.exe command-line utility, which can be used to modify the attributes of an existing object in a specific type in the directory. In this case, you d use the dsmod group command with the appropriate switches. The “secgrp {yes no} sets the group as a security group (yes) or a distribution group (no). For more information on the dsmod utility, type dsmod ? at a command prompt. This type of modification cannot be done via the Active Directory Users and Computers snap-in.
Since deleting groups is a permanent step and recovering from an inadvertent removal of a group could be time consuming, your best bet is to limit the number of people with permission to delete groups and ensure they fully understand the implications of deleting a group.
| Test Day Tip | You won t be tested on LDAP, but you will need to understand the concepts related to maintaining groups and group membership. Be familiar with these overall concepts and review them briefly before the exam. Outdated or unused groups create a security risk, so they ll likely appear in one or two questions someplace on the exam. |
Delegating Security Group Maintenance
In small organizations, it might be possible for one or two administrators to manage the routine maintenance associated with security groups. In large organizations, however, this task is typically divided up and delegated to members of the organization who are not in the IT department. The added benefit of this is that those closest to the resource are most likely to keep it current. Delegation of these administrative tasks can be to anyone within a department or organization who is both trusted and familiar with personnel. An administrative assistant can be given the job of maintaining group membership for his or her department or area. Security groups in Windows Server 2003 can also be used in Microsoft Exchange 2000 mailing lists, so having an administrative assistant oversee this process can make even more sense.
Typically, it makes sense to have the resource owner manage the ACLs on the resource, whether that s a few files and folders on a member computer or a file server operator who maintains the company s file servers. The person responsible for the resource is generally the best person to manage the resource groups on that resource.
Delegating Account and Resource Group Maintenance
Account and resource group maintenance reduces the workload on the IT department but comes with its own set of challenges. Those to whom delegation is granted must be reliable and highly trusted employees since they are granted the power to add and remove users from various groups, granting access to corporate resources. Not only should these employees be highly trusted, they should also be given clear guidelines to help them maintain a secure environment. The security risk inside a company is often far greater than external security risks. A malicious person in this position could do damage to network resources. Also keep in mind that social engineering is the most common source of security breaches. Thus, if a trusted administrative assistant is given the authority to add or remove users from groups, he or she is more likely to be the target of such a maneuver. By educating these users as to the risks and benefits as well as the rules and guidelines, maintenance of these groups can be delegated while managing risk.
In addition, you must control and monitor who is a member of the group to whom you ve delegated control. If you create a group such as DivisionAdmins to whom you delegate control for account group maintenance, you should monitor the membership in this group. This can be done centrally via the IT department or via security policy that enforces membership in groups such that any user added who is not in the policy will be removed the next time policy is refreshed. Depending on the size of your organization, you ll need to determine the most efficient and effective method for monitoring this group s membership.
Although resource group maintenance could be delegated to the admins listed earlier, DivisionAdmins in this example, it s possible that the requests for permissions to division wide resources might overwhelm the admin whose primary job is not maintaining network permissions. Therefore, it sometimes makes more sense to have resource owners manage resource group maintenance for that resource.
You can delegate administration for a wide variety of tasks. For example, you can delegate control of a domain, an organizational unit (OU), a server, or accounts. Delegation can be managed through the Delegation of Control Wizard, through the Authorization Manager snap-in in the MMC, or through the ACL Editor. We ll look at each of these tools briefly in case you re not already familiar with them. Let s begin with stepping through the Delegation of Control Wizard in Exercise 9.02.
| |
The Delegation of Control Wizard is accessed through Start Administrative Tools Active Directory Users and Computers . This wizard is used to select groups or users to whom you want to delegate control and to select which tasks you want to delegate. This is a commonly used tool, so we ll step through this exercise to familiarize you with its functions and features.
-
Locate the object for which you want to delegate control. In this example, we ve selected the Finance OU, shown in Figure 9.6. Select an object from the left pane that you want to use for this exercise.
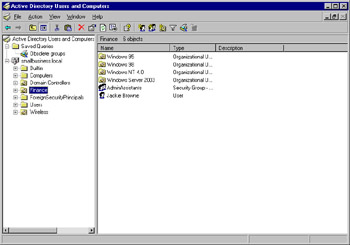
Figure 9.6: Delegating Control of the Finance OU in Active Directory Users and Computers -
Right-click the object and select Delegate Control . The Delegation of Control Wizard launches the welcome screen. Click Next to continue.
-
Click Add to add users or groups (best practices suggest adding groups) to whom you want to delegate control. Type in the name and then click Check Names to verify the name selected. The verified names are added to the list, as shown in Figure 9.7. Click OK to accept the list and then click Next to select the Tasks to Delegate .
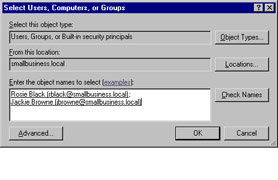
Figure 9.7: Adding Users to Delegate Control -
In the Tasks to Delegate screen, you can either choose from a pre-set list of tasks or you can create a custom set of tasks to delegate. If you choose from the pre-set list and then click Next , the final screen displays your selections so you can review them one more time before accepting and applying them. If you choose the custom tasks, the pre-set list of tasks is disabled and you must click Next to begin selecting custom tasks. For this exercise, select Delegate the following common tasks , which is selected by default. To select a task, click the box to select it. Figure 9.8 shows three permissions delegated: Create, delete, and manage user accounts , Create, delete, and manage groups , and Modify the membership of a group . Click Next to continue.
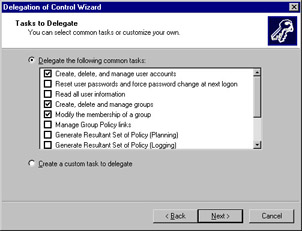
Figure 9.8: Selecting Tasks to Delegate -
The Completing the Delegation of Control Wizard screen is displayed, showing the choices you ve selected, including a) the object, b) the groups or users, and c) the tasks to be delegated. If you want to make any changes, click Back . If you want to exit without saving changes, click Cancel . Otherwise, click Finish to delegate control of the listed object, as shown in Figure 9.9.
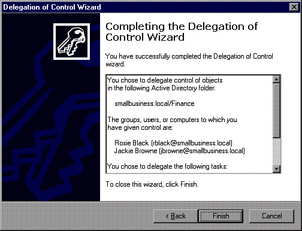
Figure 9.9: Completion of Delegation of Control Wizard
| |
Using the Delegation of Control Wizard, you can easily delegate control of objects within the site, domain, or forest. Another way of managing delegation is through the Authorization Manager snap-in in the MMC. The Authorization Manager is a specific tool that can be used for role-based delegation with applications that support this method. We ll discuss role-based authorization and delegation later in this chapter. For now, it s important to understand that role-based administration is implemented to facilitate authorization and computer configuration. This is accomplished via the use of scripts. Typically, this is used when an application supports role-based authorization.
Finally, you can use the Access Control List Editor. For example, if you have a shared folder, you can right-click that folder and select Sharing and Security . In the Properties dialog for that folder, click the Security tab. The groups or users who have access are listed and the selected group or user s permissions are displayed in the box below that, as shown in Figure 9.10. You can access Advanced permissions by clicking the Advanced button. This gives you access to permissions, auditing, ownership, and effective permissions for the selected object. By editing the ACL in the object s properties, you can control access to the object at a very detailed level, if desired.
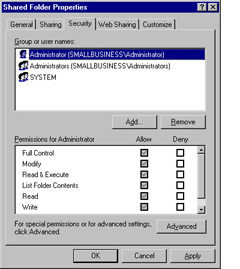
Figure 9.10: Shared Folder Permissions Access Control List
These three methods provide a variety of ways to delegate and manage access control in Windows Server 2003. The most commonly used tools are the Delegation of Control Wizard for efficiently managing delegation of administrative tasks and the direct editing of the ACL for objects over which you have control.
Objective 4.2.4, 4.3.2: Analyzing Auditing Requirements
As part of designing network resource security, you should analyze your requirements for auditing to determine what level of auditing is appropriate for your organization. You can begin by identifying the types of attacks your system might be vulnerable to, and identify those audit events that would help determine if the system were successfully or unsuccessfully attacked . Remember, you can audit both successful and unsuccessful events, and determining which events are most meaningful is the key to defining auditing requirements that will protect your system.
It s important to create a list of events that are important. Auditing unimportant events will simply fill your event log with meaningless data and will create more work for you as you try to sort through a long list looking for the important events. If you choose to implement extensive auditing, you might want to use an additional tool, such as Microsoft Operations Manager (MOM), to help filter data to assist in identifying important events.
At first glance, you might think that unsuccessful attempts might be the only events worth looking at. Certainly, tracking unsuccessful events can help you see if someone is trying to gain access to resources to which he or she does not have permission. However, tracking successful events can also be useful if carefully chosen . Obviously, a majority of successful events indicate normal business activity (as do many unsuccessful events). However, a hacker who gains access will also log a successful event. If you regularly review events, you ll see patterns of usage that are normal, making it somewhat easier to spot irregularities. In addition, looking for a series of unsuccessful events followed by a successful event could indicate an unauthorized user has managed to get on to the network.
Knowing your business patterns will help you spot patterns in the audit events. If your business is typically a Monday through Friday 8 a.m. to 5 p.m . type of business, activity outside these hours could indicate a problem. Additionally, being aware of personnel changes can help you modify access as needed and can be used in combination with auditing. For example, many companies have a policy in place that requires the Human Resources department to immediately notify IT of any personnel actions such as suspension or termination. (This type of policy also helps when new employees are hired and need to be granted network access.)
There are a number of events that could be managed, but the following list is a good starting point:
-
Logon events
-
Account logon events
-
Directory Service access events
-
Privilege use events
-
Object access events
-
System events
-
Process tracking events
-
Policy change events
Logon Event
Logon events are generated when a user logs on to or off of a computer. Every time a user logs on or off, whether on a workstation or server, an event is generated. A variety of event IDs are associated with logon events. Table 9.5 shows a partial list of these event IDs. An explanation of how some of these IDs may be interpreted follows the table.
| Logon Event ID | Description |
|---|---|
| 528 | A user successfully logged on to a computer. |
| 529 | Logon failure. A logon attempt was made with an unknown username or a known username with a bad password. |
| 530 | Logon failure. A logon attempt was made with a user account outside of an allowed time. |
| 531 | Logon failure. A logon attempt was made using a disabled account. |
| 532 | Logon failure. A logon attempt was made using an expired account. |
| 533 | Logon failure. A logon attempt was made by a user who is not allowed to log on at this computer. |
| 534 | Logon failure. The user attempted to log on with a type that is not allowed. |
| 535 | Logon failure. The password for the specified account has expired. |
| 536 | Logon failure. The Net Logon service is not active. |
| 537 | Logon failure. The logon attempt failed for other reasons. (In some cases, the reason for the logon failure is unknown.) |
| 538 | A user logged off. |
| 539 | Logon failure. The account was locked out at the time the logon attempt was made. |
| 540 | A user successfully logged on. |
| 541 | Main mode Internet Key Exchange (IKE) authentication was completed between the local computer and the listed peer identity or quick mode has established a data channel. |
| 542 | A data channel was terminated . |
| 543 | Main mode was terminated. (This can occur when the security association time limit is expiring, when policy changes or either computer terminates the session.) |
| 544 | Main mode authentication failed because the peer did not provide a valid certificate or the signature was not validated . |
| 545 | Main mode authentication failed because of a Kerberos failure or because a password is not valid. |
| 546 | IKE security association (SA) failed because the peer sent an invalid proposal. A packet was received that contained invalid data. |
| 547 | A failure occurred during the IKE handshake. |
| 548 | Logon failure. The security ID from a trusted domain does not match the account domain SID of the client. |
| 549 | Logon failure. All SIDs corresponding to untrusted namespaces were filtered out during an authentication across forests. |
| 550 | Notification that could indicate a denial-of-service (DoS) attack. |
| 551 | A user initiated the log off process. |
| 552 | A user successfully logged on to a computer using explicit credentials while already logged on as another user. |
| 682 | A user reconnected to a disconnected terminal server session. |
| 683 | A user disconnected a terminal server session without logging off. |
Logon attempt failures can indicate a number of things. It could simply indicate that a user forgot a password or mistyped it. However, it could also indicate an attempt to attack the network. In a large environment, these events become numerous and difficult to interpret. If patterns emerge, repeat, or change, you should investigate, especially when the events fall outside of normal parameters. Events occurring outside of normal business hours or in greater-than-usual volume might indicate an attack.
Account misuse can be indicated by events 530, 531, 532, and 533. These events indicate the account name and password were correct but that other restrictions prevented the user from logging on such as time of day restrictions. These events should be investigated to determine if there is a problem or if the user simply needs changes to his or her access for legitimate business purposes.
Account lockouts occur when a set number of unsuccessful logon attempts have been made. These events can indicate an unauthorized user attempting to gain access to the network or it can indicate a legitimate user who forgot his or her password. To spot potential problems, look for earlier 529 events by the same user account and see if any pattern emerges.
Account Logon Event
An account logon event is generated on DCs for domain account activity, and on local computers for local account activity. Account logon events are created when a user s credentials are authenticated. When domain credentials are used, the account logon events are only generated in the DCs event logs. If the credentials presented are local credentials (Security Accounts Manager (SAM) database), the account logon events are generated in the server s security log. You can choose to audit successful and unsuccessful logon events on critical servers. An important point to note is that because account logon events can be recorded by any valid DC in the user s domain, you ll need to consolidate event logs across the DCs in order to analyze all account logon events in the domain. You can consolidate event logs by using new features in Windows Server 2003. For example, System Monitor supports viewing data from multiple log files simultaneously and from data stored in a SQL database. Selected data from multiple log files can be saved as a separate file for later analysis. Windows Server 2003 supports log files greater than 1GB in size so performance data can be appended to an existing log file. In addition, you can log data directly to a SQL database using Open Database Connectivity (ODBC) connections.
Directory Service Access Event
Directory Service access events record when directory services were accessed. As you can imagine, directory service objects are successfully accessed on a regular basis, which generates a tremendous number of events. The attempted access generates an event ID 565. By looking at the event details, you can determine which object the event corresponds to. Due to the high volume and lack of specificity in the event, it s usually more helpful to audit unsuccessful directory service access to look for indicators of an attack.
Privilege Use Event
Privilege use events are logged every time a user uses any privileges. For example, you might want to monitor the use of the privilege Create, delete, and manage user accounts or Create, delete, and manage groups. By monitoring the use of privileges, you can see when these privileges are used and by whom. For example, if Lisa has permission to create, delete, and manage user accounts and you notice that she has used this privilege about once per month on average, you d suspect something was wrong if you suddenly saw Lisa using this privilege three or four times a week. As with directory service access, auditing successful events will generate large volumes of typically innocuous events. Therefore, it s more useful to audit successful use of privileges related to security such as changing user permissions or group membership, adding users to a group, and so forth. When you delegate various IT administrative tasks, you can audit the use of those privileges to ensure they re being used in an appropriate manner.
There are three specific event IDs that can be helpful to monitor the use of privileges, as shown in Table 9.6. Monitoring and interpreting this data can indicate users attempting to expand their privileges or cover their tracks.
| Privilege Use Event ID | Description |
|---|---|
| 576 | Specified privileges were added to a user s access token. (Generated when user logs on.) |
| 577 | User attempted to perform a privileged system service operation. |
| 578 | Privileges were used on an already open handle to a protected object. |
The 577 and 578 events can indicate a user was attempting to gain elevated privileges by acting as part of the operating system. The GetAdmin attack attempts to add a user account to the Admin account using this method. The only entries for this event should be for the System account. Event IDs 577 and 578 can also be generated when a user attempts to change the system time in an attempt to cover his or her tracks and hide the actual time an event took place. These two IDs can also be generated when an attacker attempts to install or load a virus, worm, or Trojan horse by imitating a driver loading or unloading. Managing the audit logs, attempting to shutdown the system, and taking ownership of files or objects are also logged as event ID 577 or 578. Auditing changes to audit or event logs can be very helpful since attackers typically attempt to hide their activities by modifying the audit or event logs.
Object Access Event
Object access events record when any object with a system access control list (SACL) is accessed. Objects that can be accessed are essentially anything a user interacts with, such as files and folders, printers, and Registry keys. For all object access events you want to log, you must enable auditing for object access on the object and then define the SACL for each object. As with other types of events, auditing all object access events will slow system performance and generate volumes of information, making it difficult to distill the meaningful events from the long list of normal activity events. In general, it s helpful to audit access on targeted objects based on importance and sensitivity of the data. For example, you might want to audit all access to payroll files. An unusual pattern of access or reading and writing might indicate a problem.
System Events
System events are generated when the computer environment is changed in some significant way, either by a user or by a process. You should audit computer shutdown events for servers, although this function is enabled by default in Windows Server 2003. For earlier operating systems, logging shutdown events is important to know when servers are shut down and by whom. Other system events include when the system time is changed, when Windows is starting up or shutting down, or when the audit log is cleared, to name just a few.
Process Tracking Events
Auditing process tracking events monitors processes running on computers. There are so many processes running on computers throughout the course of even a single day that this typically is not a helpful auditing event. If you have a specific use for this or want to monitor a specific process, you will see event IDs 592, 593, 594, and 595. It s not common to audit for these events unless you have a specific need.
Policy Change Events
Auditing for policy change events allows you to see attempts to alter policy settings, including changes to audit policies. An attacker might attempt to change audit policy to stop auditing on the objects or in the areas of the intended attack. Event IDs 608 and 609 indicate that a user right was assigned (608) and a user right was removed (609). Auditing these events can help spot irregular policy change events. A number of attacks might be indicated by the 608 and 609 events, including:
-
Attempt to act as part of the operating system
-
Backup or restore files and directories
-
Change system time
-
Debug programs
-
Force shutdown of local or remote system
-
Load and unload device drivers
-
Manage auditing and security log
-
Take ownership of files or other objects
Although each of these events might be harmless, watching for patterns or unusual access patterns can tip you off to attempted intrusions. For example, changing user rights assignments might be harmless or it might indicate that a rogue user is trying to upgrade permissions for a user to gain unauthorized access. Changing the policy for backups or restores could be an attempt to gain access to the backup or restore process. Loading and unloading device drivers is typically a harmless event driven by dynamic processes on the system, but it can also be indication of a virus being loaded into the system area reserved for drivers. Changes to audit logging policies themselves can be an indication of a malicious user trying to stop logging of events while he or she does something to the system. Even changing the system time can be seen as an attempt to cover a malicious user s tracks to disguise the real time an intrusion occurred. Although most of these events are typically harmless, unusual patterns might indicate intrusion or attack.
| Test Day Tip | Review the various events that can be audited and logged and think about scenarios involving patterns of events. The exam will not require you to memorize these event IDs, but you should understand what the events are and what kinds of attacks they might indicate when they appear in an audit log, especially when in groups or in particular patterns. |
Objective 4.3: Design an Access Control Strategy for the Registry
The Registry is the heart of the Windows Server 2003 operating system and contains sensitive data about the files and folders, the applications, and the computer state. If a malicious user gains access to the Registry, he or she could do serious damage to the computer. Access to the Registry should be controlled and monitored to ensure the Registry is protected from intentional and unintentional harm.
The Registry is given a high level of security by default. The only users who are granted full access to the entire Registry are administrators. Other users are generally given full access to the keys related to their own user accounts located in HKEY_CURRENT_USER. They are also generally given read-only access to other areas of the Registry related to the computer and the software. Users are granted no access to other users account data. If a user has permission to modify a key, that user can modify that key and any key beneath it in the hierarchy.
While permissions can be modified for the Registry using the Registry Editor (by using the regedt32.exe command at Start Run ), it makes sense in a larger organization to apply security to the Registry via group policy. Although this topic has been touched on earlier in this book, let s look again at the tools you have at your disposal for securing the Registry across the enterprise. We ll review the use of regedt32.exe and then we ll look at group policy.
When you launch the Registry Editor, you can view or modify any Registry keys to which you have access. As you re well aware, modifications to the Registry can cause a system to crash and can make recovery difficult and time consuming unless you ve recently backed up the Registry. Use care when viewing or modifying the Registry and, if in doubt, always export a current copy of the Registry or make sure your Automated System Recovery (ASR) disk is up to date before making any changes. Exercise 9.03 steps through viewing Registry access permissions.
| |
In this exercise, we ll step through reviewing Registry access permissions. We will not make any changes to the Registry settings, but you should still use care . You should also choose to Cancel out of screens or dialogs instead of clicking OK . If you were making changes that you wanted to keep (on the job), you would click OK instead. Most needed changes can be made without directly editing the Registry, and best practices dictate that any time you can avoid directly editing the Registry, you should do so.
| Note | Any changes to the Registry, whether intentional or not, could cause your system to become unstable or unusable. Please do this exercise with care. |
-
Click Start Run and then type regedt32 in the Open text box. Click OK to launch the Registry Editor .
-
Click File on the Registry Editor menu. Notice there is no Save or Save As function. This is because any changes you make in the various dialogs are applied immediately. Exiting closes the Registry Editor with whatever settings currently exist. There is no way to exit without saving changes. This is why it s critical to save the Registry before working on it, and use care when working in it.
-
In the Registry Editor, the left pane displays the nodes and the right pane displays any nodes or keys beneath the one selected on the left. Depending on the state of your Registry tree, you might only see one node, My Computer. If so, click the + to the left of My Computer to expand the tree. In most cases, you ll see My Computer listed with five nodes beneath it: HKEY_CLASSES_ROOT, HKEY_CURRENT_USER, HKEY_LOCAL_MACHINE, HKEY_USERS, and HKEY_CURRENT_CONFIG.
-
Click the + to the left of HKEY_CURRENT_USER to expand the tree. Notice the keys beneath HKEY_CURRENT_USER, including AppEvents, Control Panel, Printers, Software, and others.
-
Click HKEY_CURRENT_USER to select it. Right-click the selection or click Edit on the menu and select Permissions.
-
The Permissions dialog for HKEY_CURRENT_USER is displayed. In this dialog, you can add or remove users listed in the Group or user names: dialog. You can also edit permissions for the currently selected user or group. Figure 9.11 shows this dialog; notice that you can modify permissions for the Administrator group, which is currently selected in Figure 9.11.
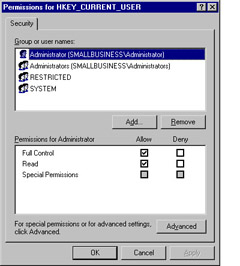
Figure 9.11: Modifying Default Permissions on Registry Key -
You can set special permissions and set advanced settings as well. Click the Advanced button to access this dialog.
-
The Advanced Security Settings for HKEY_CURRENT_USER dialog is shown in Figure 9.12. Notice several things in this dialog. First, you can view or modify permissions as well as set auditing, view or modify the owner, and view effective permissions. In addition, there are two important check boxes you should be familiar with.
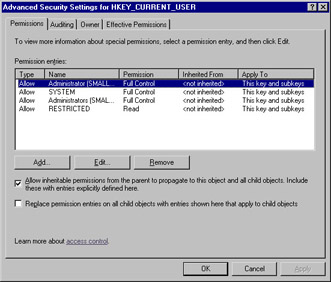
Figure 9.12: Advanced Registry Settings for HKEY_CURRENT_USER -
The first check box is labeled Allow inheritable permissions from the parent to propagate to this object and all child objects. Include these with entries explicitly defined here. This box is checked by default. This will cause permissions to be inherited by all child objects. Removing this check box will cause permissions to be applied only to the object for which they are explicitly set. Understanding how permissions apply to child objects is important for understanding permissions throughout the network structure.
-
The second check box is Replace permissions entries on all child objects with entries shown here that could apply to child objects. This check box is not checked by default. Checking this box will cause all subfolders and files to have their permissions reset to those inheritable from the parent object. Once you select this, there is no Undo function and changes are permanent. If you want to modify permissions for child objects below the parent, you can use this to reset permissions but care should be used.
-
Click the Auditing tab. You can create, modify, or review auditing set for this object. Notice the same two check boxes regarding inheritance of permissions are located here as well, as shown in Figure 9.13.
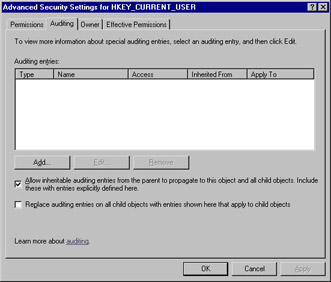
Figure 9.13: Auditing Tab Options -
Click the Owner tab. On this tab, you can take or assign ownership of this object if you have the appropriate permissions to do so. You can also change ownership of subcontainers or child objects by selecting the check box labeled Replace owner on subcontainers and objects.
-
Click the Effective Permissions tab. On this tab, you can view the permissions that would be granted to the selected group or user based solely on the permissions granted directly through group membership, as shown in Figure 9.14. You begin by clicking the Select button, selecting the user or group, and then viewing effective permissions. This tool calculates the permissions granted to a specific user or group and takes into account group membership (for the user or group) and inherited permissions (from the parent object).
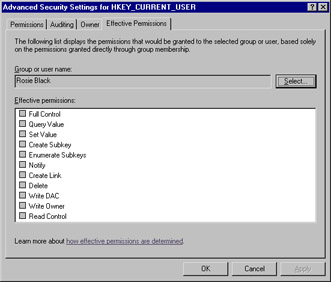
Figure 9.14: Effective Permissions Options -
Click Cancel to exit the Advanced Security Settings for HKEY_CURRENT_USER dialog. Click Cancel to exit the Permissions for HKEY_CURRENT_USER dialog.
-
Click File on the Registry Editor menu, and select Exit to close the Registry Editor.
| |
Now that we ve looked at how to modify Registry settings via the Registry Editor, we ll look at a more global method of setting Registry settings. As you learned in Chapter 2, Securing Servers based on Function, security templates can be used to set security across the enterprise in a consistent manner. There are also security settings that can be access via group policy. Using group policy to set Registry access is the recommended way for managing Registry access. It provides an efficient and reliable method for setting permissions, and ensures that settings are re-applied every time group policy is applied. This can help ensure that permissions are maintained as specified in the policy and avoids errors that might be made when directly editing the Registry. To use this method, the computer must be joined to a domain. Policy settings are refreshed every 90 minutes on workstations or member servers, and every 5 minutes on DCs by default (including every 16 hours if no changes have been detected ). In Exercise 9.04, you ll step through setting Registry access permissions using the Group Policy Editor snap-in in the MMC.
| |
In this exercise, we ll step through how to set Registry permissions via Group Policy. For the purposes of this exercise, we ll select the default domain policy. However, in practice, you might apply these settings to an OU, a site, or a domain.
-
Click Start Run , type mmc in the Open text box, and then click OK to launch the Microsoft MMC .
-
Click File Add/Remove Snap-in .
-
In the Add/Remove Snap-in dialog, click Add . Scroll through the list until you locate Group Policy Object Editor . Click to select then click Add .
-
The Select Group Policy Object Wizard will launch. The default Group Policy Object (GPO) selected is Local Computer . Click Browse .
-
In the Browse for a Group Policy Object dialog, locate Default Domain Policy on the Domains/OUs tab and then click OK .
-
Click Finish to close the Select Group Policy Object Wizard . Click Close to close the Add Standalone Snap-in dialog. Click OK to close the Add/Remove Snap-in dialog.
-
In the left pane of the MMC, click the + to the left of Default Domain Policy to expand the tree.
-
Click the + to the left of Computer Configuration . In the expanded tree, click the + to expand Windows Settings .
-
Click the + to expand the Security Settings . In the list under Security Settings, locate the Registry node. Click to select the Registry node. If there are no subnodes, the tree will not expand but the + will not be displayed, as shown in Figure 9.15.
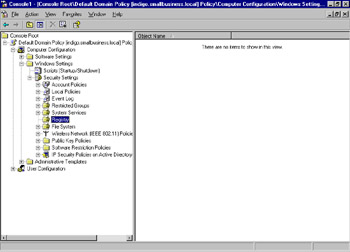
Figure 9.15: Registry Node in Group Policy Object Editor Snap-In -
If any Registry policies exist, you can view or modify them here. If none exists, you can add a key.
-
For this exercise, let s assume you want to limit the ability to run the Regedt32 command. Click Registry , and then on the menu, click Action Add Key . The dialog, Select Registry Key , is displayed as shown in Figure 9.16.
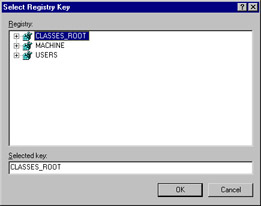
Figure 9.16: Adding Key to Registry Access -
In the Select Registry Key, three keys are visible: CLASSES_ROOT, MACHINE , and USERS . Click the + to the left of USERS to expand the tree.
-
Click the + to expand .DEFAULT and locate the Software node, as shown in Figure 9.17.
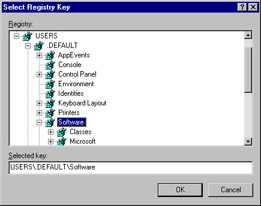
Figure 9.17: Selecting the Software Node -
Expand the Software node, click the + to the left of the Microsoft node, and scroll down until you locate RegEdt32 .
-
Click RegEdt32 to select it and then click OK . The Database Security for Users\.DEFAULT\Software\Microsoft\RegEdt32 dialog is displayed. You can now view or modify permissions for this key, as shown in Figure 9.18. The Administrators group is selected by default and has Full Control and Read permissions set to Allow by default.
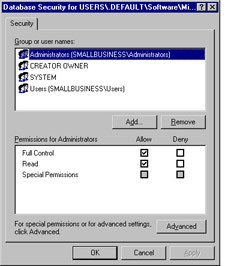
Figure 9.18: View or Modify Permissions for Registry Key -
Click Users and notice that in the Default Domain Policy, Users permissions are set to allow Read only, shown in Figure 9.19.
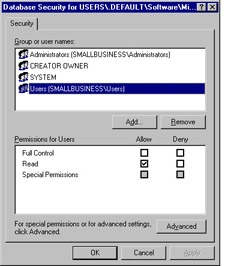
Figure 9.19: Users Permissions Set to Read Only by Default -
Users need to be able to read the Registry in order to perform normal system tasks, but they do not have the ability to modify the Registry in any way.
-
You can access Advanced settings to modify how permissions are inherited, to set auditing, or to change or delegate ownership as well. Remember, these settings will be applied via group policy. These options are shown in Figure 9.20.
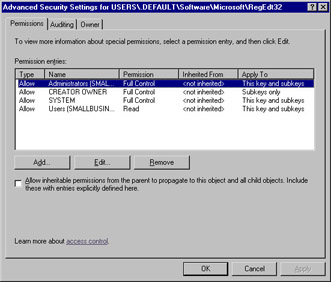
Figure 9.20: Advanced Settings Options -
Click Cancel to exit the Advanced Settings dialog without saving changes, or click OK to accept any changes you ve made.
-
Click OK (or Cancel ) to exit the Database Security for Users\.DEFAULT\Software\Microsoft\RedEdt32b dialog.
-
When you click OK , you will be prompted by an Add Object dialog. The default setting is Configure this key then Propagate inheritable permissions to all subkeys . You can also select Configure this key then Replace existing permissions on all subkeys with inheritable permissions . These two options were discussed in the previous exercise. The third option is to select Do not allow permissions on this key to be replaced . These options are shown in Figure 9.21.
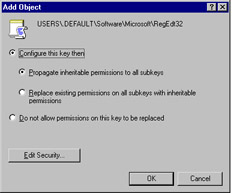
Figure 9.21: Modifying Permissions for the RegEdt32 Registry Key -
If you want to modify permissions, you can click the Edit Security button. Otherwise, click OK .
-
In the MMC, you now have an object listed in the right pane, which should reflect the Registry key we just added USER\DEFAULT\_Software\Microsoft\RegEdt32, as shown in Figure 9.22.
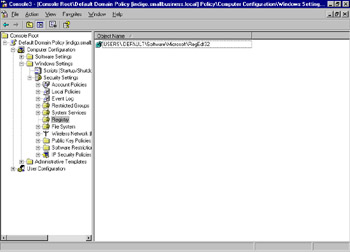
Figure 9.22: Default Domain Policy with RegEdt32 Permissions Specified -
For the purposes of this exercise, we ll want to delete this key to leave the Default Domain Policy in its original state. Click the object, click the red X on the menu, or right-click and select Delete .
-
A Security Templates alert is displayed asking Are you sure you want to delete USERS\.DEFAULT\Software\Microsoft\RegEdt32? Click Yes to delete the key. Note that this does not delete the key from the Registry; it simply deletes the object from the policy.
-
Click File Exit to exit the MMC. Click No when prompted to Save console settings.
| |
Objective 4.3.1: Design a Permission Structure for Registry Objects
By default, when you install a clean version (not an upgrade) of Windows Server 2003, the Setup Security.inf security template is applied. This template sets up strong security for the computer on which it is installed, including setting appropriate Registry access permissions. This is also true for computers running Windows XP. However, this will not be the case on all computers, especially computers running Windows NT 4.0 or Windows 98.
Perhaps the easiest way to manage Registry settings is to use the settings provided in the predefined security templates in Windows Server 2003. Sections of the predefined templates can be imported and used to apply permissions to the Registry according to the computer s configuration. For example, suppose you want strong security on the Registry on DCs. The settings in securedc.inf, as they relate to the Registry, could be applied to all DCs in the domain even if you did not want to apply the entire securedc.inf template. The settings provided in the compatws.inf template loosen Registry permissions just a bit because legacy applications often require expanded access to the Registry to work properly. This setting could be propagated only to computers in an OU populated with computers using a legacy application to mitigate the risk of softening security on the Registry.
To import just a portion of a security template, you can use either the command-line tool, secedit.exe , or the Group Policy Object Editor snap-in or the Security Configuration and Analysis snap-in in the MMC. These were discussed in Chapter 2, but a brief review will help refresh your memory since this is an important concept for this exam.
Using the secedit.exe command, you can specify which database the settings will be imported into. You also specify the security template you want to import settings from, and you can specify which areas of the template to import. For example, you might only want to import the USER_RIGHTS area of the template. By default, if no area is specified, all areas are imported. By specifying the area or areas you want to import, you can select just a subset of settings to import and apply to the currently selected database (the security database into which you re importing settings). You can create a new database, import settings, and analyze them without applying them to the computer on which you re working. This is useful for testing configurations before implementing them.
An alternative to using the secedit.exe command line is the Group Policy Object Editor snap-in in the MMC. Using this tool, you can also import the security settings of a security template to apply to a GPO. For example, select the Local Computer as the GPO and expand the nodes in this manner to get to the Security Settings: Local Computer Policy Computer Configuration Windows Settings Security Settings . If you right-click Security Settings you can select Import Policy or Export Policy from the menu. If you select Import Policy , you will be prompted to select a template from which to import policy.
Finally, you can use the Security Configuration and Analysis snap-in , also in the MMC, to open or create a database for use on a single computer, in an OU or across a domain. Once you have opened or created a database, you can import settings from security templates.
In most cases, the default Registry settings in the predefined security templates will provide the appropriate level of permissions for the Registry. In addition, you should use GPOs to modify Registry settings across the enterprise to avoid errors and to minimize the time and effort involved. If you have particular software packages that require special Registry settings, this too can be propagated across the domain via group policy. As always, you want to provide the least possible permissions to computers, applications, and users to maintain the most secure environment, while still allowing adequate access to required resources. If you look for every opportunity you have to simplify settings and provide the least privileges possible, your job will be much easier, things will run more smoothly, and security will be enhanced.
EAN: 2147483647
Pages: 122