Controlling Quality and File Size
| < Day Day Up > |
| Now that you know how to incorporate sound in a movie, it's time to talk about optimizing it for export. A direct relationship exists between quality and file size. If you want the best-quality sound, the file size will grow. Conversely, small file size means lower sound quality. This is just a fact. You ultimately need to make a decision about how to balance this tradeoff. Is a high-quality sound important enough to make your audience sit through an extended download time? Is a speedy download worth the sacrifice in quality? You should be very deliberate in your decision-making process to end up with the best compromise possible. While exploring this topic further, we'll first cover some digital audio fundamentals, and then you'll learn how to apply this knowledge to Flash's compression settings. Digital Audio FundamentalsEarlier this hour I suggested there were two sensible ways to use audio in Flash. You can start by either importing as high-quality audio file as possible (.wav or .aif) and let Flash compress it when you publish or importing an MP3 which, by definition, is already compressed. If you take the route of importing high-quality sounds, you'll want to know a few basics about .wav and .aif sounds. The two primary factors that affect the file size are sampling rate (that is, how many pieces of sound are saved per second) and bit depth (or how much detail is saved in each of those samples). CDs have 44,100 samples per second (often expressed as 44K) and 16-bit depth (meaning 65,536 "shades" of sound). So, a 44K/16-bit audio file is very good. If you listen to an 8-bit sound file, it will have a much lower dynamic range (from high to low). The quality loss when you listen to files with a lower frequency rate (for example, 22K, 11K, or lower) are not quite as obvious, but they tend to sound hollow. It's worth mentioning that a longer sound will be bigger and stereo sounds are twice the size of mono.
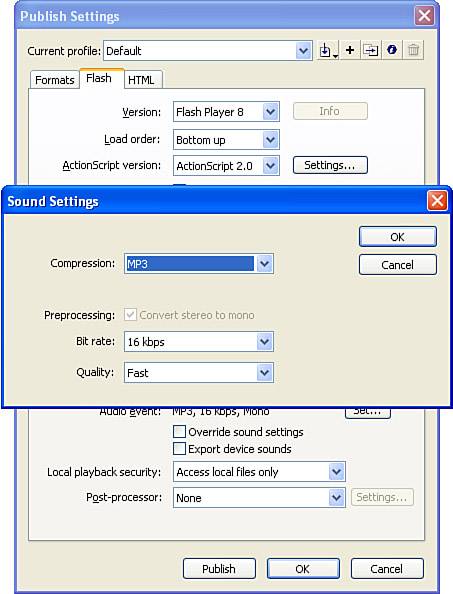
If you want to start with MP3s, there is really just one factor: bit rate. A 1 second MP3 file that's 256 kilobits (Kb) has a bit rate of 256 kilobits per second (Kbps). MP3s can have bit rates up to 320Kbps. In fact, it's possible to have a variable bit rate MP3 (VBR instead of CBR for constant bit rate). The reason a variable bit rate is useful is that the portions of the sound with more detail use a higher bit rate (up to 320Kb), while other places in the sound might not need as much depth. A VBR MP3 often sounds better than an equivalent-sized CBR MP3 because there's more detail where it's needed. So, in fact, the average bit rate is more important than simply the bit rate. This discussion leaves out exactly how your audio compression tool applies the MP3 algorithm. The software cuts out details from the sound where your ear is least likely to notice. In the end, it's basically magic because you're left with a small sound file that sounds almost as good as the original. Bringing this back to the world of Flash, realize the easiest way to approach audio is to bring in an uncompressed audio file and let Flash apply MP3 compression upon publishing the .swf. That is, you can bring in a .wav and Flash will internally convert it to an MP3. Flash's MP3 compression is not VBR so it's possible to create a better sounding MP3 outside of Flash. If you import an MP3 Flash won't recompress it (unless you override the default settings). In the next section you'll see exactly how to control Flash's export settings. This brief overview of digital audio should give you enough information to analyze your source audio files before you import them into Flash. Export SettingsAll this theory is interesting, but how do you apply it to your sounds? You have two places in Flash where you can specify quality and compression settings: the Sound Properties dialog box, which is unique to each imported sound, and the Flash tab of the Publish Settings dialog box. The Sound Properties dialog box affects settings that are unique to the individual sound and the Publish Settings dialog box affects all sounds globally. Global Publish SettingsTo set the default sound format for every sound in a Flash movie, you select File, Publish Settings. Make sure that under the Formats tab you've checked Flash (.swf), and then click the Flash tab (see Figure 10.9). You see two different sound settings in this dialog box: Audio Stream and Audio Event. Audio Stream affects sound instances that use the Stream Sync setting, whereas Audio Event affects sounds that use the Event or Start Sync setting. (The Audio Stream setting also affects the audio from videos you've import, as you'll learn in Hour 18, "Using Video.") If you click the Set button, you can see all the options available, as shown in Figure 10.10. Figure 10.9. The Flash tab of the Publish Settings dialog box provides a way to set the default sound settings globally for an entire file.
Figure 10.10. You can set the type of compression for all sounds in a movie in the Publish Settings dialog box.
There's a Set button next to both Stream and Event so you can set the compression for sounds used each way separately. There are five choices for sound compression. With the exception of when you use Raw (which is really no compression), you need to specify additional options for the compression you choose. For example, you can't just say "compress using MP3" you have to specify how much MP3 compression. Because each option has its own unique characteristics, let's look at each in detail:
You've just learned how to set the default sound settings for both Stream and Event sounds from the Publish Settings dialog box. It's important to understand that the default publish setting affects only uncompressed (that is, non-MP3) sounds you've imported. You'll see in the next section how to set sound settings for each imported sound individually. Imported uncompressed sounds (.aif and .wav) will, by default, use the settings you make in the Publish settings. Imported compressed sounds (MP3) don't recompress and therefore don't follow the Publish settings. One exception is when you select the Override Sound Settings check box (in the Publish settings). Checking this box causes the settings you apply here to be imposed on all sounds in the movie, regardless of their individual export settings. Override Sound Settings can be useful when you want to publish a single copy for a special purpose. Say you want a copy to demonstrate from your hard drive download time isn't an issue, so you could make all the sounds play at their highest quality (Raw). Individual Export SettingsIn addition to a movie's globally specified sound settings, each sound item in the Library can have its own individual settings, which apply to every instance of that sound. Just double-click a sound in the Library (or select Options, Properties), and you see the Sound Properties dialog box, as shown in Figure 10.11. Figure 10.11. The Sound Properties dialog box provides individual control of exactly how a sound will be exported, regardless of the default publish settings.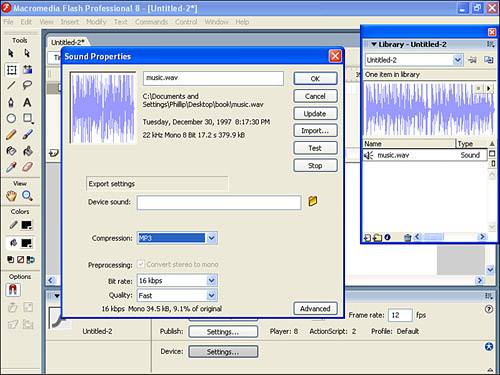 This dialog box is similar to the Bitmap Properties dialog box you studied in Hour 3. In the same way that individual imported bitmaps can have their own sets of compression settings, so, too, can imported audio. The choice of settings is identical to the settings in the Publish Settings dialog box. However, in this dialog box, for each change you make, you're given details of the effect on file size and quality. Down at the bottom of the dialog box you can see how much the file compresses for each change. If you click the Test button, not only does Flash perform the compression you specified, but the sound starts playing and you can hear how it sounds. (This is similar to the Test button for bitmaps, although with bitmaps you judge the visual effect.) This gives you all the information you need to decide what settings to use. You can listen to the sound while assessing the effect on file size. Let me translate a couple options you'll see depending on what sounds you import. When you import a noncompressed format (.aif or .wav), you'll see the Default option, meaning Flash uses whatever settings you specify in the Publish Settings dialog box. If you import an MP3 (already compressed), you'll see the Use Imported MP3 Quality check box. This means "don't recompress." You can uncheck this option, but only do so if you're in a fix. That is, it's better to go back and make another MP3 from the original sound than to recompress inside Flash. The Sound Properties dialog box also gives you the same ability to replace sounds as you have for replacing bitmaps. For instance, if you've edited a sound in a sound editor and you want to import the replacement sound, just click the Update button. (If the file has moved, you are asked to point to the new location.) In addition, if you want to replace a sound (without taking the trouble of reassigning every keyframe where you've already used the sound), just click Import and select the new file when prompted. Tricks for EfficiencyObviously, the best way to reduce file size in respect to audio is to avoid using audio. Although this might sound facetious, it's worth consideration. You should force yourself to consider each sound you use, and if it's not adding something to your file, it's most certainly distracting because it's adding to the file size (and that's a distraction during download). Gratuitous sound effects are worse than gratuitous visual effects because sounds add more significantly to the file size. Just be extra critical when asking yourself whether a particular sound is really necessary. After you've decided that a sound is, indeed, necessary, you still have ways to reduce the sound's impact on the file size. The best way is to trim any silence at the beginning or end of the audio. Silence still adds to the file size. Ideally, you should do this before importing the audio into Flash, but you can also do it for each instance through the Edit Envelope dialog box (refer to Figure 10.7). Another great way to reduce file size is to use a short looping sound instead of a long linear sound. Of course, there's a possibility of selecting a loop that can become monotonous, but you might be surprised how much mileage you can get from one simple loop. Sprinkle a few incidental Event sounds that are independent of the loop, and the effect can often sound very interesting. Probably the most subjective question is "Which level of compression is appropriate?" Determining which level of compression is appropriate is really a subjective decision, but that doesn't mean I can't make a few suggestions. First of all, there's a common misconception that audio containing voice can withstand the most compression, whereas music can't. This is just plain false! A better generalization would be to say that sounds of natural items (acoustic instruments and voices, for example) are best kept at a high quality, whereas sounds of synthetic items (such as a distorted electric guitar and synthesized keyboards) will likely be perfectly acceptable at a lower quality. This is true because any sound on the computer is fake you're trying to make the user believe the sound is one thing or another when, in fact, it's just electronic data. When you attempt to simulate something natural, such as a voice or an acoustic instrument, your audience has a good recollection of what that sound is supposed to sound like, and they'll notice if it doesn't sound right. On the other hand, sounds from an electric guitar, for example, can be distorted and still sound perfect. (Heavy metal connoisseurs may disagree, but you get the idea.) Ultimately, you'll still need to test each compression setting to hear how it sounds, but just remember that it's easier to notice that something's wrong when a natural sound gets distorted. One other fact: If everything else is kept equal, a mono sound will appear "cleaner" than a stereo sound. This doesn't mean that you shouldn't use stereo. Instead, simply realize that in order to maintain quality in a stereo sound, you usually can't compress as much (and add to this the fact that stereo sounds are twice as big as mono sounds). Therefore, just be absolutely sure you need stereo sound (and remember you can still pan the left and right channels without a stereo sound). |

| < Day Day Up > |
EAN: 2147483647
Pages: 235