| Although you've already used the Library to do several tasks, we haven't yet taken time to really explore all the details of the Library. Let's do that now so you're sure to take full advantage of the Library's offerings. Getting Your Bearings Hour 1, "Basics," discusses the importance of knowing where you are at all times. In the Library, this point is especially important. Using the Library can be very confusing if you don't pay attention to subtle clues. Before you select a tool from the drawing toolbar, you should ask yourself exactly where you are and what you are doing there. Here are a few clues to help you get your bearings in the Library: Three things: the edit bar, the edit bar, and the edit bar. The edit bar is the most important indicator and one to which you should pay attention at all times. By the Way: Moving the Edit Bar With the timeline showing, you can hold Shift+Alt and double-click the edit bar to move it below the Timeline. You can use Shift+Alt and double-click again to move it back. |
Anytime you're inside a Library symbol, you see a plus sign (usually in the center) that indicates the registration point of the symbol. More about the registration point next. Just remember that you won't see the plus sign when you're editing the contents of a regular scene. You use the registration point when controlling an instance's exact location. If a symbol is positioned at 0x and 0y (the upper left of the stage), just that registration point coincides with 0x 0y. In addition, you can use ActionScript to rotate or scale an instance and Flash will use the registration point as the axis of rotation or center from which it grows. It's confusing because, when you use the Transform tool to rotate or scale an instance, Flash uses the visual center as the center. Remember that you can always go inside and move the contents of a symbol relative to its registration point. In addition to seeing the plus sign, while editing a symbol, you never see edges to the Stage because there isn't a Stage when you're inside a symbol. When you drag instances onto the Stage, you need to place them within the Stage borders (if you want the users to see the objects). Symbols simply don't have a Stage the point of reference of a symbol is its center (registration point). You can access the contents of a master symbol in several ways: First, from the Library window, you can select the symbol and then choose Edit in the Library's options menu. Alternatively, you can just double-click the symbol (double-clicking the symbol name lets you rename the symbol). Second, you can simply double-click any instance onscreen, and you are taken to the master symbol to edit. The difference in doing it this way as opposed to using the Library window is that while editing, you see the rest of your onscreen contents dimmed out but in position. You can also do this by right-clicking an instance and selecting Edit in Place. Third, you can access any symbol from the Edit Symbols menu. Recall the two buttons at the top right of the screen: The clapper button is the Edit Scene button, and the circle-square-triangle button (which looks like a graphic symbol's icon) is the Edit Symbols button (see Figure 4.6). The Edit Symbols menu provides a list of all the symbols in a movie. Also, the Edit Scene menu is an easy way to get back to a scene. Figure 4.6. The Edit Symbols menu gives you quick access to all the symbols in a file. 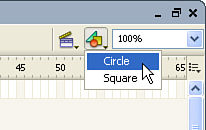
Watch Out!: Transformation Point Versus Registration Point I cringe to even bring this up because it sounds much worse than it is but it's important to understand the difference between transformation and registration. Transformation is the point around which you can scale or rotate an object (while authoring) and registration is an arbitrary reference point inside a symbol. If you open the Info panel, click the center box, and then select an object, the values shown indicate the location of the transformation point. However, when you use ActionScript to move a symbol instance, the value you set for x and y affect where the registration point displays. When you use Convert to Symbol to create the symbol you choose a registration point from 9 logical positions including the center plus any of the four sides or four corners. Plus you can always go inside the symbol and move its contents relative to its registration. You'll see the registration point as a plus (both inside the symbol and when it's selected on stage). Any object on stage has a transformation point (shown as a white down when you select the object with the Free Transform tool). The transformation point is always the visual center at the time the object is created or dragged from the library. You can use the Free Transform tool to move the transformation point. In addition when you rotate or scale, the object will rotate or scale around that transformation point. For example, you could move the transformation point to the corner of a flower petal and then rotate several petal instances to make a flower. |
Managing the Library by Using Names, Sorting, and Folders The Library is so great that you'll use it all the time. As the total number of symbols in the Library grows, you'll want to develop ways to keep them organized. You can manage the Library any way you want, but this section looks at three ways in particular: naming, sorting, and using folders. Because every symbol must have a name (and symbols are easy to rename), naming symbols consistently makes sense. How to best name symbols is subjective, but some standard practices are worth following. First, you should be clear and concise. If you have an image of a circle, you can call it Circle. There's no need to be cryptic and call it Cir. However, a name such as Red Circle with No Line might be a bit much. You should say what you have to, but nothing more. Also, you should realize that the Library can be sorted alphabetically by symbol name, so you can develop a naming strategy to plan ahead. For example, if you have several symbols all being used in a particular part of a movie, you can precede each name with the same text prefix for example, game_. Therefore, you might have symbols named game_background, game_piece, game_scorecard, and so on. You can even use a similar method when an entire team is working on the same file. You can have each person precede symbol names with his or her initials so figuring out which symbols were created by which team members is easy. In Hour 23, "Working on Large Projects and in Team Environments," you'll learn more about such naming conventions. As mentioned earlier in this section, the Library automatically sorts symbols alphabetically by name. If you widen the Library window, you can explore additional sorting options. (You can either resize the window by dragging a corner of it or click the Wide View button on the right side of the Library, as shown in Figure 4.7.) You should take a look at Figure 4.7 to familiarize yourself with the Library window. Note that you can sort by name, by kind (all the graphic symbols are listed separately from the button symbols, for example), by use count (meaning how many instances you've dragged from the Library), or by date modified. Figure 4.7. Several indicators and tools are built in to the Library. 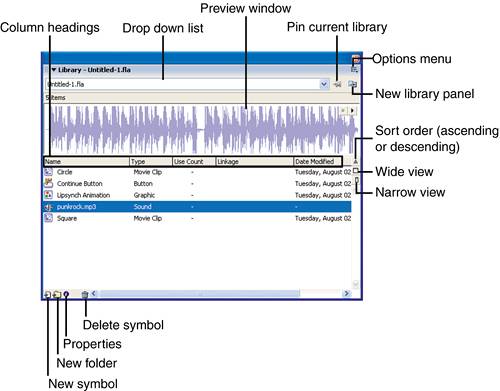
The Library window has several useful features: The preview window gives you a thumbnail view and preview of any animation or audio. Column headings do more than just explain what's listed in the column. If you click a column heading, the Library is sorted by the attribute you select (Name, Kind, Use Count, Linkage, or Date Modified). You can click the tiny arrow to toggle between ascending and descending alphabetical sorting. Clicking New Symbol has the same effect as selecting Insert, New Symbol. New Folder lets you create a new folder to hold several Library items. Clicking Properties gives you access to the same Symbol Properties dialog box that you see when you create a symbol. Wide View stretches the window for you. Narrow View changes the window to a narrower view. The Pin Current Library option stops Flash's default behavior of always reflecting the library for the currently active file. By pinning the library, you can easily drag items from one file's library to another file's (because each file has its own single library). The Library's drop-down list gives you a quick way to edit another file's library without activating that file. The New Library Panel button lets you arrange library windows. For example, you might want to copy items from one library to another or you might be getting tired of jumping between two files' libraries using the list box. The Options menu provides all the options that are available. (Don't forget it's here!)
Finally, you can organize your Library by using folders. This is almost identical to using files and folders on your computer's hard drive, except that in the Library you have symbols and folders. Creating a folder is as simple as selecting New Folder in the Library's options menu or clicking the orange New Folder button at the bottom of the Library. You can name the folder immediately after you create it, or you can name it later, the same way you rename symbols (by double-clicking the name or selecting Rename from the options menu). Organizing folders is pretty intuitive, but let me mention a couple maneuvers now. You can put symbols inside folders by simply dragging a symbol's icon (which appears to the left of its name) on top of the folder. You can open a folder (to reveal its contents) by double-clicking the folder's icon. You can even put folders inside folders. Organizing the Library isn't difficult to figure out. Most of the material just covered on the subject includes general good organization skills. If you know how to rename Library items, sort, and use folders, you'll be fine. |