| The information in this section isn't unique to Flash. It's years of traditional, conventional animator's techniques that we will apply to Flash. For each technique, we'll do a task. Adding a Motion Blur This technique uses Flash Professional 8's Blur filter, but not on the object that's being animated. Instead, it's used on a duplicate instance containing a similar shape. Even if you don't have Flash Professional, you can apply the concept to your own animations. It just won't be as efficient as what I show here. Try It Yourself: Add a Motion Blur In this task you'll use the Drop Shadow filter to add a blurred trail to a simple object. Follow these steps : 1. | In a new file, draw a circle, select it, and convert it to a symbol. Name the symbol Circle and select the Movie Clip behavior.
| 2. | Move your instance of the Circle to the left side of the stage. In Frame 25, insert a keyframe (F6). In Frame 30, insert a frame (F5).
| 3. | In Frame 10, insert a keyframe (F6), hold Shift, and drag the instance all the way to the right side of the stage. Now, go to Frame 15 and insert another keyframe.
| 4. | Select the keyframe in Frame 1 and set Motion Tween; do the same for Frame 15. The circle is on the left at Frame 1, tweens to the right in Frame 10 where it will wait until Frame 15, where it tweens back to the left (and waits another 5 frames before repeating).
| 5. | Test the movie to see what it looks like with no blur. When you're done, lock the layer and insert a new layer.
| 6. | We're going to start with a Blur filter. Because I only want it blurred while it's moving we can insert new keyframes in the interpolated frames. Namely, click the cell in frame 5 and insert a keyframe (F6) and then again in frame 20. Even if you knew from the start you were putting keyframes there, the order we did it is best because the Circle is in the correct interpolated position.
| 7. | Select the instance in frame 5 and use the Filters panel to add a Blur filter. Click the padlock to unlock the Blur X and Blur Y and set Blur X to 20 and Blur Y to 5. Select the instance in frame 20 and add a Blur filter with the same settings. Interestingly, if you select the instances in any of the other frames they now have a Blur filter applied but with 0 values for the blur. This simply makes them tween from 0 up to whatever you set in frames 5 and 20.
| 8. | Test the movie and it just looks like the circle is out of focus. That's okay, but to enhance it you can add a Drop Shadow. Select the instance in frame 5 and add a Drop Shadow. Set Blur X to 70 and Blur Y to 10. Now, set the color to the same color as your Circle (or possibly a shade lighter). Finally, set the angle to 180 (that'll put the shadow to the left of "behind" the circle); and set the distance to 30. (You can see the effect in Figure 22.1.) Select the instance in frame 20 and apply the same Drop Shadow settings except set the angle to 0 this time.
Figure 22.1. The Drop Shadow filter serves as a suitable motion blur when you set the color to match the object and the angle to appear to trail the object's motion. 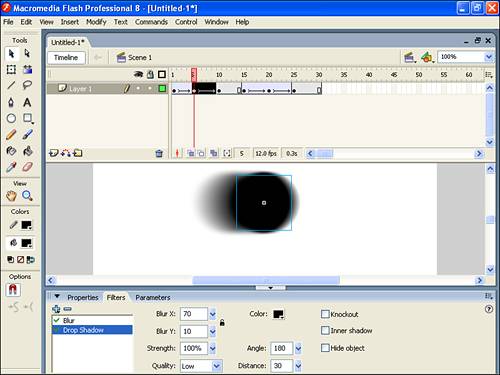
| 9. | If you test the movie it probably looks worse. That's because while the frames where you applied the Drop Shadow (5 and 20) should look pretty good, the Drop Shadow that was automatically added to the Circle in frames 1, 10, 15, and 25 don't have the angle (they're all defaulted to 45 degrees). So, click frame 1, click the circle, access the Drop Shadow and set the angle to 180 do the same for frame 10. Finally, click frame 15, click the circle, access the Drop Shadow and set the angle to 0 and repeat for frame 25.
| 10. | Now you can test the movie and it should look pretty good. Feel free to crank up the frame rate. Also, you might consider setting the ease to Ease Out on frames 5 and 20.
|
A good deal of this exercise was just tinkering with the Filters panel. It should be easier when it's your idea you're trying to implement. The key points are that filters automatically interpolate and a Drop Shadow (set to the right color and angle) serves as a pretty good motion blur. Using Anticipation The blinking technique mentioned earlier this hour is a form of anticipation, drawing the user's attention to something that's about to happen. You can use other forms of anticipation as well. For example, a car with a manual transmission that is stopped facing up a hill drifts back a little bit when it begins to move forward. You can accentuate that effect in your animations to make them more effective. Not only will the users look at the object that's preparing to move (by moving in the opposite direction), but they'll anticipate that something's about to happen. Try it out in the following task. Try It Yourself: Use Anticipation to Improve an Animation In this task you'll add a subtle touch of anticipation for a more effective result. Follow these steps: 1. | In a new file, draw a circle at the bottom of the Stage and convert it to a symbol (by pressing F8). Name it Circle and ensure that its behavior is set to Movie Clip.
| 2. | Insert a keyframe at Frame 10 (you want the circle to sit still for the first 10 frames). Insert another keyframe in Frame 15 and one at Frame 25. You're going to squash the circle between Frames 10 and 15 and then move it up as it goes to Frame 25.
| 3. | Select Frame 25, hold down the Shift key, and then move the instance of Circle close to the top of the Stage.
| 4. | In Frame 15, use the Free Transform tool to compress the circle by scaling it vertically. Also make the circle a little wider because when you squash something in real life, it gets wider, too (see Figure 22.2). Remember, too, that if you hold down Alt while you drag the top-middle resizing handle, the bottom of the circle won't move.
Figure 22.2. When you squash the circle, change both the vertical and horizontal scales. (Onion Skin is turned on here for easy comparison to the original shape.) 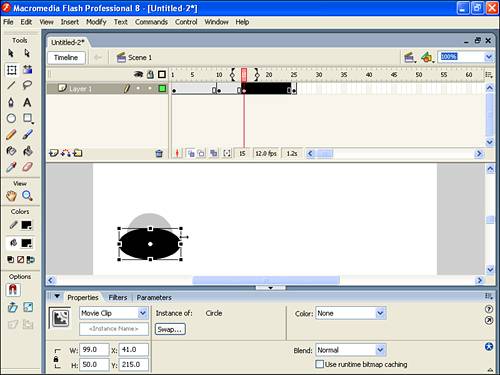
| 5. | You want the bottom of the circle to remain stationary (only the top squashes down). When you select the Transform tool and then the Scale option, you scale the circle around its center by default. You can override this if you hold down Alt while resizing. Therefore, if the bottom moved up, you should now move the circle down. Turn on Onion Skin, and position the bottom of the circle to coincide with the bottom of the circle in Frame 10.
| 6. | Set a motion tween for the keyframe in Frame 10 (so it tweens down to its squashed shape) and in Frame 15 (so it tweens on its way up to the top).
| 7. | Test the movie. It looks all right, but while Circle tweens to the top position, it also restores its shape but it takes 10 frames to do it.
| 8. | To make the movie more believable, make Circle snap into its normal shape as soon as it starts to move. To do this, go to Frame 16 and insert a keyframe (by pressing F6). It's good that you set tweening for Frame 15 already because the keyframe you inserted at Frame 16 placed the circle in the proper interpolated position. Select the circle in Frame 16 and select Modify, Transform, Remove Transform (or press Ctrl+Shift+Z). The circle immediately returns to its unscaled state.
| 9. | Test the movie to see the final result. Save this movie because in a minute you'll address how to make the end point more believable.
|
You can use the anticipation technique quite extensively, and it usually means you can get away with using fewer frames (and fewer tweens). You make the user anticipate the movement by including movement in the opposite direction. The task you just did involved squishing the circle down because it was about to go up. If you're moving something to the right, adding a slight move to the left can work, too. The anticipation is usually slower than the movement that follows. That is, during the anticipation portion, fewer frames are used or less distance is covered. There are no hard-and-fast rules for this you must judge how something looks when you test the movie. Using Overkill Whereas anticipation happens before the animation plays, overkill applies to the end of an animation or after it plays. If you're in a car that comes to a stop, you feel as though you move backward just for a moment after the car comes to a rest. Of course you're not moving backward, but you expect to keep going forward, and when you don't, you imagine that you're going backward. A user expects to have that feeling, so you can add this effect to your animations, and it will actually make them more believable. You can try it in the following task. Try It Yourself: Use Overkill to Make an Animation More Effective In this task, you'll add the subtle effect of overkill to make an animation more believable. Follow these steps: 1. | If you saved the last task, start with it. If you didn't save it, make a simple motion tween of a symbol called Circle that moves from the bottom of the screen to the top of the screen, ending in Frame 25.
| 2. | Insert keyframes in Frames 26, 27,and 28 by clicking in Frame 26 and then pressing F6 three times.
| 3. | Edit the extra frames so that one frame has the circle going too far and becoming stretched (26), one frame has the circle reverberate and actually move lower than the end frame (27), and one has the circle end up in its final resting position (27 where it happens to be already, so that frame won't need to be adjusted). To do this, vertically stretch the circle in Frame 26 so it's extra tall and narrow (as in Figure 22.3). You don't need to make sure the bottom or top lines up with circles in adjacent frames; however, turn on Onion Skin so that you can be sure the stretched circle in Frame 26 is positioned a little higher than the one in Frame 25.
Figure 22.3. To make the circle overshoot its destination, you can stretch it to exaggerate the overkill. 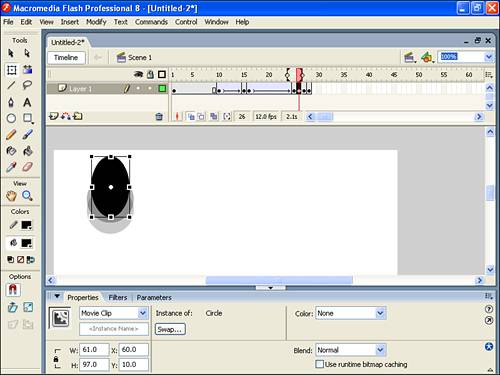
| 4. | In Frame 27, simply move the circle down a few pixels.
| 5. | Test the movie. It's pretty amazing that just a touch of overkill can make this animation so much more believable.
|
Animation truly is a matter of fooling the user! To prove this, imagine an animation with no tweening but with anticipation and overkill. Say that Frame 1 has a circle at the bottom of the Stage. Frame 10 has a keyframe where the circle is squashed. In Frame 11, a normal circle is moved halfway up the Stage. By Frame 12, it's stretched and past its destination. It's normal (or a little squashed) and a little lower in Frame 13. Finally, at Frame 14, it's in its normal shape in the destination frame no tweening, and it looks great. Figure 22.4 shows all the frames, with Onion Skin turned on. Figure 22.4. Just a few keyframes can make an effective animation when you use anticipation and overkill. 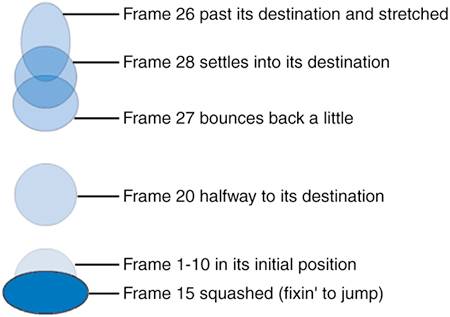
Simulating Depth Despite the fact that Flash is only a two-dimensional program, you can still make the user think your movies have depth. And even though you got to see a few special effects in Hour 13 using shadows there are still more ways to fake depth as you'll see in this section. The main way to show depth is with perspective. Simply put, objects appear smaller when they are more distant than they do when they are nearby. When I was a child, I would get scared when I watched an airplane in which my father was traveling take off. As it got smaller and smaller in the sky, I thought my father was disappearing. We'll look at several subtleties related to perspective, but they're all based on the fact that when you see something get smaller, you think it's moving away. In the following task you'll try to tween an object and change its size. At first it will look plain, but you'll add to it. Try It Yourself: Add Perspective to a Simple Animation In this task you'll add just two lines to make the perspective more apparent. Follow these steps: 1. | Start by drawing a car and converting it to a Movie Clip symbol. In the keyframe in Frame 1, place the car in the bottom left of the Stage. Add a keyframe in Frame 40, and move the car to the top right of the Stage. Do a simple motion tween between the keyframes.
| 2. | Scale the car larger in Frame 1 and smaller in Frame 40.
| 3. | Test the movie. It probably doesn't look convincing.
| 4. | Insert a layer and draw two converging lines as if they were the shoulders of a road. The animation looks infinitely better (see Figure 22.5).
Figure 22.5. The addition of lines can help the user see depth. 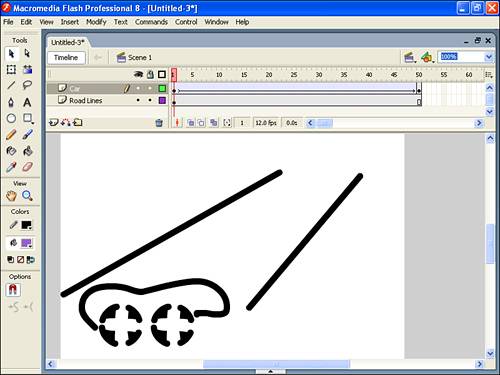
| 5. | To add even more evidence that the car is covering great distances, add some mountains or bluffs in the road layer. Draw a horizon line toward the top of the screen and draw a boxy mountain/bluff on the horizon (see Figure 22.6).
Figure 22.6. Adding a horizon line and mountain (for scale) makes the perception of depth even greater. 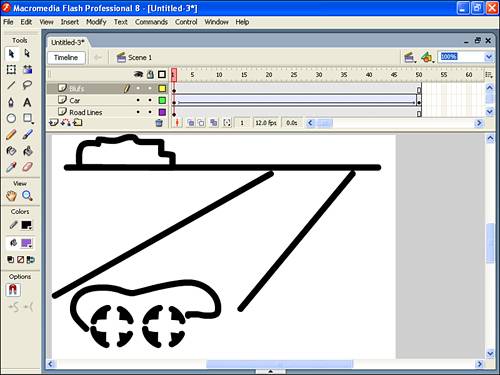
| 6. | Without a reference, the mountain (besides not looking much like a mountain) doesn't have any perspective. Draw another mountain closer (below the horizon) and make it a little bigger. Make an even bigger mountain, partially blocking the road, on the right side. If you fill the closest mountain with white (so it blocks the road and the car), the result is even more believable (see Figure 22.7).
Figure 22.7. The repeating shape and changing size of the mountains enhance the perspective effect. 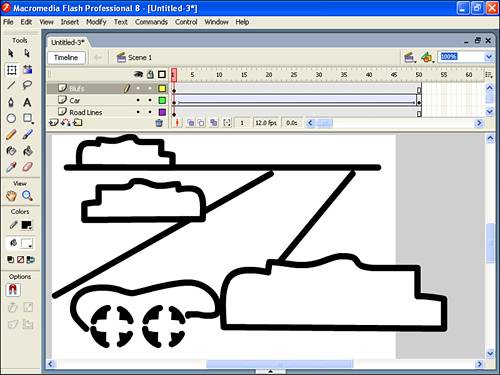
|
Just imagine how much more believable the previous task would be with realistic-looking graphics. As you've seen, you can use some simple clues to tell the user there is depth. The road shoulders and horizon are there mainly to explain the surface on which the car is traveling. You added mountains that vary in size according to how far away they are supposed to be. The varying-sized mountains actually repeat the converging sense of the lines. Finally, blocking the car with a big mountain leaves little question in the user's brain that the car is going behind the mountain. You can add even more clues that the car is moving away. Not only do objects get smaller as they move away, but they make smaller and slower movements. If you set Ease to Out, the car would appear to move more slowly the farther away it goes (and that's how a car moving away appears). If you added some bumps in the road (which would have the added benefit of looking more natural), you could make the bumps smaller as the car got farther away. One way to add bumps would be to create a motion guide that gets less jagged toward the end of the car's path. Such tricks just repeat the message that things that are far away are smaller than things that are nearby. Try another task that simulates depth. This time you'll travel with a car. Try It Yourself: Simulate Depth with Size, Layering, and Relative Speed In this task you'll travel with a car and create the illusion of depth in several ways. Follow these steps: 1. | Draw a rectangle that is taller than it is wide to simulate a log. Convert it into a symbol called One Log, copy it, and paste about 15 copies onto the Stage. Space them evenly so they are twice as wide as the Stage (zoom out and use the Align panel). Select them all and convert them into a movie clip called Logs (see Figure 22.8).
Figure 22.8. You'll be moving these logs past the Stage, so the Logs instance needs to be much wider than the Stage. 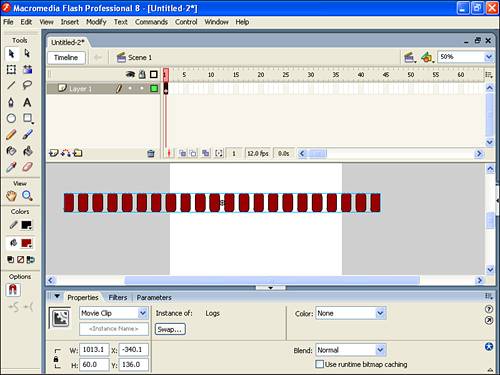
| 2. | Position Logs so that the leftmost log is just touching the left side of the Stage. Scale it slightly larger. Copy this instance and paste it into a new layer. Position the copy similarly on the left side of the Stage, but scale this version smaller than the first and make sure it's positioned higher (as in Figure 22.9). These will be the posts for the guardrails.
Figure 22.9. The two layers for the logs contain the big (close) logs and the smaller (distant) ones. 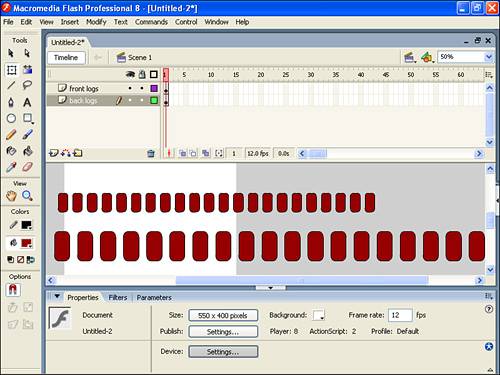
| 3. | In a new layer, draw a very wide rectangle (as the guardrail). Convert it to a symbol called Guardrail and copy it into a new layer. Scale the instance in the second layer appropriately to the smaller logs. Position the two instances of Guardrail in a layer between the two layers for logs, so the smaller one is on top of the small logs and the larger is below the large logs (so that the guardrails are on the inside of the road). (Take a peek at Figure 22.9 to see how it should look.)
| 4. | Insert frames for all the layers at Frame 60 (by clicking in Frame 60 and pressing F5). In the two layers with logs, insert a keyframe at Frame 60 (by clicking in Frame 60 and pressing F6). In Frame 60 of the layer with the large logs, hold Shift while you move the logs all the way to the left (so that the rightmost log is just touching the right side of the Stage). For the layer with the small logs, hold Shift while you move it to the left but it won't look like those logs are moving as far (see Figure 22.10).
Figure 22.10. Don't move the smaller logs quite as far as the larger logs. 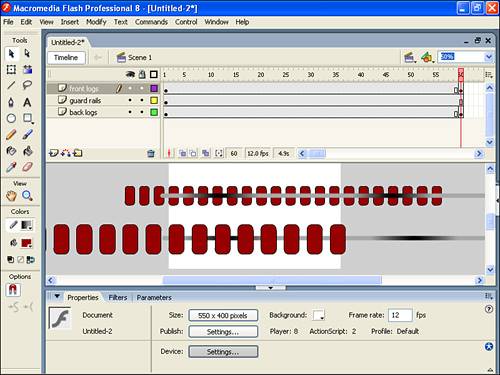
| 5. | Set motion tweening in Frame 1 of each logs layer. You don't need to tween the guardrail layers because the motion of the logs will imply that the guardrail is moving.
| 6. | Insert another layer for a car. You can draw a car and make it a movie clip. You can even go inside the master version of the car and insert rotating wheel clips. But whatever you do, don't tween the car that's in the main Timeline. It will remain in the same position, but the logs passing by at varying speeds will make it appear to be moving constantly to the right.
| 7. | Test the movie. The logs that are close to the screen will appear to move faster than the smaller logs because they are closer to the viewer.
|
To add to this task, you can draw a mountain or other elements near the horizon. If you add trees in the background, you can have them tween to the left as well but at a much slower rate. You probably don't need to tween the mountain at all, but if you do, only let it move a tiny bit. Controlling Point of View The two tasks you just did with cars involved different points of view (POV). In the first one, the view didn't change; you just saw the car move. In the second task, the view moved with the car, and the foreground and background moved. The first situation was as if a camera were stationary on a tripod as the car moved away. The second case was as if the camera were in a helicopter that was traveling at the same speed as the car. When you watch a movie or an animation, you don't often ask exactly where the camera was positioned but it's very important. If the camera is shaking, it gives an entirely different feeling than if it's panning slowly. When you watch a movie, try to note exactly where the director has placed the camera. Of course, in computer animation, you're not limited in physical ways but there's still always a point of view. Next you'll try a simple task where the point of view affects the user's experience. Try It Yourself: Control Point of View for Visual Effect In this task you'll change the point of view during an animation to imply motion. Follow these steps: 1. | In a new file, draw the best-looking airplane you can. Convert it to a movie clip so you have one instance of your airplane clip. (If you want to get fancy, you can go inside the clip and add some animated frames perhaps an animating propeller.)
| 2. | Insert keyframes (by pressing F6) at Frames 50 and 60. In Frame 60, hold Shift while you drag the instance of your airplane to the right until it's off the screen. Set motion tweening in the keyframe at Frame 50.
| 3. | Test the movie, and you can imagine you're filming this from another airplane that is keeping up with your airplane. At Frame 50, your plane stops. It needs something more.
| 4. | Insert a new layer, named Background, and zoom out to 25%. In the new layer, use the Pencil tool to draw a jagged line much wider than the Stage, as in Figure 22.11. Select the line and convert it to a symbol call it Mountains. In Frame 1 of the Background layer, position Mountains so the left side just touches the left side of the Stage.
Figure 22.11. Draw a horizon full of mountains, and when they're tweened, they'll make the stationary plane look like it's moving. 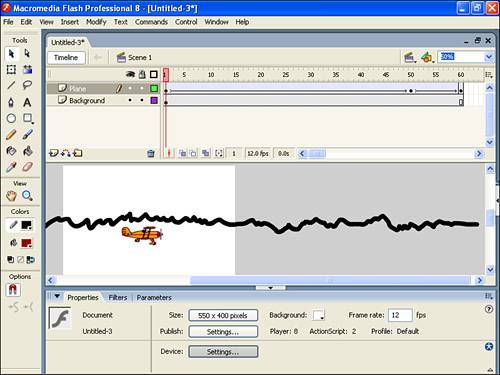
| 5. | Insert a keyframe in Frame 50 of Background. Move the instance of Mountains in Frame 50 all the way to the left so its right side just touches the right side of the Stage. In Frame 1 of Background, set motion tweening.
| 6. | Test the movie.
|
Point of view drives most animation. When you have a clear sense of where the user's point of view is (that is, where the camera is), the potential is great. You can use camera angle and camera shake all kinds of tricks that actually become visual elements. Most visual elements are concrete and obvious. Point of view may be the most powerful because it's so subtle. Watch a few movies and pay attention to the location of the camera. It might ruin the illusion you normally get, but it can be educational. For some really great examples of changing point of view, check out the Flash movies at www.bulbo.com. Beginning with the End in Mind A common approach animators take is to begin an animation or a tween at the end point. For example, if you're making a title zoom onto the Stage, create the end keyframe first, where the title is scaled and positioned in its end point. Then go back and set up the initial keyframe. It's not so much a technique as an approach. In this hour's tasks involving anticipation and overkill, you inserted several keyframes (where the circle was not transformed) and then went back to make changes after you had the pristine end keyframes. Know where you're headed, and make plans before you arrive. This may seem vague, but it's so common that it's worth mentioning as an advanced animation technique. |