Ensuring Quality
| [ LiB ] |
Before you worry about fixing bugs, it makes more sense to figure out a way just to avoid bugs. After all, if you don't create any bugs, you won't have to fix them. In practice, this will probably never happen. However, you can follow approaches that tend to reduce or nearly eliminate bugs . This section covers such techniques that should lead to higher-quality apps.
Building Proofing Systems
A proofing system is an application itself that helps you review your application. Usually it's a hidden feature built in to your app that gives you the additional power to help step through all the content. Not only can you use such features to "proof" your content (by making sure it's all there), it also helps ensure you viewed every screen. The idea is that instead of manually stepping through every conceivable combination of settings available in your app, you have a script that does this for you.
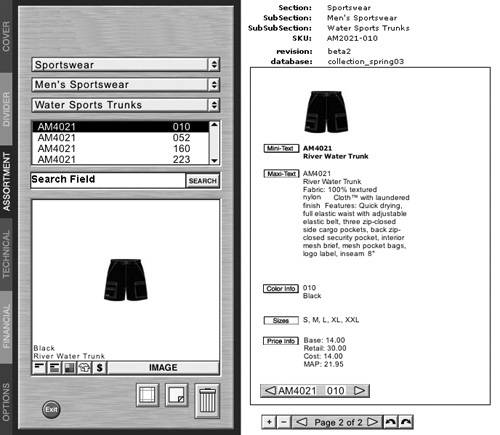
Here's a simplified example from a real project. I helped build a catalog-maker tool for representatives of a clothing manufacturer. The database included just more than 3000 items. For each piece of clothing, there were about a dozen additional fields of data, such as retail price, discount price, size information, description, and so on. The representatives were able to view or display (for a printed copy) any item and any corresponding data. One of the proofing tools we built presented each item with all the additional data onscreen simultaneously (shown on the right side of Figure 11.2). If the quality assurance person found an item with funky data, he could print the screen; all the data and any pertinent variables from my app would display. In the real app, no one would ever want to see all the data for any item simultaneouslyalthough he could individually select each field. For the quality assurance person to use the finished app to proof the data, he would have to click to see each additional field. Not only would this be a ton of clicking, the quality assurance person would likely miss a few. This is just one proofing tool, basically creating displays that would never be needed in the finished app.
Figure 11.2. This proofing tool used a modified version of the real app to enable the quality assurance person to check each item in a large database.
One serendipitous outcome of proofing scripts is that they sometimes turn out to be so useful, you may decide to turn them into features for the end user . For example, I made a simple script that automatically stepped from one screen to the next (loading external JPGs). This way, my client could ensure the image files they created were all in order. We ended up adapting the script (originally tied to a button) to automatically engage on a timed basis, and the client used it for a "kiosk mode," in which they could just leave it running at tradeshows and such. In basic form, Listing 11.1 shows what the code looked like before (when it was used as a proofing tool) and after (when it was turned into a slide-show feature):
Listing 11.1. Image-Proofing Script
Part A: Initialization (common to "before" and "after")
1 //populate variables 2 sections=["outdoor", "architecture", "portraits"]; 3 photos=new Object(); 4 photos.outdoor=[" beach ", "mountain", "hills"]; 5 photos.architecture=["house", "bridge", "office"]; 6 photos.portraits=[" kids ", "family", "baby"]; 7 8 //init 9 sectionNum=0; 10 photoNum=0;
We actually had way more than nine images, but this is how the data was structured.
Part B: Proofing Script ("before")
11 //proofing button: 12 next_btn.onPress=function(){ 13 //trace(photos[sections[sectionNum]][photoNum]+".jpg"); 14 my_mc.loadMovie(photos[sections[sectionNum]][photoNum]+".jpg"); 15 photoNum++; 16 if(photoNum>=photos[sections[sectionNum]].length){ 17 photoNum=0; 18 sectionNum++; 19 if(sectionNum>=sections.length){ 20 sectionNum=0; 21 } 22 } 23 } The only gnarly part here is line 14and that's more a factor of the way the data was structured. (If you want to test it without actual photos, just uncomment line 13.) I didn't want to modify how the data was structured just for this proofing script. The if statements are just to make sure we don't go past the last photo in any section, and they ensure that we loop around after the last section.
Part C: Combined Slide-Show/Proofing Script ("after")
11 //proofing button: 12 next_btn.onPress=function(){ 13 advance(); 14 } 15 16 function advance(){ 17 //trace(photos[sections[sectionNum]][photoNum]+".jpg"); 18 my_mc.loadMovie(photos[sections[sectionNum]][photoNum]+".jpg"); 19 photoNum++; 20 if(photoNum>=photos[sections[sectionNum]].length){ 21 photoNum=0; 22 sectionNum++; 23 if(sectionNum>=sections.length){ 24 sectionNum=0; 25 } 26 } 27 } 28 29 startShow_btn.onPress=function(){ 30 showInt=setInterval(advance, 10000); 31 } 32 stopShow_btn.onPress=function(){ 33 clearInterval(showInt); 34 } Notice the entire "proofing script" was moved into the advance() function. This way the same code could get triggered both by the proofing button and the setInterval (triggered every 10 seconds while the slide-show feature played ). I guess it's sort of rare that the same exact script can get recycled into your projectbut it usually doesn't take much modification.
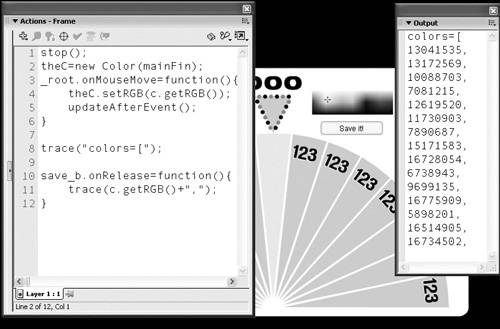
In addition to providing a feature for your users, a proofing script might also come in handy during production. Although this tip probably may seem like Chapter 10 material, it actually fits well here. As a simple, quick, and dirty production helper, I use the Output window all the time. For example, I made a little wheel-of- fortune app that helps me pick a random number (say, for book giveaways). For the different colored slices in the wheel, I had code that picked colors randomly, but I would often see dark muddy colors that didn't really match the look and feel I wanted. The solution was to randomly pick colors from a pool of "good" colors. Because I wanted lots of colors in the pool and I didn't want to type them all in by hand, I wrote a script that enabled me to quickly point to a color on Martin Naas's Color Picker component (downloadable from www.flashcomponents.net). I would click an Add It button (which would push() the selected color onto the end of an array). Then I would pick a bunch of colors and click a See It button that just did a trace(colorArray) . I then copied the Output window and pasted it into my real app (see Figure 11.3).
Figure 11.3. I gathered a variety of suitable colors using a free Component and a little bit of code.
Even though the wheel-of-fortune example was a production tip, it also ensured there were no color bugsgetting a random color that I didn't like. To carry it a bit further, I could have written a proofing script thatone by onewent through and colored a clip of each of the colors in the array. In either case, these sorts of tricks save a lot of typing!
In many situations, you'll want your proofing script to report the results after you have finished. The idea is you want to avoid the human element every step of the way. Suppose, for example, that you're just checking whether all the linked JPGs are presentyou don't care whether the content is correct; you just want to see whether each file is in the appropriate folder. In this case, you just need a report of the results. This can be as simple as doing a trace() and viewing the report in the Output window. A more permanent way to save the results is to send an email containing the results of the test. It's pretty easy. Suppose you've collected an array called myArray , for instance; you can use this code with a Send button:
send_btn.onPress=function(){ var theString=myArray.toString(); getURL("/books/1/478/1/html/2/mailto:bugs@phillipkerman.com?subject=data&body="+theString); } Like I said, easy. Just stuff the results after body= , and it will appear in the email body. This approach means your bug finder can be running the test remotely; users just click the button to send you the results. They don't even need Flash! You'll see a similar application later in this chapter as you learn how to build a homemade debugger.
On some occasions, you may need to use an outside tool to help you proof your app. (For instance, although Flash can do a lot, other tools can write text files directly to disk. An application server such as ColdFusion MX can do this sort of operation, too.) Outside tools may prove valuable to you because beyond the Output window, onscreen text fields, and triggering an email, Flash can't really get data into other forms without the help of outside tools. One advantage, however, of writing all your proofing scripts inside Flash is that you can readily recycle the code into something useful for your app. Don't feel obligated to use just Flash if you have some other needs or you have existing skills with other tools.
Leaving Tracks As You Go
The idea of leaving tracks won't necessarily prevent bugs, but it will help you recover when you do find a bug. It's like Hansel and Gretel's well-intentioned plan of leaving bread crumbs to help find their return path . Of course, you'll use a more secure method, but the idea is the same: You need an easy way to go back to an earlier (functioning) version of your app. This section shows you ways to plan for such backtracking.
Save As
Your tracking system need not be terribly fancy. For example, the easiest way is with version numbering. All you need to do is periodically do a Save As and rename the file with a higher number. I combine the date with the version number. For example, here are a few filenames from a work in progress:
cows_12_APR_r1.fla cows_12_APR_r2.fla cows_13_APR_r1.fla cows_13_APR_r2.fla cows_13_APR_r3.fla
Basically, I can see the latest version of my cow project is revision 3 on the 13th of April. This is just the way I do it; you can come up with another system if you prefer. For example, my approach makes it slightly difficult to determine which is the latest versionyou always have to look for the highest number. Regardless, it's definitely easy to go back and view older versions when you find that some recent addition causes a bug.
If you're really organized, you'll want to document exactly what features were added to each version. You don't have to be super detailed, but knowing when each feature was added can help you backtrack. Here's what I'm talking about: Every time you do a Save As, write down the new version number. Then, for every general feature you add, write it down under the version numberas general as "sorting feature," "fixed double-entry issue," or "added back button," for instance. Continue to do this so that in the end you can easily see all the features that were added to each revision. This may seem overly detailed, but it does offer two additional benefits in addition to recovery. Namely, you have a document to let the client see all the new features. Also, if you have some disaster and lose files, going back and adding features is much easier (even without the code) when you have a list to remind you of what all you added. Honestly, I don't usually use this technique until a project starts getting really hairy and deadlines are looming. Even though it might seem that's the time to hunker down and work (instead of spending time documenting), it's exactly the time you need to become even more careful because you're more likely to make mistakes.
There's an obvious fact that's easy to forget. You should always save, and then do a Save As. Otherwise , the most recent changes won't be in the old file, but rather in the new file. This process will more accurately mimic the concept I have in mind: "Okay, let's save what we have so far and begin adding some new features."
Carrying the Save As technique a step further, I always keep a backup of my source files on a separate computer. At least twice a day, I back up the latest revision onto my web space. (I did the same with the manuscripts for this booktalk about paranoid !) The thing is, I've never had a hard disk failure, but it's definitely possible. I'm just not going to be the one who says, "The computer lost my file." If you do back up to a web space, you'll see that separating your code from your content is an extra benefit because your backups will be nice and small.
You might not think there's much more to say about Save As, but it's worth noting that Flash MX 2004 has a new feature called Save and Compact . A nasty fact about Flash files is that they always grow when you saveeven if you've removed items. Now, instead of needing to Save As, you can select File, Save and Compact. This effectively defragments your file by discarding unused elements.
Documenting Inline
Again, a simple tracking system involves putting tracking information right inside your code files. Generally, I'm talking about comments in the code, such as keywords that make it easier to search through the code. For example, I usually put //HW next to any hard-wired scripts. The idea is that I can later search my scripts for "HW." You can come up with your own keywords. Also, if you work on a team, you should probably put your initials next to any code you add to someone else's file.
Note
Check In/Check Out
If you're working on a team and have Flash MX Professional 2004, you can take advantage of the Project panel's Check In and Check Out features. You can learn more about the Project panel in Chapter 10. Basically, you can check out a file, and others on the team will see an indication that the file is unavailable to them while you edit it. Like a lot of these techniques, it's more of a habit that you develop than anything else. But it's a habit that becomes critical as your project size grows.
Your inline documentation can also be right onscreen. Often I keep a list of known issuesbugs or missing features that I plan to fix later. This saves bug finders ' time because they know something isn't complete yet. Also, it helps you, the developer, because you're reminded of the remaining work. Similar to how I suggested you approach fixing bugs in a deliberate manner, you should approach adding features carefully , too. You would never program anything if you tried to program everything at once. Keeping a "to do" list right onscreen is a good way to (almost subconsciously) plan for the upcoming work.
Document Fixes
I suppose this is a repeat of the tip in the "Save As" section, but it bears repeating here: Document the changes added to each revision. Because we're nearly ready to look at how to fix bugs, I thought I should remind you that the same technique of documenting added features can be applied to fixing bugs. That is, every time you fix a bug, you may consider doing a Save Asor at least documenting all the fixes in each revision. All the additional benefits apply here, too: You have documentation for your client and a list of reminders if you have to start all over.
Defining Testing Procedures
Measuring success is an important component to any project. If your application is supposed to save time for the user, for instance, it's best if you can prove that with data. Similarly, measuring an application's quality takes place while you test it. Although you can't really test until you have something built, you can identify how you plan to test in advance. Ideally, you should identify the testing procedure before you even build. Without a way to test, how can you tell whether you've reached your goals? It may seem I'm mixing the concept of testing for bugs and testing for success, but the best way to find bugs is to test whether the app reaches its goals.
It's not critical that you define how you're going to test before you begin programming. Actually, as you're working you may become suspicious that something you're building may be prone to fail. Obviously, the programmer should do what he can to ensure the app worksbut he can't test everything. There's nothing wrong with the programmer saying, "Be sure to test this feature; I think it may be buggy ."
Although some people's idea of bug testing is to just pound on an app, it's best to have a formal process in place. A good testing procedure means that you test for things you otherwise may not when just poking around. Then, when the time comes to retest, you have a procedure to follow so that you retest everything.
I think the best way to judge how much effort is warranted for any quality assurance plan is to look at the size or importance of your project. It's not always easy to calculate the value of quality assurance. Like insurance , it's a ripoff until you need it. In any event, it makes sense to analyze this question early in a project often before you have anything to test.
| [ LiB ] |
EAN: 2147483647
Pages: 120