Chapter 1. Flash Basics
| CONTENTS |
- Timeline Hierarchy
- Script Locations
- Always Movie Clips
- Coordinate System
- Tricks of the Trade
- Summary
Flash professionals are a strange breed. Some have traditional animation and graphics skills. Others come to Flash from a programming background. Still others are so young they don't have any professional background they're straight out of college (or younger)! It doesn't matter where you come from because Flash is approachable and powerful.
For this book to serve as the bridge between intermediate Flash and advanced programming, it is best that you start at the same level. Intermediate Flash users, who are familiar with drawing, tweening, and sound effects, are about to embark on programming; already experienced programmers are about to apply their skills to Flash. But we all need to start at the same level.
This chapter is an important link to the material that follows. It isn't a recap of drawing, tweening, and sound effects; rather, it's a quick overview of foundational knowledge unique to Flash scripting. If the material in this chapter looks familiar, good. If not, you should make sure that it all makes sense before attacking the rest of the book.
Specifically, this chapter covers:
-
The timeline hierarchy of nested Movie Clips.
-
The Stage coordinate system.
-
Traditional Flash tricks, such as invisible buttons and empty Movie Clips.
-
The places where scripting occurs.
I'd like to think that most of this chapter is a review, but it's okay if some material is new to you. If nothing else, you should begin to approach the concepts in the way they're presented here. For example, if you've never heard of invisible buttons, that's fine just try to start using them.
Timeline Hierarchy
A key concept that is critical to understanding Flash is nested timelines. Any time you select a shape and Insert, Convert to Symbol (F8), the shape is placed in the Library and you're left with an instance of the symbol on the Stage. You also can select an instance of a symbol and Insert, Convert to Symbol, which nests an instance of the selected symbol inside a new symbol. The main thing to remember is that F8 takes whatever is selected and places it in the Library as a new symbol (even if you have a symbol instance selected). Such nesting of symbols has implications for both programming and animation structure.
Implications for Animation and Filesize
To see how nesting symbols applies to animation, consider how to create a symbol of a car containing moving wheels. First, draw a wheel and convert it to a Movie Clip symbol called "Wheel." To create a rotating wheel symbol (that is, a Movie Clip containing an animation), you can convert an instance of the Wheel symbol to another Movie Clip called "Rotating Wheel." Then edit the contents of the Rotating Wheel by making a simple Motion tween that rotates the Wheel symbol. Because only symbol instances can be used in a Motion tween, the extra step of placing the Wheel symbol inside the Rotating Wheel symbol is necessary. Finally, use two instances of the Rotating Wheel clip inside a third clip, "Car." Then you can animate the car across the main timeline.
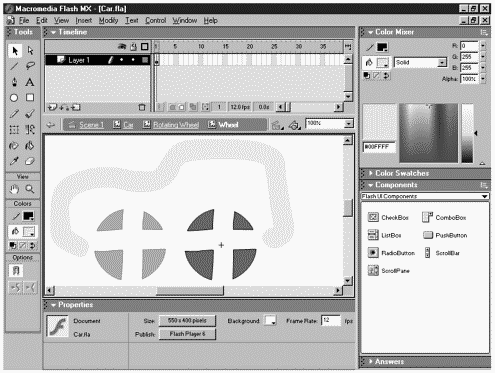
In the end, your car is a symbol containing two instances of the Rotating Wheel clip, which both contain an instance of the plain wheel. When building such nested symbols, it's usually best to work from the "inside out" or "specific to general." Regardless of how you approach it, be sure to monitor the address bar that appears above the Stage, as shown in Figure 1.1. The address bar begins with the name of the scene that you're currently editing, and shows the hierarchy of symbol nesting as well. In Figure 1.1, the address bar indicates that you're editing the "Wheel" symbol inside "Rotating Wheel," which in turn is nested inside "Car." Of course, you can make more complex nested symbols than a car with rotating wheels you just have to keep track of what you're doing.
Figure 1.1. The address bar shows the hierarchy of nested symbols.
Besides enabling complex effects, nested symbols can reduce your movie's filesize by recycling graphic components. You can actually take this seeming advantage too far, and it will begin to work against you. Take the absurd example of a single-pixel symbol that is recycled and nested to make a line and then four lines are used to make a square and so on. Generally, however, the benefits of recycling symbols are significant.
In addition to filesize savings, careful use of symbols generally (and Movie Clips specifically) can help your productivity. For example, when a change is made to the master symbol, that change is reflected in each instance already in use. Also, when you duplicate a shape that hasn't been converted to a symbol, you encounter two problems: the obvious filesize contribution and the fact that Flash might not render the "identical" shapes the same way. Because you can position graphics in fractional locations, Flash often needs to round off when drawing every pixel. The bottom line is that two different shapes of the same size can easily appear slightly differently, whereas multiple symbols look the same (unless they're scaled differently).
Implications for Programming
Finally, nested symbols can be useful for programming tasks. For one thing, nesting symbols makes your Flash file more modular and manageable. Imagine if our entire money supply were based in pennies. It would certainly be possible to carry out any transaction, but it'd be a pain. You could nest one hundred pennies in a "dollar" symbol. A ten-dollar bill is like 10 instances of the "dollar" symbol. Sometimes such nesting is simply more convenient.
In addition to modularization, clips and buttons are the primary ways to include interactivity in your movies. If you want to respond to user's mouse click, you can use a button that can "trap" a user's press. If you want a script to execute the moment a movie is fully loaded, you can use Flash's load event that's made for Movie Clips. Throughout this book you'll see that there are countless ways to make your movie respond to user interaction but they nearly always involve a clip or button instance.
Addressing (or Targeting)
When creating nested symbols, it's important to pay attention to the address bar. When programming, it's just as important to understand the concept of addressing (also called targeting) that is, which clip you want to affect. Say you intend to move a Movie Clip instance when the user clicks a button. The instance could be in the main timeline or nested inside another clip (perhaps many levels deep). Before you say "move," you have to address the correct clip. It's like in real life. If you want someone in a crowd to move, for example, you can't just say, "Hey, move." You must first address the person you're targeting by saying "Hey, Phillip, you move."
Another way to envision addressing is to think of the folder (and subfolder) structure on your computer. You can have symbols inside symbols just like folders inside folders. (I'll use this analogy throughout the description and tie it to Flash at the end of this section.) If you are browsing one folder and you want to open a file in a subfolder, you simply "address" the subfolder you want to browse. When you decide to address another file or folder, you have two basic ways to do so: relatively and absolutely. Take a quick look at Figure 1.2. Starting from the folder "Flash MX," if you want to go into a folder "Help" and then into a subfolder "Flash," the relative target can be expressed as go into the folder "Help" and then into the subfolder "Flash." Consider that you can only be "in" (browsing) one folder at a time, so when you begin by saying go into the folder "Help," you're assuming that a folder called "Help" is present within the current folder. This is relative addressing because it's relative to where you are. (In Chapter 7, "The Movie Clip Object," you'll learn that Flash uses the reserved word "this" to mean "this timeline.")
Figure 1.2. Relative and absolute addressing are similar to browsing files and folders on your computer.
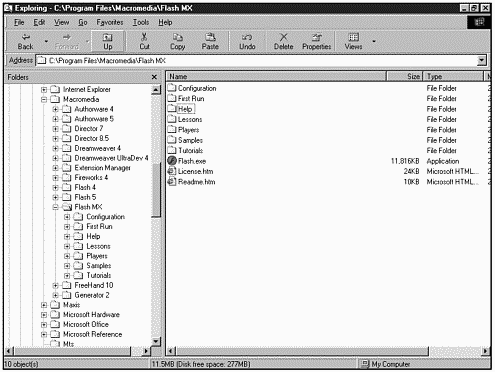
In addition to relative addressing that "dives" down into subfolders, relative addressing can go up too. That is, if you're inside one folder (or Movie Clip), you can refer to the folder that contains the folder you're in. For example, if you were browsing the "Flash MX" folder inside the "Macromedia" folder, you could refer to the "Macromedia" folder with a relative target: "go up one level" (the same way you could click "Up" in Figure 1.2). In Flash, such a relative reference involves the term _parent; in HTML, the characters ../ are used. You'll learn more about this later in this chapter, but the important concept to remember is that relative references can go "up" or "down."
Absolute addressing is an alternative to relative addressing. Absolute addresses specify the entire address of the item (or folder) that you're targeting. As such, absolute references are unaffected by which folder you're currently "in." In the case of browsing folders, an absolute path would include the drive letter. For example: C:\Program Files\Macromedia\Flash MX is an absolute path. You also can compare a phrase such as "next door" or "down the street" to a relative address, and "1234 SW Whatever St., Portland, OR 97214" to an absolute address.
It's a subjective decision as to which references are better: absolute or relative. But, generally, relative references are desirable because you aren't restricted in changing the hierarchy. Imagine that you wanted to move your "Flash MX" folder to a different hard drive? All of a sudden, the absolute address C:\Program Files\Macromedia\Flash MX won't work. However, if you're using a relative target, such as Macromedia\Flash MX (which is really go inside the folder "Macromedia" adjacent to where I am and then go into the folder "Flash MX"), it isn't tied to any particular drive or folder. The only disadvantage of relative references is that they require you to be "in" a particular folder (in this case, the "Program Files" folder). The absolute reference C:\Program Files\ Macromedia\Flash MX works no matter where you are (as long as the folder hasn't moved).
Although the decision between relative and absolute addressing is subjective, you'll often find that relative targets become quite complicated when you have to go both "up" and "down" to find the target. For example, if you wanted to address the folder called "Flash 4" (which is inside your "Macromedia" folder) if you were in the "Flash MX" folder, a relative target would be go up one folder, and then down into "Flash 4." It's not impossible to make relative references that change direction like this, but an absolute address is often easier.
Just so we don't drift too far from Flash, let's look at addressing in Flash. You often need to address clip instances (and their timelines). Using the earlier car example, if I were in a "wheel," I could use a relative address to refer to the car in which I was contained. It helps greatly to name the instances of each nested Movie Clip. For example, if I wanted to address the front wheel instance inside my car, I would want to make sure that both the car and the wheel had an instance name. Because you might have several instances of the original "car" symbol on the Stage, you definitely cannot address a clip by its master name in the Library. You can address only one clip instance at a time so you'd have to specify which car instance you were targeting.
Relative addressing in Flash is pretty simple. You just begin with this and follow it by the instance name of the clip you're addressing. If the instance name is "BigCar," for example, you just use this.bigCar. To address instances inside instances, you simply separate each instance name with a dot (that is, a period "." but people say dot). this.BigCar.FrontWheel will address the "FrontWheel" instance inside the "BigCar" instance that is present in the current timeline. If you are writing a script from inside the "FrontWheel" instance and want to target the "BigCar" instance, use _parent. The term _parent means the clip that contains the clip you're in. (Think "up one level.") You can also use _parent._parent (and so on) to "go up" more than one level at a time. You can also target an instance that's "up one level." Say, from inside the "FrontWheel" instance, you want to address "BackWheel" (which is contained in "BigCar," the same clip containing "FrontWheel"), you can use _parent.BackWheel.
Absolute addresses in Flash almost always begin _root, which addresses the main timeline. For example, _root.BigCar.FrontWheel will address the instance named "FrontWheel" inside "BigCar," which is in the main timeline. The only exception to beginning absolute addresses with "_root" is when addressing levels. Using the loadMovie method, you can play .swf files inside clips or level numbers. To address a clip (or the entire .swf file) absolutely that's been loaded via loadMovie, begin with _level1 (use _level2 for level 2, _level3 for 3, and so on). If you see an address that begins with _root, you know it's absolute. If it begins with _parent or this, you know it's relative. Finally, if you don't see _root, _parent, or this, then the this is implied (and can always be added for clarity) and therefore you have a relative address.
Addressing clips might sound like an exercise in futility, but there are actually several reasons to do so. You can address a clip to change one of its properties. For example, you could address the front wheel in the car to change its alpha property. For example, the script _root.BigCar.FrontWheel._alpha=50 would set the front wheel's alpha to 50%. Not only can you change properties of an individual instance, but you can also make instances change more significantly. For example, _root.BigCar.FrontWheel.gotoAndStop(10) will go to frame 10 (in the FrontWheel instance) and stop. Such a script is called a method of the instance. We'll discuss both changing properties and using methods (plus much more) in Chapter 4, "Basic Programming in Flash," and Chapter 7, "The Movie Clip Object." It's just important to understand why you'd need to address a clip in the first place. (Again, if you addressed me by saying "Hey, Phillip," you probably had something more to say.)
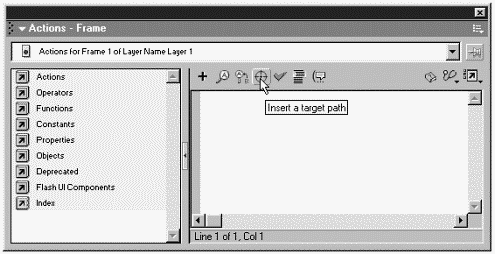
This section provides the basics of addressing. You might want to practice, however. A great way to learn is by using Flash's Target Path Editor. Any time you see the Insert Target Path button (see Figure 1.3), you can explore your entire file and Flash will write the target reference for you. What's more, you can experiment with both relative and absolute targets.
Figure 1.3. The Insert Target Path button helps you compose a target path.
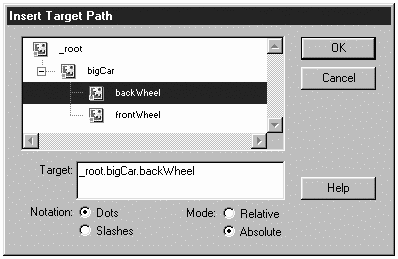
Finally, although the old "slash" reference is also supported (and might be familiar to those with HTML experience), I recommend using only the dot notation. You can see the Target Path Editor in Figure 1.4.
Figure 1.4. The Target Path Editor enables you to choose between relative and absolute paths and dot and slash notation.
Script Locations
All your scripts are written in the Actions panel, but there are three places you can attach scripts: keyframes, button instances, and Movie Clip instances. You can also place scripts inside a master Movie Clip, but still attach scripts only to keyframes, button instances, and clip instances that are inside the Movie Clip.
Flash is "event-driven," meaning that events trigger scripts to execute. Even after you write a script (an instruction for Flash to follow), you must select an event to trigger that script.
Keyframe scripts are probably the easiest to understand. You simply select a keyframe and open the Actions panel to create a script. When the frame is reached, a frame script is triggered. That is, if you put a script on frame 10, it will execute when the playhead reaches frame 10. Keep in mind that Flash executes the script first and then draws the onscreen contents. This becomes important if your script's instructions are to jump to another frame; you might never see the onscreen contents of the frame where the script is written.
| | Button and Movie Clip scripts are attached to instances of buttons or Movie Clips but not contained inside the master symbol of a button! If you place a script anywhere inside a button's symbol, it will be ignored. If you place a script inside a Movie Clip symbol, it will work fine; but consider such a script is placed in a keyframe, button instance, or nested clip instance. To attach a script to a button or clip instance, select an instance on the Stage and then use the Actions panel to write a script. Button and clip instance scripts differ from frame scripts in one interesting way: They are always contained within an event. Buttons respond to mouse events (such as press, release, and rollOver) and clip instances respond to clip events (such as load, unload, and enterFrame). (In Chapter 14, "Extending ActionScript," you'll see that Flash MX also enables you to make Movie Clips respond to mouse events a task previously reserved for buttons.) When comparing buttons and clips to keyframes, remember that keyframe scripts execute in the event that the frame is reached, whereas button scripts respond to mouse events, and clip instance scripts respond to clip events. For example, you can't simply make a button gotoAndPlay(1). You have to specify exactly what event will trigger that script a press mouse event, a rollOver event, or other. Chapter 4 discusses events in greater detail, but you should have a clear understanding of these three script locations. |
Another very important concept related to addressing is that button and keyframe scripts both perform as though you were "in" the timeline in which they reside. Scripts attached to clip instances perform as though you were "in" the Movie Clip's timeline. For example, if your script gotoAndStop(1) were attached to a keyframe or button (within a mouse event), it would cause the playback head to jump to frame 1 within the timeline in which the button or keyframe resides. (If it helps, just add the implied "this," as in this.gotoAndStop(1).) If the same script were attached to a clip instance, the playback head would jump to the first frame within the clip unless you changed the script to _parent.gotoAndStop(1). This topic will be fully explored in many of the workshop portions of this book.
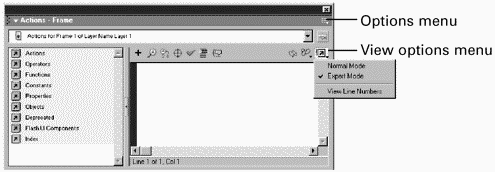
One last point about script locations: You can display the Actions panel in Normal Mode or Expert Mode. This is set through the options menu (at the top-right of the Actions panel) or the new View options menu (see Figure 1.5).
Figure 1.5. The View options menu enables you to change from Normal Mode to Expert Mode.
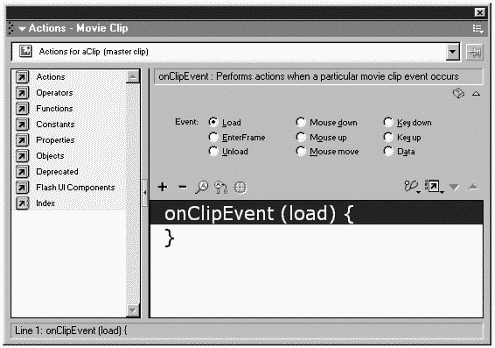
| | I used to switch between Expert Mode and Normal Mode quite frequently. It can be nice the way Normal Mode not only ensures proper syntax but often lists a choice of options (see Figure 1.6). With Flash MX's new code hints feature, however, you can get that same list of options automatically. In Chapter 2, "What's New in Flash MX," I'll go over all the tricks to using code hints, but the bottom line is that I'd strongly recommend that you simply leave the Actions panel set to Expert Mode. For a quick taste, click the first cell in the timeline, open the Actions panel, set it to Expert Mode (Ctrl+Shift+E), and then press the following three keys in sequence (but not all at the same time): Esc, O, C. You should see a drop-down list of options for the "On Clip" events. Start a new line, and then press Esc, O, N for a list of "On Mouse" events. (Forget for a moment that you're not allowed to put mouse or clip events on keyframes.) Once you learn how to use code hints, you'll find the correct script elements with little effort. |
Figure 1.6. Normal Mode provides a list of options (as does the new code hints feature).
Always Movie Clips
Every time you create a symbol, you have a choice between Movie Clip, Button, or Graphic behavior. Selecting the Button symbol is often convenient because an instance automatically causes the cursor to change to a "finger" (for the user), and the symbol has provisions for various visual states plus a "hit" state. Buttons are great when you need buttons.
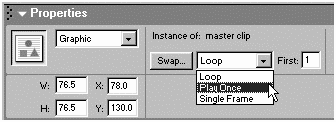
The choice between the Graphic and Movie Clip symbols isn't as clear. I used to believe, incorrectly, that Graphic symbols were appropriate for static graphics and Movie Clips for multi-frame clips. However, a Graphic symbol should be used in one of only three cases: when you're creating a multi-frame clip that you want locked to its parent timeline (so that you can scrub by dragging the red current frame marker to preview its behavior); when you're planning to take advantage of one of the special loop settings available only to Graphic symbols (See Figure 1.7); or when you want Flash to stream the contents of the Graphic symbol (instead of loading all frames before proceeding the way Movie Clips do).
Figure 1.7. Use a Graphic symbol only when you need to preview in the timeline or use one of the Loop options found in the Properties panel.
Basically, if those cases don't exist, use Movie Clips. Only Movie Clip and button instances can be named, which means that only they can be addressed to have their properties changed or ascertained. (You must know the name of a clip to address it, after all.) There are other features of clip instances just remember the cool stuff that can be done only with clip instances. Now that Flash MX lets you name button instances (and, for that matter, text objects), many of the ways that you can affect a clip instance now also apply to buttons. In practice, however, the fact that Movie Clips can now perform button-related tasks (such as use mouse events and the hand cursor), there are even fewer reasons to use buttons.
Nested Movie Clips not only have the ability to be addressed, but they almost always contribute less to filesize. A simple test in which you compare nesting Graphic symbols inside Graphic symbols to clips inside of clips will show a dramatic filesize difference. To offer a bit of balance, nested Graphic symbols will tend to perform slightly better (and stream differently), although this is usually of negligible benefit compared to the filesize bloat they cause.
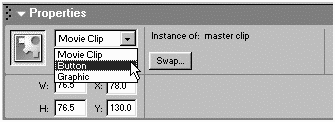
Realize that the behavior you select when you make the symbol or if you change a Library symbol's properties later will affect only the default behavior for created instances. By using the Properties panel, you can change a particular instance's behavior, as shown in Figure 1.8. A symbol that was originally a button can "act" like a Movie Clip, for example. Changing an instance's behavior makes that instance perform as selected the only difference is that the original symbol (and subsequent instances) might have a different default behavior.
Figure 1.8. You can change the behavior of any instance on the Stage through the Properties panel.
Coordinate System
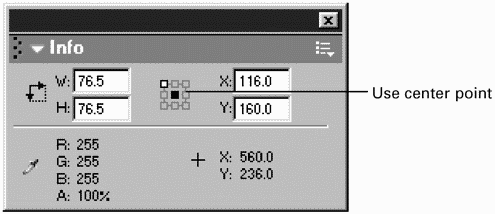
On the Stage, Flash considers the x and y coordinates to begin at the top-left corner. The x coordinate increases as you move to the right. The y coordinate increases as you move down. This might be familiar to you, and you just accept that "0, 0" is the top-left corner. In the case of clip instances, position is based on the center registration point of that clip. If you use someClip._x=100, the clip will move so that its center appears at position 100x. Whenever you're inspecting the coordinates of clips on the Stage, use the Info panel and be sure to click the center box, as shown in Figure 1.9 (so that you're not viewing the top-left corner of the clip). (By the way, the coordinates that appear in the Properties panel reflect either the center point or the top-left corner, depending on the current setting in the Info panel.)
Figure 1.9. The center option on the Info panel reflects the location a clip will move to when using ActionScript.
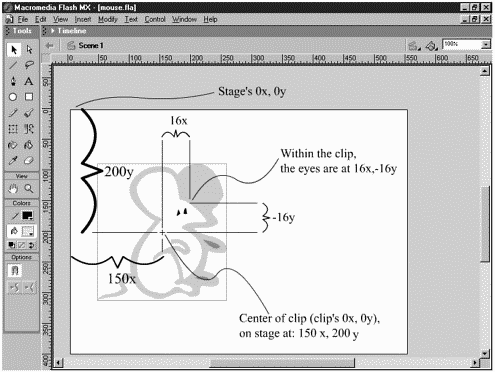
Similarly, when you are inside a clip, "0, 0" is the center of the clip, as shown in Figure 1.10. The best way to understand coordinates is to select View, Rulers and edit a symbol by double-clicking the symbol item in the Library.
Figure 1.10. The position of objects on the Stage is based on the top-left corner being 0x, 0y. Within Movie Clips, objects are based on the center being 0x, 0y.
Tricks of the Trade
As I mentioned, Flash-heads tend to be strange characters. Perhaps they've turned out that way while developing creative and resourceful solutions to control Flash. Some of the tips that I'm about to disclose might seem wacky on first look, but they're all very useful.
Invisible Buttons
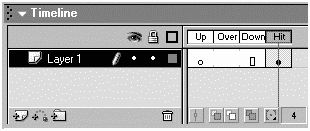
Buttons are cool because you can automatically create an Over-and Down-state. However, they also offer something else: access to mouse events. There are situations when you want or need access to a mouse event (such as Roll Over, for example), but you don't need or want all the pretty graphic features of a button. (Chapter 3, "The Programmer's Approach," discusses the value of code-data separation that is, separating the generic programming code from the specific graphic content so that you can easily extract the programming and use it again with different content.) An invisible button is perfect for this. What is an invisible button? Simple: a button that has no graphic contents except a shape in its hit state (see Figure 1.11). I don't know how many times I've drawn a shape, converted it to a button symbol, and then double-clicked the button instance to edit its contents by dragging the first frame to the Hit-state but it's a lot of times! The coolest part of invisible buttons is that Flash will display (while authoring) a semi-transparent cyan shape, so it's easy to position the button.
Figure 1.11. An invisible button is simply a button with graphics in the Hit-state only.
Let me give you a couple examples of when an invisible button might be useful. Say you have several words that you intend to act as clickable buttons. It might seem easiest to have a separate button for each word, whereas nesting the text inside the button would be clumsy. Each word would be a separate button, editing the words would require going into the button, and each one would need a hit state that's larger than the word (or they would be hard for the user to click). Compare this to having several instances of an invisible button that contains a rectangle in its Hit-state. All the text can be in the main timeline where it's easy to edit, you can resize the invisible buttons as needed, and overall it will be easier to maintain.
You also can use invisible buttons in conjunction with clip instances. I often find that a button with just an Over-and Down-state isn't enough; sometimes a "selected" state is necessary to show the user which buttons have been selected. One Movie Clip could contain different frames for Up, Over, and Down (similar to a button). Additionally, the clip could contain graphics to communicate "selected" (perhaps a checkmark). Just place an invisible button in the clip (or on top of the clip), and by jumping to the appropriate frames within the clip, you can make a much more sophisticated button.
I can think of many more times when invisible buttons would be useful. Any time that you simply want something "clickable" but don't want to put all the graphic content inside a button, invisible buttons can help.
Empty Movie Clips
| | Similar to the reasons for invisible buttons, empty Movie Clips are useful when you want to take advantage of some benefit of a Movie Clip but don't have a need or desire for any graphics. A Movie Clip can do "Movie Clip things," regardless of whether the clip has any graphic contents. You can put extra frames and keyframes within an empty clip to write scripts; you can attach scripts to instances of empty Movie Clips; you can even give names to empty clip instances so that they can be addressed. And now Flash MX enables you to create empty clip instances entirely in script (that is, never dragging from the Library). The easiest way to create an empty Movie Clip is to select Insert, New Symbol; name it; and click OK. When you're taken inside the clip to edit its contents, simply return to your main scene. The trick to remember is that you'll need to drag an instance of this empty clip from the Library window. Unlike invisible buttons, empty Movie Clips are displayed as a white dot while you are authoring (see Figure 1.12). |
Figure 1.12. Empty Movie Clips appear as a small white dot when on stage.

Perhaps even more common than empty Movie Clips are Movie Clips that have contents in all their frames except the first frame. While you are authoring, such a clip appears as an empty Movie Clip; that is, as a white dot. (Actually, because the dot is so cryptic, I often place something in the first frame of every clip I just move it off the Stage so that the user won't ever see it, but I'll be able to easily grab it while authoring.) There are situations in which you don't want to display the contents of a clip until a certain event occurs. Just create a blank keyframe in the first frame of the clip with a stop() script. Then, perhaps when the user clicks the correct button, you can use a script such as _root.clipInstanceName.play(), which causes the instance (called "clipInstanceName" in this case) to play. You'll see exactly how this works in more detail in Chapter 4, but you should have an idea how such clips can be used.
Empty Layers and Keyframes
A really great technique is to create an extra layer for no other purpose than to contain blank keyframes. These keyframes are strategically placed wherever you want a label or script. You could actually have one layer for all your keyframe scripts and another for all your labels. It's nice to separate these keyframes from your graphics (and tweens) because they won't disrupt anything visual. For example, if you want a keyframe script that stops your animation right in the middle of a tween, inserting a keyframe script on the same layer as the tween will disturb your tween. Instead of only two keyframes (one at the beginning and one at the end), you'll have three keyframes. If, later in the project, you want to move the middle keyframe (where the stop occurs), you can't do it without changing the tween. Putting a stop script on a dedicated script layer solves this problem. Figure 1.13 shows a real project with separate layers for scripts and labels.
Figure 1.13. A typical project's timeline will include layers that contain only labels and scripts.

I have another trick that combines layers with empty Movie Clips. Empty clips are difficult to select because you need to grab a tiny white circle (refer to Figure 1.12). If you have several empty clips near each other, it can be impossible to select the correct one. To keep things organized, I often create a new layer for each empty clip (or group of clips). Because I know that when I click the layer in the timeline it will select all the contents of that layer on the Stage, I can quickly determine which empty clip is which by clicking the layer that I've named to match the clip. The nice thing about layers is that they don't add to the exported .swf's filesize.
You'll find many more tips and tricks throughout this book. However, I expect the tricks I've shown so far are familiar, if not "old hat," to you. At least make sure that you understand how they work and why they're helpful.
Summary
Depending on your past experience, this chapter was either a review, all new, or a mix thereof. In any case, this is the starting point from which we will program advanced Flash scripts. It's fair to assume that you know how to draw and animate in Flash. However, I think this chapter was a good way to get everyone oriented. If some of the material was new to you, that's fine. If it's all new to you, I suggest that you first read a basic Flash MX book, such as Sams Teach Yourself Macromedia Flash MX in 24 Hours, which I wrote before this book.
The critical concepts that you really must understand to get the most out of this book include timeline hierarchies (nested clips), addressing (or "targeting"), script locations (keyframes, button instances, and clip instances), and the coordinate system. In the "Tricks of the Trade" section, you learned helpful (but not required) information about making invisible buttons and empty Movie Clips. Additionally, a method to use a whole layer for keyframes containing scripts or labels was discussed.
| CONTENTS |