Workshop Chapter 14. Offline Production
| | CONTENTS | |
This workshop chapter combines offline production with time-based animation. As discussed in Chapter 3, "The Programmer's Approach," offline production is any procedure that's executed only during authoring. The process of collecting coordinates for the mapping exercise which we covered in Workshop Chapter 5, "Mapping and Scripted Masks" is an example of offline production. In this workshop chapter, we will build a data string and output it using the trace() command. Then we'll take the text that appears in the Output window to another file and use it in a time-based animation sequence. Making one file that gathers data and another file that uses that data might seem like extra work, but you'll see that both files can be quite simple. The file that acquires data has one simple job: to gather data; the file that uses that data also has a simple job: to use the data.
Think about how a player piano accepts a roll of paper that has holes punched out of it. Imagine now that there was a special piano that punched the holes as you played on the keyboard. We're going to build a special Flash movie that produces the data for an animation and another movie that uses the data. After the data is produced, the offline movie that produced it can be discarded or saved for future jobs because it will have done its job.
-
Create a new file and save it as offline.fla. Set the movie's document properties to 8 fps. Draw a circle, convert it to a Movie Clip called Circle, and give the instance the name circle.
-
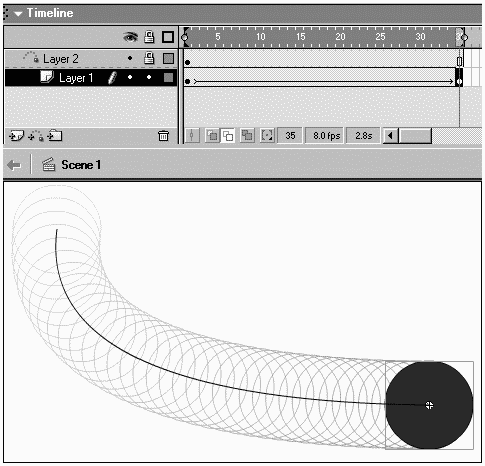
Make a simple animation using the circle instance in the main timeline and put a stop() script in the last frame. For this example, I made a tween that follows a Motion Guide (see Figure W14.1).
Figure W14.1. Any animation will do, but I used a Motion Guide for this example.
-
Type the following code into a frame script of the main timeline:
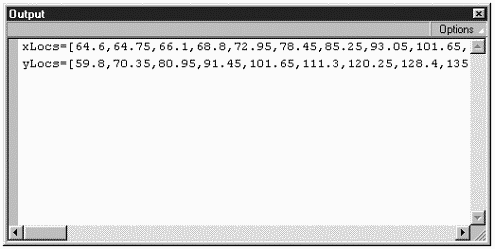
1 xLocs = new Array(); 2 yLocs = new Array(); 3 flag = 0; 4 circle.onEnterFrame=function(){ 5 xLocs.push(this._x); 6 yLocs.push(this._y); 7 if (_root._currentframe == _root._totalframes && flag == 0) { 8 flag = 1; 9 trace("xLocs=["+xLocs.toString()+"]"); 10 trace("yLocs=["+yLocs.toString()+"]"); 11 } 12 }Lines 1 3 initialize two empty arrays that will hold _x and _y locations plus the flag variable (which gets set to 1 after all the data has been gathered). Notice that the onEnterFrame callback function (line 4) contains two primary lines of code (lines 5 6) that execute once every time a new frame is displayed. The current position of the circle clip gets pushed onto the end of each array. Then the if statement in line 7 will only execute once namely, when the _root timeline's _currentframe matches _totalframes (that is, the last frame) and the flag variable is still equal to 0. If that condition is true, the flag is set to 1 (therefore the if statement is never true again). Also, two trace commands display a nicely formed string in the Output window.
I say the string is nicely formed because it will be able to be used as-is to populate both array variables xLocs and yLocs in the second movie. The string includes three basic components: First, the variable name, an equal sign, and an open bracket: xLocs=[. Second, a string version of the array, which, incidentally, separates each value with a comma: xLocs.toString(). Finally, a closing bracket: ]. Figure W14.2 shows what appears in my Output window. (By the way, you don't need to use the toString() method; Flash automatically converts the array's contents to a string form when executing a trace() command it doesn't hurt to be explicit, however.)
Figure W14.2. The Output window displays the string as we formatted it.
-
Test this movie and copy the contents of the Output window to the Clipboard. Return to the movie and open the Library window.
//
It turns out that if you have a lot of data in the Output window and I mean a lot you might not be able to copy it all. I've noticed that this condition happens on the Macintosh more often than on Windows machines. Usually, you can get around this problem by using the Output window's Save to File option. At the worst, you can shorten your animation for this workshop. In a real-world situation, you might have to gather the data in stages, maybe 100 frames at a time.
-
Create a new file called online.fla. Drag the Circle symbol from the old file's Library onto this file's Stage. Close the Library window.
-
Give the instance of the Circle in the new file the name circle.
-
Before we forget, paste the contents of the Clipboard (from Step 4) into the frame script of online.fla (where all the rest of our code will go) so that you have two lines of script that populate the two array variables (xLocs and yLocs).
-
To see where we're headed, type the following simple script underneath where the two arrays are initialized:
_root.onEnterFrame=function(){ frame++; circle._x=xLocs[frame]; circle._y=yLocs[frame]; } circle._x=xLocs[0]; circle._y=yLocs[0];As soon as the movie begins, this script executes once every 1/12 of a second (based on your frame rate). The last two lines just position the circle clip in its initial location. This code is slightly sloppy because I'm relying on the fact that frame (a homemade variable with no value) will evaluate as 0 the first time. The only significant problem with this example is that it's still tied to the frame rate that is, if you increase the frame rate, the circle clip will animate faster.
In addition to making this time-based rather than frame-based, I want to make the circle clip play its animation once every time the user clicks; therefore, we won't define the onEnterFrame callback until the user clicks.
-
First let's make it animate only after the user clicks. Replace all but the two lines that initialize the two arrays with the following code:
1 _root.onMouseDown=function(){ 2 frame=-1; 3 this.onEnterFrame=function(){ 4 frame++; 5 circle._x=xLocs[frame]; 6 circle._y=yLocs[frame]; 7 if (frame>=xLocs.length){ 8 this.onEnterFrame=null; 9 } 10 } 11 }This code is a bit circular, but it makes sense. When the user clicks, the frame variable is initialized to -1, and then an onEnterFrame callback is created (lines 3 10) that contains the same basic code we used before to position the circle clip. In addition, an if statement is triggered when the frame variable reaches the end of the xLocs array. If that if statement's condition is true, the onEnterFrame callback is cleared.
Now that the circle clip moves only after the user clicks, we can move on to apply a time-based script. Although we'll keep the onEnterFrame callback, we can calculate a value for frame. This way, frame will neither increase too fast nor ever fall behind. This time-based approach requires that we store the current time when the user clicks and then continually check to see how much time has elapsed.
-
To make a time-based solution, we need to decide on an effective frame rate. This way, the original animation will always play the same even if we crank up the frame rate. Because our offline animation was created at 8 fps, we'll need some calculation to make it play the same inside the 12 fps online version. Type the following code inside the first frame (but not in any callback functions):
fps=8; milPerFrame= (1000/fps);
Basically, because we'll be checking to see how many milliseconds elapse between each enterFrame event, we'll need to know how many are supposed to elapse. To save a variable, you could replace fps in the second line with 8 but it's clearer this way.
-
Now that we know how many milliseconds are in 1/8th of a second, we can use the following modified version of the two callback functions:
1 _root.onMouseDown=function(){ 2 startTime=getTimer(); 3 frame=0; 4 this.onEnterFrame=function(){ 5 now=getTimer(); 6 elapsed=now-startTime; 7 frame=Math.floor(elapsed/milPerFrame); 8 circle._x=xLocs[frame]; 9 circle._y=yLocs[frame]; 10 if (frame>=xLocs.length){ 11 _root.onEnterFrame=null; 12 } 13 } 14 }The first difference appears in line 2, which stores the starting time. Then, instead of having one line of code that increments frame, lines 5 7 first figure out how much time has elapsed, and then line 7 calculates an integer value for frame based on the elapsed time divided by how many milliseconds per frame should have elapsed. That's all!
What's really cool about this workshop is that you can set the frame rate in the online movie to anything you want, and the animation will always play the same! Sure, if you lower the frame rate to something lower than what was used in the offline movie, the online movie will skip frames to keep on time but that's a good thing.
Consider how you might use this technique to "record" your mouse movement. You could make another version of the offline movie that includes a draggable clip. As you drag the clip, the script records where the clip has been dragged. The only thing to remember is that you'll have to output all the variables gathered before you finish testing the movie. If you return to the authoring environment before you do that, all your variables will be reset. (This "record" version appears in the downloadable version, which you can find at www.phillipkerman.com/actionscripting.)
The technique discussed in this workshop is quite versatile. For example, you can use other programs to create the variables for the online version of the movie. Most animation tools have some sort of scripting capability to make that possible. You can even determine synch points in an audio file to use in Flash. When there's not a whole lot of data, you can just create the array of locations by hand. If it's just a simple animation, doing it by hand is easy. Actually, in Workshop Chapter 15, "Creating a Dynamic Slide Presentation," we'll create a short array that contains the location for a text bullet point that animates onto the Stage. No tweening necessary! Finally, realize that the array full of data doesn't have to be limited to x and y locations. You can automatically gather data about a clip's scale, alpha, or any other property.
| | CONTENTS | |