Using an IDE to Create and Run the Hello World Project
Using an IDE to Create and Run the Hello World! Project
You can use any plain-text editor such as Notepad to write the source code. You also can download a free compiler, which usually includes a preprocessor and linker. You then can compile and run your code from the command line. The command line may be, for example, a DOS prompt at which you type a command that specifies the action you want, such as compiling, followed by the name of the file you want to compile.
While there is nothing wrong with using a plain-text editor and command line tools, many programmers, including me, prefer to create, compile, and run their programs in a C++ Integrated Development Environment, known by the acronym IDE. The term integrated in IDE means that the text editor, preprocessor, compiler, and linker are all together under one (software) roof. Thus, the IDE enables you to create, compile, and run your code using one program rather than separate programs. Additionally, most IDEs have a graphical user interface (GUI) that makes them easier for many to use than a command line. Finally, many IDEs have added features that ease your task of finding and fixing errors in your code.
The primary disadvantage of using IDEs is you have to pay to purchase them (though there are some free ones). They also require additional hard drive space and memory. Nevertheless, I recommend obtaining an IDE since it enables you to focus on C++ programming issues without distractions such as figuring out the right commands to use on the command line.
There are several good IDEs on the market. Microsoft s, called Visual C++, can be obtained separately or as part of Microsoft s Visual Studio product. Borland offers C++ Builder, both in a free and commercial version. IBM has a VisualAge C++ IDE. There are a number of others as well.
In this book, I will use Microsoft s Visual C++ .NET 2003 IDE since I happen to have it. However, most IDEs work essentially the same way, and your code will compile and run the same no matter which IDE you use as long as you don t use any library files custom to a particular IDE. The standard library files we will be using, such as iostream , are the same in all C++ IDEs.
Additionally, I am running the code on a Windows 2000 operating system. The results should be similar on other operating systems, not just Windows operating systems, but additional types of operating systems as well, such as UNIX.
Let s now use the IDE to write the source code for the Hello World! project, and then compile and run it.
Setting Up the Hello World! Project
Once you have purchased and installed Visual C++ .NET 2003, either as a standalone application or as part of Visual Studio .NET 2003, you are now ready to start your first project, which is to create and run the Hello World! application.
-
Start Visual C++.
-
Open the New Project dialog box shown in Figure 1-2 using the File New Project menu command. (The values in the Name and Location fields will be set in steps 5 and 6.)
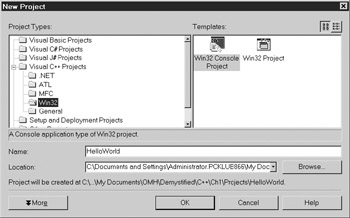
Figure 1-2: Creating a New Project -
In the left or list pane of the New Project dialog box, choose Visual C++ Projects from the list of Project Types, and then the Win32 subfolder, as shown in Figure 1-2.
-
In the right or contents pane of the New Project dialog box, choose Win32 Console Project from the list of templates. The word console comes from the application running from a console window. Win32 comes from the Windows 32-bit operating system, such as Windows 9 x , 2000, or XP.
-
In the Location field, using the Browse button, choose an existing folder under which you will create the subfolder where you will put your project.
-
In the Name field, type the name you ve chosen for your project. This will also be the name of the subfolder created to store your project files. I suggest you use a name that describes your project so you can locate it more easily later.
-
Click the OK button. This will display the Win32 Application Wizard, shown in Figure 1-3.
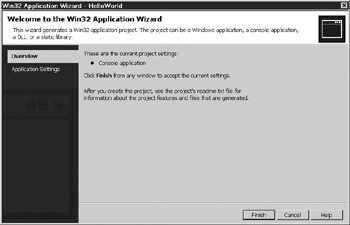
Figure 1-3: Starting the Win32 Application Wizard -
Click the Application Settings menu item on the left. The appearance of the Win32 Application Wizard then changes to that shown in Figure 1-4.
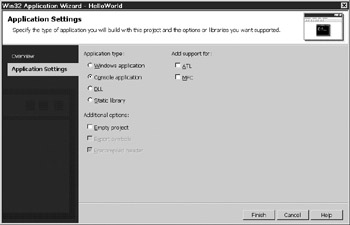
Figure 1-4: Win32 Application Wizard after choosing Application Settings -
Choose, if necessary, Console Application under Application Type (this is the default) and Empty Project under Additional Options. Choosing Empty Project will disable both checkboxes under Add Support For, which should be disabled anyway.
Caution Make sure you follow this step carefully , particularly choosing Empty Project, which is not the default. Not configuring Application Settings properly is a common mistake and may require you to start over.
-
Click the Finish button. Figure 1-5 shows the new subfolder HelloWorld and its parent folder. These were the name and location chosen in steps 5 and 6.
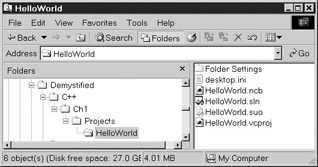
Figure 1-5: Windows Explorer showing newly created subfolder and files
You now have created a project for your application. The project is a shell for your application, containing files that will support the creation and running of your application. However, right now the project is empty of any code you have written, so it won t do anything. Accordingly, the next step is to start writing code.
Writing the Source Code
Visual C++ has a view of a project that is similar to Windows Explorer. That view is called Solution Explorer, shown in Figure 1-6. If Solution Explorer is not already displayed, you can display it with the menu command View Solution Explorer.

Figure 1-6: Viewing your project with Solution Explorer
Solution Explorer has folders for both source and header files. The file in which the code for the Hello World! application will be written is a source file. Source files have a .cpp extension, cpp standing for C++. By contrast, the iostream file that is included by the include directive is a header file. Header files have an .h extension ”the h standing for header.
We will use Solution Explorer to add a new source file to the project, after which we will write code in that new source file.
You can use the following steps to add a new source file to the project:
-
Right-click Source Files in Solution Explorer. This will display a shortcut menu, shown in Figure 1-7.
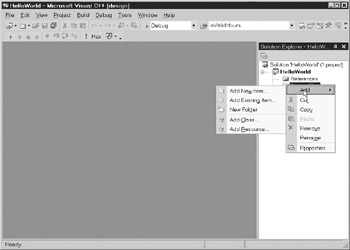
Figure 1-7: Source Files shortcut menu -
Choose Add Add New Item from the shortcut menu to add a new source to the project. This will display the Add New Item dialog box, shown in Figure 1-8.
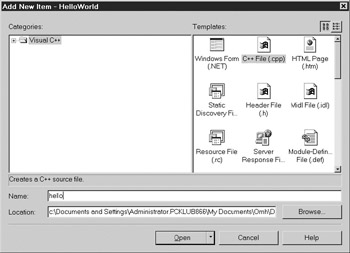
Figure 1-8: Adding a New Source File to your ProjectNote If the source file already exists, you can add it to your project using the Add Add Existing Item shortcut menu item.
-
Generally, you will not change the Location field, which is the subfolder in which the project files are stored. Type the name of the new source file in the Name field. You do not need to type the .cpp extension; that extension will be appended automatically since it is a source file. By typing hello , as shown in Figure 1-8, the new file will be called hello.cpp.
-
When you are done, click the Open button. Figure 1-9 shows the new hello.cpp file in Solution Explorer.
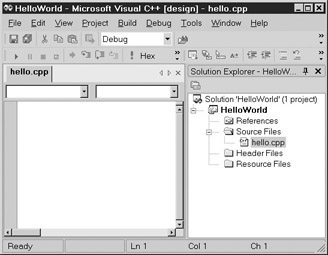
Figure 1-9: Solution Explorer showing the new .cpp file
Writing the code is easy. Double-click hello.cpp in Solution Explorer. As shown in Figure 1-10, this will display the hello.cpp file, which at this point is blank.
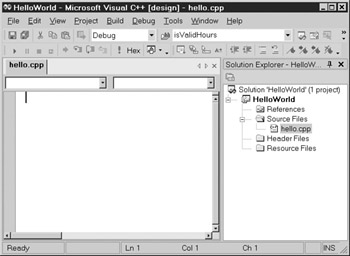
Figure 1-10: The source file before typing code
Now just type your code. When finished, hello.cpp should appear as in Figure 1-11.
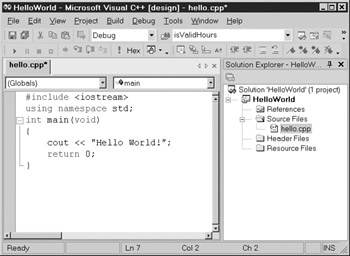
Figure 1-11: The source file after typing code
| Caution | You also can use Notepad or any other text editor to write the code. How-ever, do not use Microsoft Word or any other word processing program to write your code. While a word processing program enables you to neatly format your code, it does so using hidden formatting characters that the compiler does not understand and will regard as syntax errors. |
Save your work, such as by pressing the Save toolbar button. We re now ready to compile.
Building the Project
You compile your code from the Build menu. You may compile your code from any one of the following different menu choices:
-
Build Solution
-
Rebuild Solution
-
Build HelloWorld
-
Rebuild HelloWorld
HelloWorld is the name of your project. A solution may contain more than one project. Here the solution contains only one project, so there is no practical difference between the project and the solution.
Build means to compile changes from the last compilation (if there was one). Rebuild means to start compilation from the beginning. Build therefore is usually faster, but Rebuild is used when there have been extensive changes since the last compilation. As a practical matter, it rarely makes a difference which one you choose.
Before we compile, make one change to the code, changing cout to Cout (capitalizing the C). Then choose one of the four compilation options. A Task List window should display, noting a build error, as shown in Figure 1-12. The error description in the Task List window is error C2065: ˜Cout : undeclared identifier.
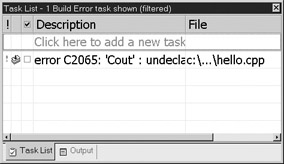
Figure 1-12: The Task List window showing a compilation error
| Tip | If the description column is not wide enough to show the entire error description, you can display the error description in a pop-up window by right-clicking the error description and choosing Show Description Tooltip from the shortcut menu. |
As explained in the earlier section on the Compiler, the compiler can understand your code and translate it into machine language only if your code is in the proper syntax for that programming language. As also explained there, C++ has rules for the spelling of words and for the grammar of statements. If there is a violation of those rules, that is, a syntax error, then the compiler cannot translate your code into machine language instructions, and instead will call your attention to the syntax errors.
In C++, code is case sensitive. That is, a word capitalized is not the same as the word uncapitalized. The correct spelling is cout; Cout is wrong. Since C++ does not know what Cout is, you get the error message that it is an undeclared identifier.
While here the code is short, if your code is quite lengthy, it is not easy to spot where the error is in the code. If you double-click the error in the Task List window, then a cursor will blink at the line where Cout is, and an icon will display in the margin (as shown in Figure 1-13).
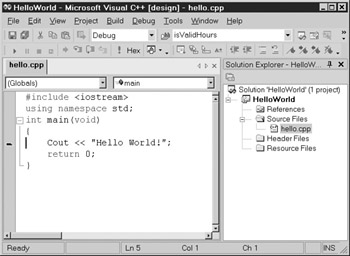
Figure 1-13: The error highlighted in the code window
Now change Cout to cout, and then compile your code again. This time compilation should be successful. Using Windows Explorer, you can now see in the Debug subfolder of your HelloWorld project folder a file called hello.obj and another file called hello.exe. These are the object and executable files previously discussed in the section Translating the Code for the Computer. Accordingly, building the project involved the preprocessor, the compiler, and the linker.
Running the Code
The final step is to run the code. You do so from the Debug menu. You may choose either Debug Start or Debug Start Without Debugging. The difference is whether you wish to use the debugger, an issue which we will discuss in a later chapter. Since we are not going to use the debugger this time, choose Debug Start Without Debugging as it is slightly faster. The result is the console window displaying Hello World! (shown way back in Figure 1-1).