Correcting Flesh Tones for Photos Going On Press
|
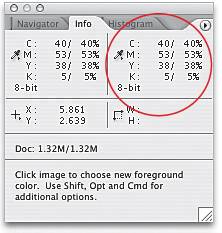
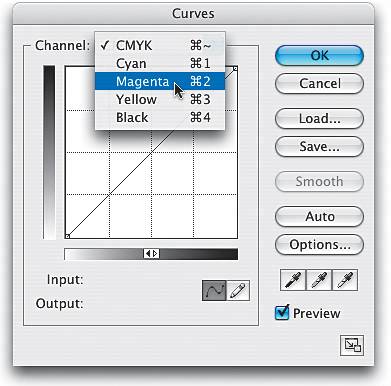
If the photos you're correcting are destined for a printing press, rather than just a color printer (i.e., they'll appear in a brochure, print ad, catalog, flyer, etc.), you have to compensate for how the inks react with one another on a printing press. Without compensating, you can almost guarantee that all the people in your photos will look slightly sunburned. Here's a technique that lets you correct flesh tone "by the numbers" to get perfect skin tones every time. Step OneWhen it comes to getting proper flesh tones on press, you're going to be concerned mainly with the relationship between the magenta and the yellow in the flesh-tone areas. Your goal will be to have at least 3% to 5% more yellow in your flesh-tone areas than magenta. The amount of yellow and magenta can be displayed in the Info palette, so start by going under the Window menu and choosing Info to bring up the palette. Then, convert your image to CMYK mode by going under the Image menu, under Mode, and choosing CMYK Color. 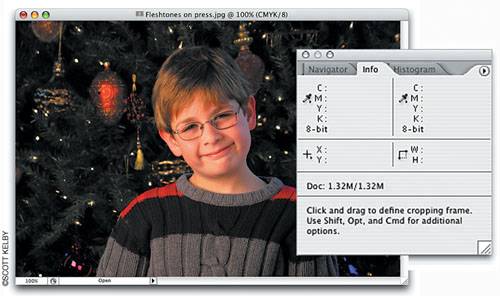 Step TwoFirst, you need to see what the current balance of yellow to magenta is, so press Command-M (PC: Control-M) to open Curves. Move your cursor outside the Curves dialog and into your photo over an area that contains flesh tones (we'll call this our "sample" area). While your cursor is there, look in your Info palette at the relationship of the magenta and the yellow. 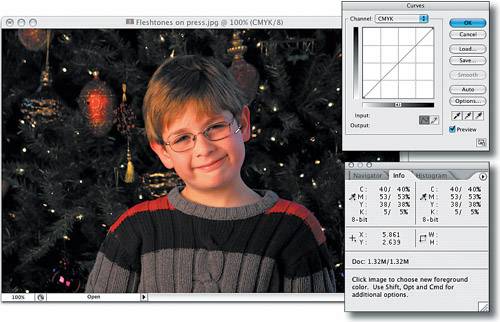 Step ThreeIn the Info palette, look at the CMYK readout (on the right side of the palette). If the magenta reading is higher than the yellow reading, you'll have to adjust the balance of the magenta and the yellow. In the example shown here, the magenta reads 53% and the yellow is only 38%, so there's 15% more magenta, and that means instant sunburn; so you'll have to adjust this balance to get perfect flesh tones. Step FourYou might be tempted to just lower the amount of magenta, but to keep our adjustment from appearing too drastic, we'll do a balanced adjustment: Lower the magenta some, and then increase the yellow enough until we hit our goal of 3% to 5% more yellow. In the Curves dialog, choose Magenta from the Channel pop-up menu. To find out exactly where the magenta in your flesh-tone area resides on the curve, press-and-hold Shift-Command (PC: Shift-Control) and click once in the sample flesh-tone area. This adds a point to the Magenta channel curve right where the magenta in the flesh tone is located. (And because you added the Shift key, it also added a point to your yellow curve, which you'll see in a moment.) Step FiveIn the Output field at the bottom of the Curves dialog, type in an amount that's 7% or 8% lower than the value shown. (Remember, the magenta reading was 15% more than the yellow, so you're going to reduce that difference by half.) 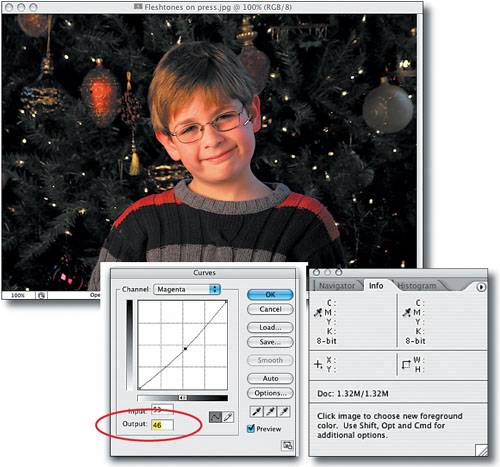 Step SixAfter you've lowered the magenta, switch to the Yellow channel by choosing it from the Channel pop-up menu at the top of the Curves dialog. You should already see a point on the curve. This is where the yellow resides in the sample flesh-tone area that you clicked on in Step 4. In the Output field at the bottom of the Curves dialog, type in a figure that's at least 3% higher than the number that you typed in the Output field for the magenta curve in Step 5. (The Info palette provides a before/after reading, with the before on the left and the reading after your adjustment on the right, so you can check your numbers in your sample area after you adjust the curve.) In our example, I lowered the magenta from 53% to 46%, and raised the yellow from 38% to 49%. This adds at least 3% more yellow than magenta in the flesh tones. 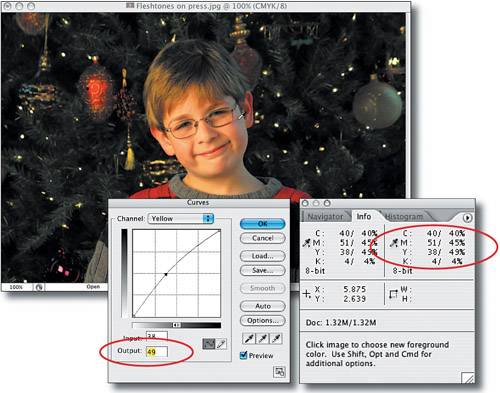 Before After |


|
EAN: N/A
Pages: 187