Custom Sizes for Photographers
|
| Photoshop's dialog for creating new documents has a pop-up menu with a list of preset sizes. You're probably thinking, "Hey, there's a 4x6", 5x7", and 8x10"I'm set." The problem is there's no way to switch the orientation of these presets (so a 4x6" will always be a 4" wide by 6" tall, portrait-oriented document). That's why creating your own custom new document sizes is so important. Here's how: Step OneGo under the File menu and choose New. When the New dialog appears, click on the Preset pop-up menu to reveal the list of preset sizes. The preset sizes for photographers are the set just below the Tabloid preset, and they include 2x3", 4x6", 5x7", and 8x10". The only problem with these is that their orientation is set to portrait and their resolution is set to 300 ppi by default. So, if you want a landscape preset at less than 300 ppi, you'll need to create and save your own.  Step TwoFor example, let's say that you want a 5x7" set to landscape (that's 7" wide by 5" tall). First enter 7 inches in the Width field, 5 inches in the Height field, choose your desired Color Mode, and then enter a Resolution (I entered 212 ppi, which is enough for me to have my image printed on a high-end printing press). Once your settings are in place, click on the Save Preset button. 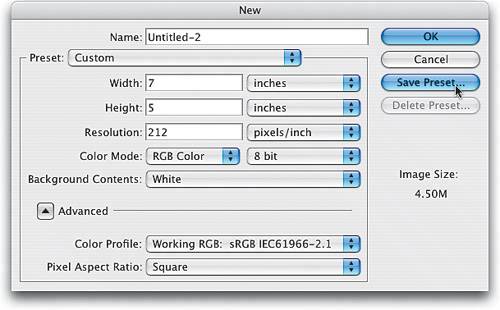 Step ThreeThis brings up the New Document Preset dialog. You can toggle on/off which parameters you want saved, but I use the default setting to include everything (better safe than sorry, I guess).  Step FourClick OK and your new custom preset will appear in the Preset pop-up menu. You only have to go through this once. Photoshop CS2 will remember your custom settings, and they will appear in this Preset pop-up menu from now on. 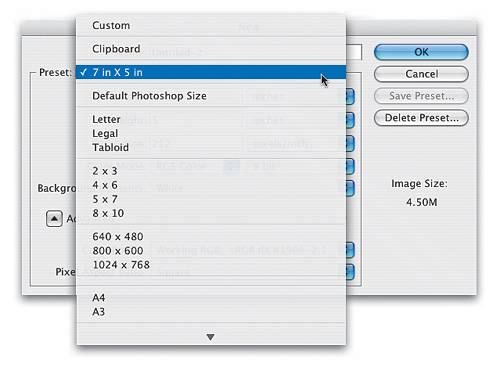 Step FiveIf you decide you want to delete a preset, it's simplejust open the New dialog, choose the preset you want to delete from the Preset pop-up menu, and then click on the Delete Preset button. A warning dialog will appear asking you to confirm the deletion. Click on Yes, and it's gone!  |
|
EAN: N/A
Pages: 187