Replicating Traditional Photography Filters
|
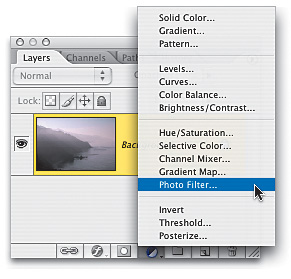
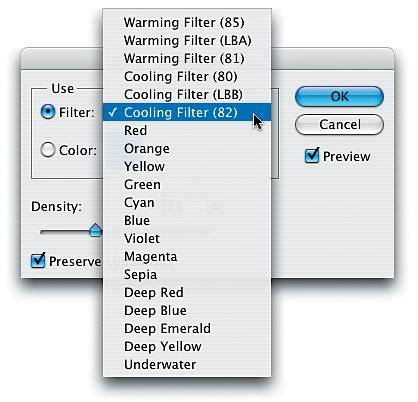
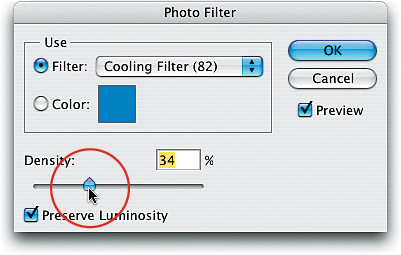
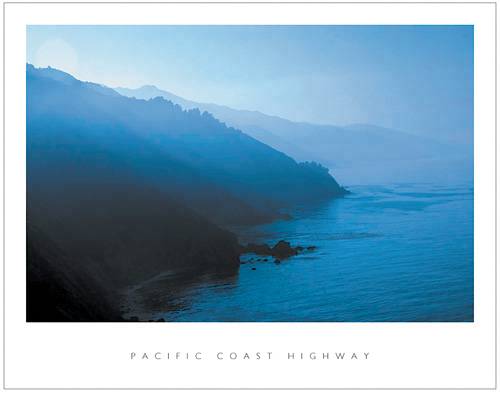
This is a totally digital way to replicate some of the most popular photography filters, such as the 81A and 81B Color Correction filters used by many photographers. These are primarily used to warm photos, especially those taken outdoors where a bright sky radiates to give photos a bluish cast, but they can also be used to create a dramatic statement using color, as we'll do here. Step OneOpen the photo that you want to apply a lens filter effect to. In this case, we have a shot taken along California's Pacific Coast Highway, but the image is kind of grayish and bland, so we'll add a photo filter (after the fact, in Photoshop) to give the photo more interest and life (basically, to make it look more like it did when I was actually there taking the shot. After all, while I was there I didn't say to myself, "Hey, this looks grayish and blandlet's shoot it!" It looked beautiful and spectacular, and I want to bring back the essence of what made me take that shot in the first place). 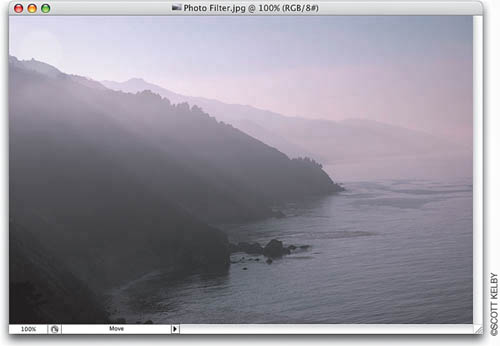 Step TwoChoose Photo Filter from the Create New Adjustment Layer pop-up menu at the bottom of the Layers palette (it's the half-black/half-white circle icon). Step ThreeThe Photo Filter dialog will appear. Click-and-hold on the Filter pop-up menu and a list of filters will appear. Since we're trying to add a blue effect to our image, choose one of the Cooling Filters (in this example, I chose Cooling Filter [82] simply because I liked it best, after trying all three blue Cooling Filters). So, choose Cooling Filter (82) (or whichever one you like best). Step FourIf you want a more intense effect than the default, drag the Density slider to the right. The default setting was 25%, so I cranked it up a little to 34% so the blue looked even more intense. Step FiveWhen you click OK, the entire photo gets a wonderful blue filtering effect. (The final effect is shown here, incorporating the "Poster Presentation" technique I show in Chapter 14.) If you decide you want this blue to affect only certain parts of your photo (for example, let's say you wanted to leave the mountains as they were before the filter), just press B to switch to the Brush tool, choose a soft-edged brush, press X to set black as your Foreground color, and paint over the areas you don't want cooled by the filter. As you paint, those areas will return to the original color (which is why it's so great that Adobe created Photo Filters as adjustment layersthey're adjustable!). |

|
EAN: N/A
Pages: 187
- ERP Systems Impact on Organizations
- Challenging the Unpredictable: Changeable Order Management Systems
- Distributed Data Warehouse for Geo-spatial Services
- A Hybrid Clustering Technique to Improve Patient Data Quality
- Relevance and Micro-Relevance for the Professional as Determinants of IT-Diffusion and IT-Use in Healthcare
- Chapter V Consumer Complaint Behavior in the Online Environment
- Chapter VII Objective and Perceived Complexity and Their Impacts on Internet Communication
- Chapter X Converting Browsers to Buyers: Key Considerations in Designing Business-to-Consumer Web Sites
- Chapter XIII Shopping Agent Web Sites: A Comparative Shopping Environment
- Chapter XIV Product Catalog and Shopping Cart Effective Design
- Finding Out Which Version of BIND Youre Running
- Configuring DNS So a Mail Server and the Email It Sends Pass Anti-Spam Tests
- Adding or Removing Zones Without Restarting or Reloading the Name Server
- Preventing a Name Server from Querying a Particular Remote Name Server
- Configuring a Resolver to Append Multiple Domain Names to Arguments