Removing Things in Perspective
|
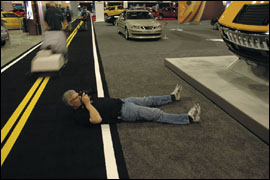
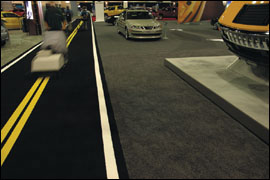
Until Photoshop CS2's introduction of the Vanishing Point filter, cloning away things in perspective was one of the hardest removal tasks of all. Luckily, this incredibly cool filter not only simplifies removing things in perspective, it actually makes it fun. In fact, this is one of those filters that's so amazing, you can wind up spending hours cloning away things that have no business being cloned away. Don't say I didn't warn you. Step OneHere's a photo of my buddy Dave Moser. We were shooting the International Car Show on press day (which is why you only see cleaning crew in the background), and Dave was lying on his back shooting a Hummer H2 that was positioned on an angle. Where's Dave's tripod, you might ask? I asked the same question, but apparently Dave doesn't mind camera shake (kidding). Anyway, since he didn't use a tripod, he should be cloned out of this photo to hide the evidence. Start by clicking on the Create a New Layer icon in the Layers palette so we can do our cloning work on a new blank layer. 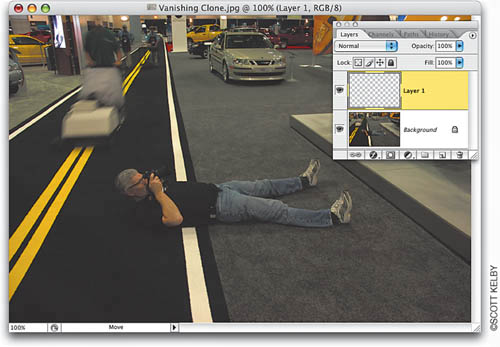 Step TwoGo under the Filter menu and choose Vanishing Point (it's near the top). First, you have to define the angle of perspective by drawing with the Create Plane tool (C). (Don't let the fancy name throw youyou use it pretty much like you would the Polygonal Lasso tool.) Just click where you want to start, and keep clicking at angles to create your selection. (Here, I clicked halfway down the road along the carpet's edge, clicked at the end of the carpet at the bottom of the image, and then clicked again where I thought the road's yellow line would end.)  Step ThreeUse the tool to trace down the yellow line. You can pretty much see what's going on hereI'm simply tracing the area that has the perspective angle of the photo. 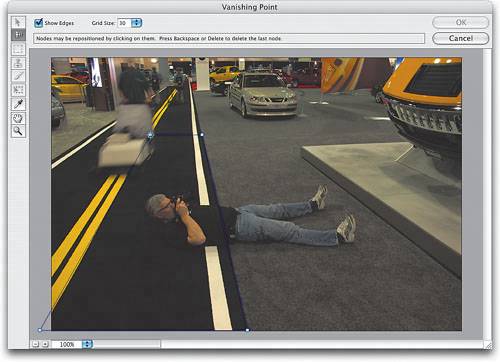 Tip When you're placing these points far away (like I am here), you can temporarily zoom in to make sure you're aligning them correctly by pressing the letter X. Step FourWhen you reach the original point you started with, a blue grid will appear. Well, hopefully it's a blue grid. If it's blue, it means you drew it correctly, and Vanishing Point is happy with you. If it's yellow, it means that you're close, and it may work, but you'd be better off switching to the Edit Plane tool (V) (it looks like an arrow) and adjusting your points until they turn blue. If your grid outline turns red, it's a bad grid (your perspective isn't right), and you'll need to tweak the points until it's right.  Step FiveOnce your blue grid is in place, you can stretch it to cover the object you want to remove. Just click on one of the center points using the Edit Plane tool, and drag in the direction you want the grid to spread. In the example shown here, I grabbed the right-center point and dragged it over to the right until Dave's legs and feet were covered. 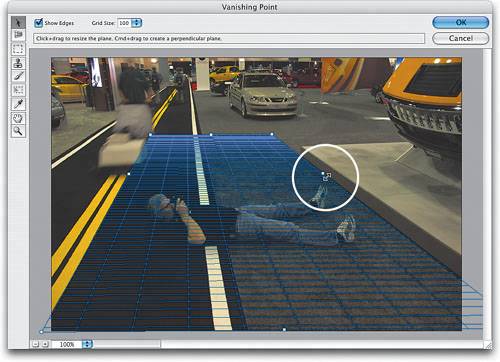 Step SixPress S to switch to the Stamp tool (it looks like the Clone Stamp tool), and the grid in the center will go away, leaving just the blue outline to show the boundaries of the grid. Option-click (PC: Alt-click) on a straight line in your image (if possible) to help you line things up. In this case, I Option/Alt-clicked on the line where the black and gray carpets meet. 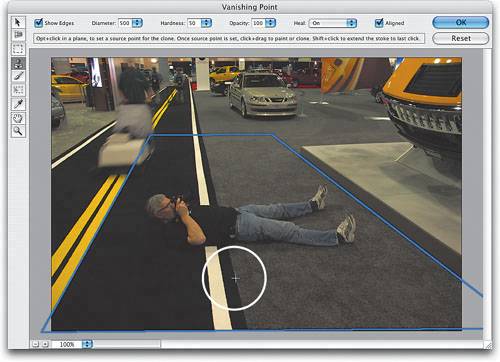 Step SevenNow, just move up that line and click-and-drag to start painting. As you do, the unwanted object (Dave) is removed, and the cloning automatically adjusts for the perspective. In this example, you can see how the white line automatically shrinks as it moves away. 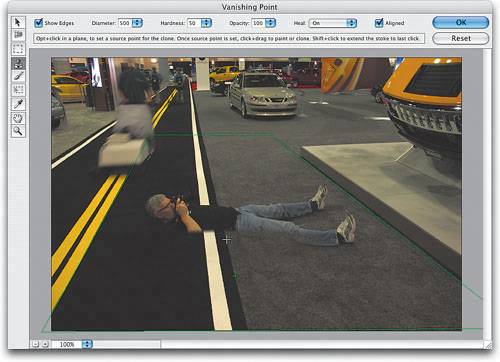 Step EightLike the regular Clone Stamp tool, if you paint too far, it starts cloning over itself (meaning it's picking up other objects) so just paint a little bit (say 1/2" or so); then move to a different area, Option/Alt-click again, and this time clone over the legs. Again, just clone away a little of his legs at a timedon't try to remove them all at once, or you'll start cloning objects back in. 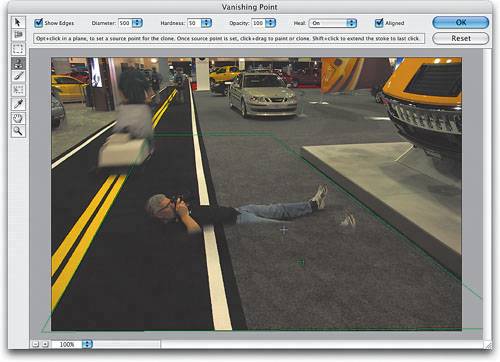 Step NineContinue using this technique to clone away other unwanted areas. Remember to Option/Alt-click several times to keep the retouch looking random, and to keep from "repeat" cloning. When it looks good to you, click OK in the dialog. Since the cloning will appear on a separate layer, you can adjust it or easily erase any extra areas using the Eraser tool (E) (if you cloned too large an area, for example). With the perspective right on the money, Vanishing Point works wonders.  Tip If you notice any repeating patterns in your cloning, just click on Layer 1, get the Patch tool (Shift-J), draw a selection around one of the repeating patterns, drag the selection into a new area on that layer, and the repeating pattern will be removed. Press Command-D (PC: Control-D) to deselect. Before After |

|
EAN: N/A
Pages: 187