Using the Tone Curve
| If you're used to working with Photoshop's Curves, then this is going to throw you for a loop, because it's an entirely different (yet somewhat more intuitive) way of working with curves. The first thing Photoshop users will notice is that you can't add points to the curveinstead the adjustments are made with sliders which control the angle of the curve. I know, it sounds freaky, but once you try it...you'll still think it's freaky, but it works. I don't think Dan Margulis (King of Curves) would like it, but he doesn't like rainbows, or puppies, or sunny days, or.... Step OneIf you scroll down from the Basic panel, you'll find the Tone Curve panel (shown here). First, you have to get your arms around the fact that the only way to move the curve is to drag the sliders, so you can think of the curve as more of a histogramit shows you what's happening, it doesn't make things happen like the curve in Photoshop does. One of the slickest things about the Tone Curve is how you can determine the range of what those three sets of sliders control. Step TwoYou do that using the two Range sliders (those two sliding triangles under the Tone Curve graphcircled here in red). Essentially, they let you choose where the black and white points are in your photo (you determine what's a shadow, what's a midtone, and what's a highlight). For example, the Range slider on the left represents the shadow areas, and the area that appears to the left of that triangle will be affected by the Shadows sliders. If you want to expand the range of what the Shadows sliders control, click-and-drag the dark gray Range slider to the right. Now your shadow adjustments affect a larger range of the image. Step ThreeThe area that appears between the Shadows and Highlights Range sliders (shown circled here) is the midtones. Dragging that Shadows Range slider to the right decreases the space between the shadow and highlight areas, so your Midtones sliders now control less of a range. A histogram appears behind the curve, and if you compare it with the histogram shown in Step One, you can see how moving the Shadows Range slider to the right has affected the midtones. Step FourIf you were to drag the Highlights Range slider to the right, you're limiting the control the Highlights sliders will have over your image. For example, if you moved the slider fairly far over to the right (like I show here) and then you dragged the Highlights Compression slider all the way to the right (as far as it will go) it will have hardly any effect on your curve (or on your image). Same thing with the Shadows Range slider. If you drag it far to the left, there's not much for the Shadows sliders to affect, so changes you make with those sliders won't have much effect. What this does give you is the ability to increase the control over any area that needs work, by moving the sliders closer toward the middle when you need to really tweak your highlights and shadows, or farther apart when your midtones need some help. Step FiveLet's return those two Range sliders (the ones under the graph) to their default position by clicking the Reset button. By the way, if you press-and-hold the Option key while you're moving those two Range sliders, you can get a clipping warning as well. Now let's start tweaking our image. We'll start with adjusting the Highlights and Shadows sliders since they pretty much work the same way. When you drag the Highlights Compression slider to the right, this affects just the brightest highlights in your image and pushes them toward white (you can see this expressed in the curve shown here). ©SCOTT KELBY  Step SixDragging the Highlights Luminance slider to the right pushes the quarter-tones in your photo toward white, as shown here where the top of the curve is starting to steepen (the way the Tone Curve is designed, it helps keep you from creating overly steep curves that could potentially damage your photo. That's one advantage for new users of Curves, because if you're in Photoshop and you don't understand Curves well, you can really trash your image. But here in Lightroom, it's harder to do much harm).  Step SevenIf you want to darken the shadow areas of your image, drag the Shadows Compression slider to the left (as shown here) and you'll see the three-quarter-tone shadow areas of the curve start to steepen, and the shadow areas are pushed closer to black. What you're basically doing is creating the classic S-curve that creates contrast, and the steeper the curve, the more extreme the contrast. Dragging the Shadows Luminance slider to the left steepens the curve even further. Note: The two Range Sliders under the Tone Curve graph only affect the Luminance sliders for the Highlights and Shadows, and the Contrast slider for the Midtones.  Step EightThe last two slidersthe Midtones slidersadjust the midpoint of the curve and the slope of the curve. For example, dragging the Brightness slider to the right (as shown here) opens up the midtone areas of your photo by brightening the quarter-tones and darkening the three-quarter tones. You can see in the curve how the midtones have been affected. The Contrast slider adds contrast by steepening the position of the middle of the curve. Note: The Midtones sliders in the Tone Curve panel have exactly the same effect on your photo as the Tone Brightness and Contrast sliders in the Basic panel. In fact, when you move either the Brightness or Contrast slider in the Tone Curve panel, those same two sliders are moving in the Basic panel as well, so there's no reason to do both. 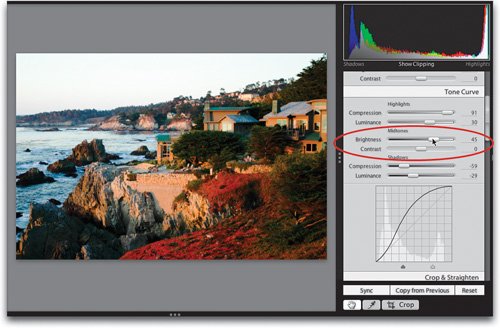 |


EAN: N/A
Pages: 71