Rendering 101
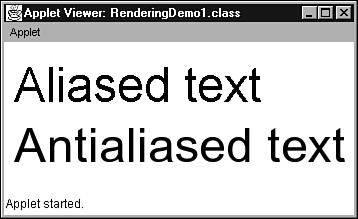
| Java 2D's Graphics2D methods render shapes, text, and images onto a drawing surface. These shapes can be constructed , either from Graphics drawing methods (such as drawArc ) or from objects created from Java 2D's geometry classes (such as Ellipse ). (These classes will be explored in an upcoming section.) In the past, you could only choose one rendering state attribute: the current color. This color attribute would subsequently be used when drawing a shape or text. Furthermore, it would be used to fill a solid shape. In contrast, Java 2D's Graphics2D context maintains several state attributes. These state attributes can be divided into the following categories: rendering hint, stroke, paint (also known as fill), transform, clipping path , and composition. State attributes are specified by creating attribute objects and by calling appropriate Graphics2D "set" methods with references to these objects as their arguments. Note A Graphics2D context holds references to attribute objects: They are not cloned. If your code alters an attribute object that is part of this context, it must call the appropriate "set" method to notify the context. Rendering Hint AttributesA rendering hint attribute is used to improve rendering quality, which is often at the expense of rendering speed (because higher quality results in slower rendering speed). These attributes are represented by objects created from the RenderingHints class (located in the java.awt package). You can create a new rendering hint by calling the RenderingHints (RenderingHints.Key key, Object value) constructor. The key argument is one of the constants declared in RenderingHints, and serves to identify the new rendering hint. Its value is specified by the value argument. This is shown in the following code fragment: RenderingHints rh = new RenderingHints (RenderingHings.KEY_ANTIALIASING, RenderingHints.VALUE_ANTIALIAS_ON); The antialiasing hint is used to prevent graphics from appearing with jagged edges. These jagged edges result from aliasing ”a technique of approximating arcs and diagonal lines by turning on the pixels that are closest to the path of the line or curve. Antialiasing provides smoother-appearing edges by modifying the intensity of pixels appearing around pixels closest to an arc or line, instead of turning on the closest pixels. However, antialiasing requires additional computing resources and can reduce rendering speed. After you've created a RenderingHints object, you can specify this object as the new rendering hint for the graphics context. You do this by calling the setRenderingHints method, as shown in the following code fragment: Graphics2D g2 = (Graphics) g; g2.setRenderingHints (rh); Alternatively, you could call Graphics2D 's getRenderingHints method to retrieve the current rendering hints and then modify only those hints that you are interested in by calling the put method on the RenderingHints object. The following code fragment shows how to achieve this task: RenderingHints rh = g2.getRenderingHints (); rh.put (RenderingHints.KEY_ANTIALIASING, RenderingHints.VALUE_ANTIALIAS_ON); g2.setRenderingHints (rh); The following types of hints can be specified:
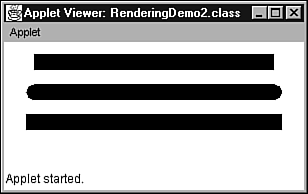
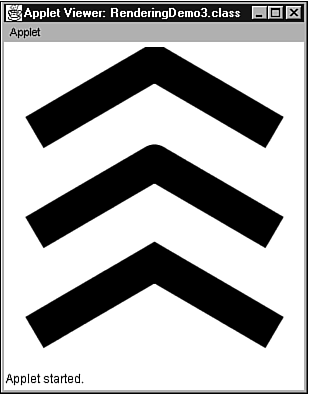
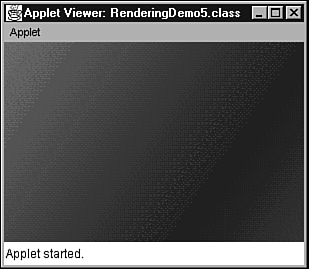
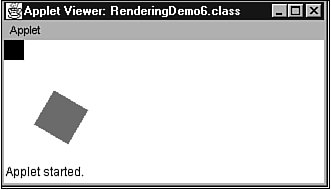
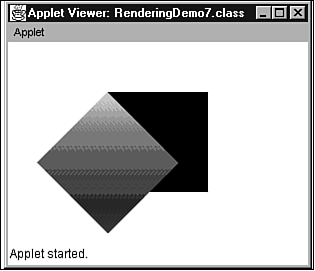
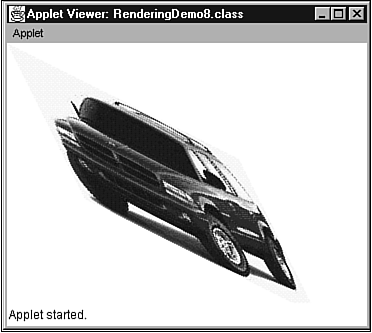
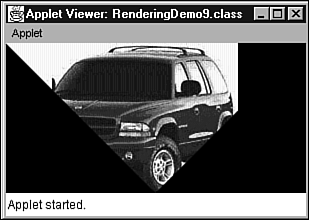
Consult the SDK documentation for more information (such as default values) on these rendering hints. To see the difference between aliasing (the default) and antialiasing, and how to turn on the antialiasing rendering hint, check out the source code to the RenderingDemo1 applet, which is presented in Listing 18.4. Listing 18.4 The RenderingDemo1 Applet Source Code // RenderingDemo1.java import java.awt.*; public class RenderingDemo1 extends java.applet.Applet { public void paint (Graphics g) { Graphics2D g2 = (Graphics2D) g; Font f = new Font ("Arial", Font.PLAIN, 48); g2.setFont (f); g2.drawString ("Aliased text", 10, 60); RenderingHints rh = g2.getRenderingHints (); rh.put (RenderingHints.KEY_ANTIALIASING, RenderingHints.VALUE_ANTIALIAS_ON); g2.setRenderingHints (rh); g2.drawString ("Antialiased text", 10, 120); } } RenderingDemo1 obtains a Graphics2D subclass object and sets its font to Arial (which should be available on most platforms). By default, antialiasing is disabled. However, it can be enabled by first obtaining the default rendering hints, replacing the antialiasing attribute's off state with an on state, and restoring the default rendering hints with the antialiasing modification by calling Graphics2D 's setRenderingHints method. Antialiased text is then displayed, as shown in Figure 18.2. Figure 18.2. Aliased text has a more jagged appearance than antialiased text. Stroke attributesA stroke attribute is used to select the outline style of a shape (such as an ellipse or rectangle). Styles range from an end cap style (the shape of an unconnected line's endpoints) to a join style (the shape of the point where two angled lines meet) to a solid or dashed appearance (or some combination of these styles). Strokes are represented by objects created from the BasicStroke class (located in the java.awt package). This class defines the outline attributes of a shape, including the width of the pen used to draw this shape, end caps, joins, and a dashed or solid pattern. You can create a new stroke by calling the BasicStroke () constructor. The stroke attributes default to a solid line with a width of 1.0 (in the user space coordinate system), a square end cap, a mitered join, and a miter limit of 10.0. (The miter limit is used to limit the trim of a miter join.) The following code fragment shows how to create this stroke: BasicStroke bs = new BasicStroke (); Alternatively, you can specify values for these attributes by calling one of the other BasicStroke constructors. For example, the BasicStroke (float width, int cap, int join) constructor creates a basic stroke object, whose pen width attribute is specified by width, cap style attribute is specified by cap, and join style attribute is specified by join. (This class contains several constants that can be passed as the join and cap argument values.) The following code fragment shows how to create a more specific stroke: BasicStroke bs = new BasicStroke (2.0f, BasicStroke.CAP_ROUND, BasicStroke.JOIN_ROUND); After you've created a BasicStroke object, you can specify this object as the new stroke for the graphics context. You do this by calling the setStroke method, as shown in the following code fragment: Graphics2D g2 = (Graphics) g; g2.setStroke (bs); If you like, you can call Graphics2D 's getStroke method to retrieve the current stroke and extract its attribute settings, as shown in the following code fragment. (It's important to cast getStroke 's return value to a BasicStroke, because getStroke returns a Stroke subclass object reference.) Graphics2D g2 = (Graphics) g; BasicStroke bs = (BasicStroke) g2.getStroke (); System.out.println (bs.getLineWidth ()); Listing 18.5 presents source code to a RenderingDemo2 applet that demonstrates drawing lines using different end cap styles. Listing 18.5 The RenderingDemo2 Applet Source Code // RenderingDemo2.java import java.awt.*; public class RenderingDemo2 extends java.applet.Applet { public void paint (Graphics g) { Graphics2D g2 = (Graphics2D) g; BasicStroke bs = new BasicStroke (16.0f, BasicStroke.CAP_BUTT, BasicStroke.JOIN_BEVEL); g2.setStroke (bs); g.drawLine (30, 20, 270, 20); bs = new BasicStroke (16.0f, BasicStroke.CAP_ROUND, BasicStroke.JOIN_BEVEL); g2.setStroke (bs); g.drawLine (30, 50, 270, 50); bs = new BasicStroke (16.0f, BasicStroke.CAP_SQUARE, BasicStroke.JOIN_BEVEL); g2.setStroke (bs); g.drawLine (30, 80, 270, 80); } } Figure 18.3 shows three lines, generated by RenderingDemo2, that illustrate end cap styles. The top line illustrates the BasicStroke.CAP_BUTT style, which ends unconnected lines with no added decoration. The middle line illustrates the BasicStroke.CAP_ROUND style, which ends unconnected lines with a round decoration, which has a radius equal to half of the width of the pen. Finally, the bottom line illustrates the BasicStroke.CAP_SQUARE style, which ends unconnected lines with a square projection, that extends beyond the end of the line to a distance equal to half of the line's width. Figure 18.3. A basic stroke's end cap styles include butt (top), round (middle), and square (bottom). Listing 18.6 presents source code to a RenderingDemo3 applet that demonstrates drawing pairs of lines using different join styles. Listing 18.6 The RenderingDemo3 Applet Source Code // RenderingDemo3.java import java.awt.*; import java.awt.geom.*; public class RenderingDemo3 extends java.applet.Applet { public void paint (Graphics g) { Graphics2D g2 = (Graphics2D) g; RenderingHints rh = g2.getRenderingHints (); rh.put (RenderingHints.KEY_ANTIALIASING, RenderingHints.VALUE_ANTIALIAS_ON); g2.setRenderingHints (rh); BasicStroke bs = new BasicStroke (36.0f, BasicStroke.CAP_BUTT, BasicStroke.JOIN_BEVEL); g2.setStroke (bs); GeneralPath path = new GeneralPath (); path.moveTo (30.0f, 90.0f); path.lineTo (150.0f, 20.0f); path.lineTo (270.0f, 90.0f); g2.draw (path); bs = new BasicStroke (36.0f, BasicStroke.CAP_BUTT, BasicStroke.JOIN_ROUND); g2.setStroke (bs); path = new GeneralPath (); path.moveTo (30.0f, 190.0f); path.lineTo (150.0f, 120.0f); path.lineTo (270.0f, 190.0f); g2.draw (path); bs = new BasicStroke (36.0f, BasicStroke.CAP_BUTT, BasicStroke.JOIN_MITER); g2.setStroke (bs); path = new GeneralPath (); path.moveTo (30.0f, 290.0f); path.lineTo (150.0f, 220.0f); path.lineTo (270.0f, 290.0f); g2.draw (path); } } Note In RenderingDemo3, the GeneralPath class was used to create a path object that describes a shape from a sequence of lines. Graphics2D 's draw method was then used to draw this shape. GeneralPath was used instead of the drawLine method because join styles don't work with drawLine. ( GeneralPath and draw will be more fully explained in an upcoming section.) Figure 18.4 shows three pairs of lines, generated by RenderingDemo3, that illustrate join styles . The top pair illustrates the BasicStroke.JOIN_BEVEL style, which joins lines by connecting the outer corners of their wide outlines with a straight line. The middle pair illustrates the BasicStroke.JOIN_ROUND style, which joins lines by rounding off the corner at a radius of half the line width. Finally, the bottom pair illustrates the BasicStroke.JOIN_MITER style, which joins lines by extending their outside edges until they meet. Figure 18.4. A basic stroke's join styles include bevel (top), round (middle), and miter (bottom). When you want to create dashed lines, call the BasicStroke (float width, int cap, int join, float miterLimit, float [] dash, float dashPhase) constructor. This constructor creates a basic stroke object whose pen width attribute is specified by width, cap style attribute is specified by cap, join style attribute is specified by join, miter limit attribute is specified by miterLimit, array of dash and space lengths is specified by dash, and dash phase is specified by dashPhase. This is demonstrated in the following code fragment. float [] dashSpaceValues = { 20.0, 10.0, 5.0, 10.0 } ; BasicStroke bs = new BasicStroke (2.0f, BasicStroke.CAP_ROUND, BasicStroke.JOIN_ROUND, 0.0f, dashSpaceValues, 0.0f); The dash array contains entries that describe the lengths of dashes and spaces. These entries alternate from dash to space to dash, and so on. The dashPhase argument specifies a length offset that determines if the line begins with a dash or a space, along with the length of this dash or space. For example, if the first two entries of the dash array are 10 (the length of the first dash) followed by 5 (the length of the first space), and the dash phase is 11, the line is drawn, beginning with the first space. In contrast, ( assuming the same dash array) if the dash phase is 6, the line is drawn beginning with an initial dash of length 4 (10 minus 6). This shortened dash is followed by a space of length 5. These examples show that the use of a dash phase helps in aligning dashed lines. In the preceding code fragment, the first entry in the dashSpaceValues array specifies the length of the first dash (20.0). The second entry specifies the length of the first space (10.0). The third entry specifies the length of the second dash (5.0). Finally, the fourth entry specified the length of the second space (10.0). A dash phase of 0.0 indicates that the line will begin with the very first dash entry (20.0). Listing 18.7 presents source code to a RenderingDemo4 applet that demonstrates drawing lines using an array of dash and space lengths, and a dash phase of zero. Listing 18.7 The RenderingDemo4 Applet Source Code // RenderingDemo4.java import java.awt.*; public class RenderingDemo4 extends java.applet.Applet { public void paint (Graphics g) { Graphics2D g2 = (Graphics2D) g; float [] dash = { 20.0f, 10.0f, 5.0f, 10.0f } ; BasicStroke bs = new BasicStroke (8.0f, BasicStroke.CAP_ROUND, BasicStroke.JOIN_BEVEL, 0.0f, dash, 0.0f); g2.setStroke (bs); g.drawLine (30, 20, 270, 20); g.drawLine (270, 20, 270, 305); g.drawLine (270, 305, 30, 305); g.drawLine (30, 305, 30, 20); } } RenderingDemo4 creates a dashed rectangle out of four lines. The result is shown in Figure 18.5. Figure 18.5. A basic stroke can be used to create dashed lines. Java 2 Version 1.3 introduces a new rendering hint to be used with BasicStroke objects. This hint specifies whether lines drawn with a BasicStroke attribute are normalized; that is, automatically translated by (0.5, 0.5) from user space to device space. Normalization is performed so that a line is centered on pixels and exactly covers whole pixels. By completely covering whole pixels, the line looks the same whether or not antialiasing is applied. The translation bias also ensures that the output to a screen and a printer is consistent. However, normalization can produce unexpected results, in some cases. For example, when the coordinate system is scaled up significantly, a stroked line that encloses a filled shape is not exactly centered on the edge of that shape. RenderingHints.KEY_STROKE_CONTROL has been provided, for use in conjunction with setRenderingHint, to determine whether normalization should be used. The RenderingHints.VALUE_STROKE_NORMALIZE constant indicates that a translation bias should be applied. The RenderingHints.VALUE_STROKE_PURE constant indicates that no normalization is performed. Use this constant when you prefer that the rendering of your geometry is accurate, rather than visually consistent. Finally, RenderingHints.VALUE_STROKE_DEFAULT indicates that you have no preference whether or not a stroke is normalized. The following code fragment enables normalization: Graphics2D g2 = (Graphics2D) g; g2.setRenderingHint (RenderingHints.KEY_STROKE_CONTROL, RenderingHints.VALUE_STROKE_NORMALIZE); Paint AttributesA paint attribute is used to select the interior color style of an enclosed shape (such as an ellipse or rectangle). Before Java 2D, only a solid color paint attribute could be used. However, Java 2D supports a more meaningful paint attribute, using either the gradient (gradual change in) paint style or the texture ( patterned ) paint style. The gradient paint style is represented by an object created from the GradientPaint class (located in the java.awt package) and the texture paint style is represented by an object created from the TexturePaint class (also located in the java.awt package). (Because the TexturePaint class involves working with buffered images, this class won't be discussed until buffered images are presented.) You can create a new gradient paint object by calling the GradientPaint (float x1, float y1, Color c1, float x2, float y2, Color c2) constructor. This object specifies a paint area ranging from ( x1, y1 ) to ( x2, y2 ), with colors that gradually range from c1 to c2. Furthermore, the painting process defaults to being acyclic . In other words, after the endpoint color has been reached, any additional coloring will use that color. The following code fragment demonstrates creating a gradient paint object: GradientPaint gp = new GradientPaint (0.0f, 0.0f, Color.red, 100.0f, 100.0f, Color.green); Alternatively, you can choose cyclic painting ( reverting to the source color when the destination color has been reached, and repeating the gradual change in color) by calling a GradientPaint constructor that takes a Boolean argument for specifying cyclic or acyclic painting. For example, GradientPaint (float x1, float y1, Color c1, float x2, float y2, Color c2, boolean cyclic) can be called with a Boolean true value in its cyclic argument to specify cyclic painting. After you've created a GradientPaint object, you can specify this object as the new paint attribute for the graphics context. You do this by calling the setPaint method, as shown in the following code fragment: Graphics2D g2 = (Graphics) g; g2.setPaint (gp); The best way to understand gradient paint is to examine a program that demonstrates this attribute. Therefore, Listing 18.8 presents source code to a RenderingDemo5 applet, that creates a gradient paint object and then fills a rectangle with this style. Listing 18.8 The RenderingDemo5 Applet Source Code // RenderingDemo5.java import java.awt.*; public class RenderingDemo5 extends java.applet.Applet { public void paint (Graphics g) { Graphics2D g2 = (Graphics2D) g; GradientPaint gp = new GradientPaint (0, 0, Color.red, getSize ().width, getSize ().height, Color.blue); g2.setPaint (gp); g.fillRect (0, 0, getSize ().width, getSize ().height); } } RenderingDemo5 performs a gradient paint from red to blue over the entire applet's surface. This paint works its way from the upper-left corner to the lower-right corner. The result is shown in Figure 18.6. Figure 18.6. A gradient paint fill operation provides a smooth transition from one color to another. Note Unfortunately, because Figure 18.6 shows RenderingDemo5 's output in black and white, the gradual color change is not easy to see. To get the full effect of this program, you need to run RenderingDemo5 with a video resolution that is capable of displaying more than 256 simultaneous colors. The same can be said for other figures in this chapter (and other chapters). The pattern of a gradient paint follows the direction of the line between the two defined points. If these points lie on a horizontal line, a horizontal pattern will emerge. Similarly, if these points lie on a vertical line, a vertical pattern emerges. However, it these points lie on a diagonal line, you will see a diagonal pattern. (A diagonal pattern is shown in Figure 18.6, because the applet's upper-left and lower-right corner points lie on a diagonal line.) Transform AttributesA transform attribute is used to convert from user space coordinates to device space coordinates. Each Graphics2D context uses a default transform to perform this conversion. To perform additional transformations (such as rotation or scaling), you can chain other transforms to the default transform, by calling Graphics2D 's translate, rotate, scale, and shear methods. To demonstrate some of these methods, Listing 18.9 presents source code to the RenderingDemo6 applet. Listing 18.9 The RenderingDemo6 Applet Source Code // RenderingDemo6.java import java.awt.*; import java.awt.geom.*; public class RenderingDemo6 extends java.applet.Applet { public void paint (Graphics g) { // Draw original rectangle. g.fillRect (0, 0, 20, 20); Graphics2D g2 = (Graphics2D) g; // Tranlate result 50 pixels to the right and 50 pixels down. g2.translate (50, 50); // Then, rotate result by 30 degrees. g2.rotate (30.0 * Math.PI / 180.0); // Then, scale result by both x and y by a factor of 2. g2.scale (2.0, 2.0); g.setColor (Color.red); // Draw transformed rectangle. g.fillRect (0, 0, 20, 20); } } RenderingDemo6 draws a pair of rectangles. The first rectangle is drawn using the default transform. This transform is then changed by chaining translation, rotation, and scaling transforms, in the order of the method calls. This results in a second rectangle being drawn where each point is first translated by 50 units horizontally and vertically, then rotated by 30 degrees, and finally scaled by a factor of 2. The result is shown in Figure 18.7. Figure 18.7. Rectangles and other shapes can be transformed through translation, rotation, and scaling transforms. Transformations affect strings of characters in the same manner as shapes. For example, suppose the following code fragment is executed. Where do you think X and Y will appear? Graphics2D g2 = (Graphics2D) g; g2.translate (80, 60); g2.drawString ("X", 0, 0); g2.drawString ("Y", 10, 30); The (0, 0) coordinates passed to the first drawString method will be added to (80, 60). The result is that X will be located 80 pixels from the left-hand side of the drawing surface and its baseline located 60 pixels from the top. Furthermore, the (10, 30) coordinates passed to the second drawString method will be added to (80, 60). As a result, Y will be located 90 pixels from the left-hand side and its baseline will be located 90 pixels from the top of the drawing surface. More complex transforms can be created by creating objects from the AffineTransform class (located in the java.awt.geom package). You create a new affine transform by calling the AffineTransform () constructor, as shown in the following code fragment: AffineTransform af = new AffineTransform (); The default constructor creates an affine transform initialized to an identity transform (a transform that does not affect a transformation from user space to device space). After it's created, you can call various AffineTransform methods to build a more complicated transform, as shown in the following code fragment: AffineTransform transform = new AffineTransform (); transform.rotate (45.0 * Math.PI / 180.0); This transform is designed to rotate points (around the origin of the user space coordinate system) by 45 degrees in the clockwise direction. After you've created an AffineTransform object, you can specify this object as the new transform attribute for the graphics context. You do this by calling the setTransform method, as shown in the following code fragment: Graphics2D g2 = (Graphics) g; g2.setTransform (at); You can easily undo the current transform by calling getTransform to return the current transform, and then by calling setTransform to restore this transform, as shown in the following code fragment: Graphics2D g2 = (Graphics) g; // Save current transform. AffineTransform original = g2.getTransform (); // Modify the transform. g2.translate (100, 100); // Do stuff with the modified transform. // Restore the original transform. g2.setTransform (original); Listing 18.10 presents source code to the RenderingDemo7 applet, which demonstrates creating and establishing an affine transform. Listing 18.10 The RenderingDemo7 Applet Source Code // RenderingDemo7.java import java.awt.*; import java.awt.geom.*; public class RenderingDemo7 extends java.applet.Applet { public void paint (Graphics g) { Graphics2D g2 = (Graphics2D) g; g.fillRect (100, 50, 100, 100); GradientPaint gp = new GradientPaint (100, 50, Color.green, 200, 150, Color.blue); g2.setPaint (gp); AffineTransform transform = new AffineTransform (); transform.rotate (45.0 * Math.PI / 180.0, 100, 50); g2.setTransform (transform); g.fillRect (100, 50, 100, 100); } } RenderingDemo7 draws two rectangles. The first rectangle is transformed by the default transform (an identify transform). This rectangle appears toward the center of the applet's drawing surface. An affine transform is created. Its rotate method is passed a rotation angle along with translation arguments. Essentially, each user space point belonging to the second rectangle will first be translated from that rectangle's origin (100, 50) to the user space coordinate system origin, rotated 45 degrees, and finally translated back to the rectangle's origin. The end result is shown in Figure 18.8. Figure 18.8. A rectangle is rotated and translated by an affine transform. Note The paint attribute is also set to a gradient paint style, to distinguish the second rectangle from the first. To wrap up this section, take a quick look at the shear method, found in both the AffineTransform and Graphics2D classes. The shear method is called to perform a shearing operation. This transform multiplies the (x, y) coordinates by its argument values, to shift the resulting point in a new direction. Listing 18.11 presents source code to the RenderingDemo8 applet that shows this method at work. Listing 18.11 The RenderingDemo8 Applet Source Code // RenderingDemo8.java import java.awt.*; import java.awt.geom.*; public class RenderingDemo8 extends java.applet.Applet { Image im; boolean shear; public void init () { String imageName = getParameter ("image"); if (imageName != null) im = getImage (getCodeBase (), imageName); String shear = getParameter ("shear"); if (shear.toLowerCase ().equals ("true")) this.shear = true; } public void paint (Graphics g) { Graphics2D g2 = (Graphics2D) g; if (im != null) { if (shear) { AffineTransform at = new AffineTransform (); at.shear (0.5, 0.5); g2.setTransform (at); } g.drawImage (im, 0, 0, this); } } } RenderingDemo8 obtains and draws an image on the applet's drawing surface. If shearing is specified, a shearing transform is created and established. Each point in the subsequently drawn image will have its coordinates multiplied by 0.5. The result is shown in Figure 18.9. Figure 18.9. A sheared Durango ”most unfortunate. Clipping Path AttributesA clipping path attribute identifies that portion of a drawing surface on which content can appear. Anything outside this path is clipped. Chapter 13, "Beginning AWT," introduced the setClip method, which is part of the Graphics class. Any object whose class implements the Shape interface can be passed as an argument to this method to define the clipping path. Prior to Java 2D, only rectangular shapes could be passed. However, it's now possible to specify nonrectangular shapes (such as ellipses and even text). What's more, you don't need a Graphics2D reference to establish the current clipping path. To demonstrate, Listing 18.12 presents source code to a RenderingDemo9 applet. Listing 18.12 The RenderingDemo9 Applet Source CodeRenderingDemo9 applet> // RenderingDemo9.java import java.awt.*; import java.awt.geom.*; public class RenderingDemo9 extends java.applet.Applet { Image im; public void init () { String imageName = getParameter ("image"); if (imageName != null) im = getImage (getCodeBase (), imageName); } public void paint (Graphics g) { int w = getSize ().width; int h = getSize ().height; g.fillRect (0, 0, w, h); Polygon p = new Polygon (); p.addPoint (0, 0); p.addPoint (w / 2, h); p.addPoint (w, 0); g.setClip (p); if (im != null) g.drawImage (im, 0, 0, this); } } RenderingDemo9 creates a polygon from the Polygon class. Because this class implements the Shape interface, a polygon can be used to specify the clipping path. RenderingDemo9 's polygon consists of an inverted triangle. When an image is drawn, only that part of the image that fits inside this triangle will be displayed. The rest of this image will be clipped at the triangle's edges. Figure 18.10 shows the resulting clipped image. Figure 18.10. Polygons and other shapes can be used as clipping paths. Composition AttributesA composition attribute determines what color is rendered when two pixels overlap. For example, suppose you have a solid green circle overlapping a solid red circle. Should the overlapped pixels be red, green, or some other color? The right choice of color will determine which circle appears to be on top, along with its level of transparency. The process of determining this color is known as compositing. Note If you recall, Chapter 13, "Beginning AWT," discussed the setXORMode method (located in the Graphics class). This method was the only means of compositing pixels in the pre-Java 2D era. Java 2D provides a pair of interfaces that form the foundation of its compositing model: Composite and CompositeContext. Furthermore, the Composite interface is implemented by the AlphaComposite class (located in the java.awt package). Objects created from the AlphaComposite class identify alpha compositing rules ; that is, compositing rules that take the alpha channel of each pixel's color into account. (These rules are a subset of the Porter-Duff rules for alpha compositing as described in T. Porter and T. Duff, "Compositing Digital Images," SIGGRAPH 84, pages 253 “259.) AlphaComposite provides constants for eight alpha compositing rules. These constants, along with descriptions, are presented in Table 18.2. Table 18.2. AlphaComposite Rules
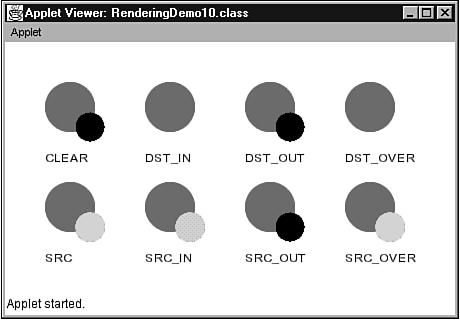
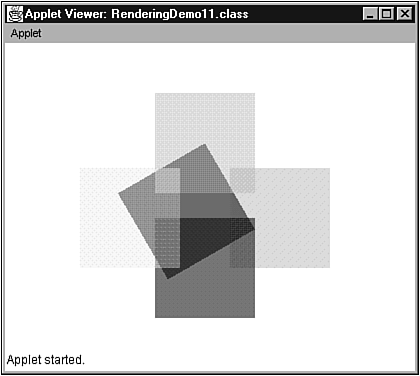
To create an object that represents an alpha compositing rule, call one of AlphaComposite 's two overloaded getInstance static methods. (Each method returns an AlphaComposite object.) After your code has this rule, it can call Graphics2D 's setComposite method to specify the new compositing attribute, as shown in the following code fragment: Graphics2D g2 = (Graphics) g; AlphaComposite ac = AlphaComposite.getInstance (AlphaComposite.SRC_IN); g2.setComposite (ac); Listing 18.13 presents source code to a RenderingDemo10 applet that demonstrates alpha compositing. Listing 18.13 The RenderingDemo10 Applet Source Code // RenderingDemo10.java import java.awt.*; public class RenderingDemo10 extends java.applet.Applet { public void paint (Graphics g) { Graphics2D g2 = (Graphics2D) g; RenderingHints rh = g2.getRenderingHints (); rh.put (RenderingHints.KEY_ANTIALIASING, RenderingHints.VALUE_ANTIALIAS_ON); g2.setRenderingHints (rh); int [] rules = { AlphaComposite.CLEAR, AlphaComposite.DST_IN, AlphaComposite.DST_OUT, AlphaComposite.DST_OVER, AlphaComposite.SRC, AlphaComposite.SRC_IN, AlphaComposite.SRC_OUT, AlphaComposite.SRC_OVER } ; String [] ruleNames = { "CLEAR", "DST_IN", "DST_OUT", "DST_OVER", "SRC", "SRC_IN", "SRC_OUT", "SRC_OVER" } ; int w = getSize ().width; int x = 40, y = 40; for (int i = 0; i < rules.length; i++) { g.setColor (Color.red); g.fillOval (x, y, 50, 50); Composite old = g2.getComposite (); g2.setComposite (AlphaComposite.getInstance (rules [i])); g.setColor (Color.green); g.fillOval (x + 30, y + 30, 30, 30); g2.setComposite (old); g.setColor (Color.black); g.drawString (ruleNames [i], x, y + 80); x += 100; if ((x + 100) >= w) { x = 40; y += 100; } } } } RenderingDemo10 exercises all the alpha compositing rules. For each rule, it draws a red circle using the default source over alpha compositing rule, saves the default composite rule, establishes a new alpha compositing rule, draws a green circle that partially overlays the red circle, restores the composite rule, and draws a string of text. The composite rule must be restored prior to drawing the text (and the red circle). If not, this text and circle will not appear for some composite rules. Figure 18.11 shows the compositing results. Figure 18.11. Java 2D provides eight alpha compositing rules that determine what colors to use when pixels overlap. As you scan through Figure 18.11, you'll probably start to feel confused . Although some of the compositing results seem intuitive, other are downright weird! The best way to learn how this works is to carefully study the SDK documentation for the AlphaComposite class. Consider the destination in rule. If you look up the documentation for this rule, you'll discover a pair of formulae that identify the resulting color. Basically, the source color (green) contributes nothing to the resulting color. Furthermore, the destination's color and alpha values are multiplied by the source's alpha value. Because color constants (such as Color.red ) were used, and these constants are completely opaque (and nonzero) alpha values, the destination color, and alpha values are preserved. Therefore, a green circle does not appear. When an AlphaComposite object is created, an additional constant alpha value can be specified. This value is multiplied with a source pixel's alpha component to increase its transparency. For example, to create an AlphaComposite object that renders source pixels to be 50% transparent, specify an alpha of 0.5. This is shown in the following code fragment: AlphaComposite ac = AlphaComposite.getInstance (AlphaComposite.SRC_OVER, 0.5f); Listing 18.14 presents source code to the RenderingDemo11 applet. This applet creates an AlphaComposite object representing a source over compositing rule. Furthermore, an alpha constant of 0.5 is provided. This constant will be multiplied with each pixel's alpha component to achieve a 50% transparency effect. Listing 18.14 The RenderingDemo11 Applet Source Code // RenderingDemo11.java import java.awt.*; import java.awt.geom.*; public class RenderingDemo11 extends java.applet.Applet { public void paint(Graphics g) { Graphics2D g2 = (Graphics2D) g; g2.setColor (Color.red); g2.translate (200, 100); g2.rotate ((60 * java.lang.Math.PI) / 180); g2.fillRect (0, 0, 100, 100); g2.setTransform (new AffineTransform ()); // set to identity AlphaComposite ac; ac = AlphaComposite.getInstance (AlphaComposite.SRC_OVER, 0.5f); g2.setComposite (ac); g2.setColor (Color.orange); g2.fillRect (150, 50, 100, 100); g2.setColor (Color.green); g2.fillRect (225, 125, 100, 100); g2.setColor (Color.blue); g2.fillRect (150, 175, 100, 100); g2.setColor (Color.yellow); g2.fillRect (75, 125, 100, 100); } } RenderingDemo11 draws a rectangle, rotated by 60 degrees, using the default source over and opaque compositing rule. After this rule is changed to allow for 50% transparency, four rectangles are drawn so that they overlap the original rectangle and each other. The result is shown in Figure 18.12. Figure 18.12. Alpha compositing makes it possible to achieve transparency. |

EAN: 2147483647
Pages: 353