Odds and Ends
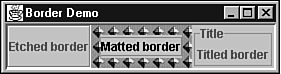
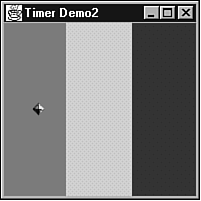
| This chapter has focused on building a GUI with Swing's windowing toolkit. Components , containers, layout managers, events, and listeners have been emphasized . However, Swing offers additional capabilities that need to be addressed ”beginning with actions. ActionsActions simplify working with toolbars and menus , by centralizing their action event handling, text, icons, and enabled state. An action is represented by an action object, created from a class that implements the Action interface. For example, the abstract AbstractAction class (located in the javax.swing package) implements this interface. To create an action, either subclass AbstractAction or use an inner class, and override the actionPerformed method. The following code fragment demonstrates creating an action from AbstractAction: Action open = new AbstractAction ("Open", new ImageIcon ("open.gif")) { public void actionPerformed (ActionEvent e) { System.out.println ("Open file."); } }; This code fragment specifies Open as the action's text, and open.gif as the file containing its icon. Assuming that this action is registered with either a toolbar button or a menu item, the open action's actionPerformed method is called when either that button or menu item is selected. In response, this method sends the Open file. string to the standard output device. To create a toolbar button and register it with an action, call JToolBar 's add method. This method returns a reference to a newly created button that's registered with an action. You can then use this reference to add a ToolTip to the button, as is done in the following code fragment: JToolBar tb = new JToolBar (); JButton b = tb.add (open); b.setToolTipText ("Open a file."); To create a menu item and register it with an action, call JMenu 's add method. This method returns a reference to a newly created menu item that's registered with an action. You can then use this reference to disable an icon (if one was specified by the action) because you probably wouldn't want to see an icon in the menu. This is demonstrated in the following code fragment: JMenu file = new JMenu ("File"); JMenuItem mi = file.add (open); mi.setIcon (null); You can enable or disable all components that share an action, by calling Action 's setEnabled method. For example, by making the following method call, you can disable both the toolbar button and menu item (created in previous code fragments ): open.setEnabled (false); Listing 16.19 presents source code to an ActionDemo1 application that brings these concepts together into a working program. Listing 16.19 The ActionDemo1 Application Source Code // ActionDemo1.java import javax.swing.*; import java.awt.*; import java.awt.event.*; class ActionDemo1 extends JFrame { Action open, save; ActionDemo1 (String title) { super (title); addWindowListener (new WindowAdapter () { public void windowClosing (WindowEvent e) { System.exit (0); } }); open = new AbstractAction ("Open", new ImageIcon ("open.gif")) { public void actionPerformed (ActionEvent e) { System.out.println ("Open file."); } } ; save = new AbstractAction ("Save", new ImageIcon ("save.gif")) { public void actionPerformed (ActionEvent e) { System.out.println ("Save file."); } } ; JToolBar tb = new JToolBar (); JButton b = tb.add (open); b.setToolTipText ("Open a file."); b = tb.add (save); b.setToolTipText ("Save a file."); JMenu file = new JMenu ("File"); JMenuItem mi = file.add (open); mi.setIcon (null); mi = file.add (save); mi.setIcon (null); JMenuBar mb = new JMenuBar (); mb.add (file); JMenu options = new JMenu ("Options"); JCheckBoxMenuItem cbmi = new JCheckBoxMenuItem ("Enabled"); cbmi.setSelected (true); ItemListener il = new ItemListener () { public void itemStateChanged (ItemEvent e) { JCheckBoxMenuItem cbmi; cbmi = (JCheckBoxMenuItem) e.getSource (); boolean selected; selected = e.getStateChange () == ItemEvent.SELECTED; open.setEnabled (selected); save.setEnabled (selected); } } ; cbmi.addItemListener (il); options.add (cbmi); mb.add (options); setJMenuBar (mb); JPanel p = new JPanel (); p.add (tb); getContentPane ().add (p, BorderLayout.WEST); setSize (200, 100); setVisible (true); } public static void main (String [] args) { new ActionDemo1 ("Action Demo1"); } } Sun has discovered that many developers would prefer to create their own components which are ActionEvent sources, and then have a method which connects these components to a particular action. As a result, starting with Version 1.3 of the Java 2 Platform Standard Edition, two new methods were added to the AbstractButton class (which is the parent of JButton, JCheckBox, JMenu, JMenuItem, and so on): setAction and getAction. You can call setAction after creating a component, which is demonstrated in the following code fragment. (This code fragment is taken from ActionDemo2.java ; distributed with the rest of this book's source code.) JToolBar tb = new JToolBar (); JButton b = new JButton (); b.setToolTipText ("Open a file."); // The following setText method call must be made after setAction // to disable text. b.setText (""); b.setAction (open); tb.add (b); b = new JButton (); b.setToolTipText ("Save a file."); b.setAction (save); b.setText (""); tb.add (b); JMenu file = new JMenu ("File"); JMenuItem mi = new JMenuItem (); mi.setAction (open); mi.setIcon (null); file.add (mi); mi = new JMenuItem (); // The following setIcon method call must be made after setAction // to disable icon. mi.setIcon (null); mi.setAction (save); file.add (mi); Before concluding this topic, you might have noticed (after running ActionDemo1 and ActionDemo2 ), that in ActionDemo1, the open and save toolbar buttons don't display the Open and Save action text. (This text is displayed on the open and save toolbar buttons in ActionDemo2. ) It turns out that if you call each button's getText method, null is returned. However, if you call each button's getIcon method, the name of the image file is returned. The rationale for this situation is that toolbar buttons typically display images and not text. As a result, there is no requirement that a toolbar button's getText method return a reference to the button's text. BordersBorders provide edges around components. They "know" how to draw lines, reserve empty space, and supply titles. Furthermore, they are objects created from classes that implement the Border interface (located in the javax.swing.border package). Figure 16.29 presents the GUI to an application called BorderDemo. This GUI illustrates beveled, etched, matted, and titled borders. (The GUI is surrounded by a beveled border.) Figure 16.29. Swing's borders can make a GUI look more professional. You create a border by calling one of the create methods in the BorderFactory class (located in the javax.swing package). After you have this border, call a component's setBorder method to apply the border to the component. (If you need to identify the current border, you can call the component's getBorder method.) For example, the following code fragment establishes a red-lined border around a panel: JPanel p = new JPanel (); p.setBorder (BorderFactory.createLineBorder (Color.red)); Version 1.3 of the Java 2 Platform Standard Edition adds a pair of createEtchedBorder methods to BorderFactory. These methods create etched borders. To simplify working with borders, you can take advantage of the numerous border subclasses (such as EtchedBorder ) of the abstract AbstractBorder class (located in the javax.swing.border package). For example, you could use the following code fragment to create a red-lined border that's identical to the border created in the previous code fragment: JPanel p = new JPanel (); p.setBorder (new LineBorder (Color.red)); Version 1.3 of the Java 2 Platform Standard Edition adds a new constructor to the LineBorder class. This constructor makes it possible to more conveniently create lined borders with rounded corners. Listing 16.20 presents source code to the BorderDemo application. This application demonstrates the simplicity of AbstractBorder 's subclasses. Listing 16.20 The BorderDemo Application Source Code // BorderDemo.java import javax.swing.*; import javax.swing.border.*; import java.awt.*; import java.awt.event.*; class BorderDemo extends JFrame implements ActionListener { BorderDemo (String title) { super (title); addWindowListener (new WindowAdapter () { public void windowClosing (WindowEvent e) { System.exit (0); } }); // getRootPane ().setBorder (new EmptyBorder (5, 5, 5, 5)); getRootPane ().setBorder (new BevelBorder (BevelBorder.LOWERED)); JLabel jl = new JLabel ("Hello World"); jl.setBorder (new EtchedBorder ()); getContentPane ().add (jl, BorderLayout.WEST); JButton jb = new JButton ("Isn't this fun!"); Icon icon = new ImageIcon ("bullet.gif"); jb.setBorder (new MatteBorder (10, 10, 10, 10, icon)); getContentPane ().add (jb, BorderLayout.CENTER); jl = new JLabel ("Goodbye World"); jl.setBorder (new TitledBorder ("Title")); getContentPane ().add (jl, BorderLayout.EAST); pack (); setVisible (true); } public void actionPerformed (ActionEvent e) { if (e.getActionCommand ().equals ("Ok")) System.out.println ("OK was pressed."); else System.out.println ("Cancel was pressed."); System.exit (0); } public static void main (String [] args) { new BorderDemo ("Border Demo"); } } Note the commented out line in BorderDemo 's source code. If this line was not commented out and the line creating the beveled border was commented out, an empty border would be applied to the root pane. The interesting thing about an empty border is that it draws nothing: All underlying pixels show through. If a container with an empty border was resized to a smaller size , the new border area would display some of the pixels from the previously sized container's component(s). This would not make a user very happy. Therefore, it's best to reserve empty borders for nonresizable containers. Tip Empty borders are a handy alternative to Box 's glues, struts, and rigid areas. Keystrokes and BindingsAn instance of the KeyStroke class (located in the javax.swing package) represents a key being typed on the keyboard. KeyStroke objects are bound to component actions (such as inserting a character into a text field, beeping the speaker, or selecting an item from a combo box's pop-up menu). When the user types keys corresponding to these bound keystrokes, the associated actions are carried out. For example, suppose a user is familiar with WordPerfect. By binding actions (that represent standard editing commands) to those keystrokes that are familiar to WordPerfect users, the user's investment in learning WordPerfect key/command associations can be carried over to a Java-based word processor program. A KeyStroke object represents either a single character (such as A ), a character and modifier key (such as Ctrl+A ), a key code (such as F1 ), or a key code and modifier key (such as Shift+F1 ). You obtain a KeyStroke object representing a key stroke by calling one of KeyStroke 's getKeyStroke methods as demonstrated by the following code fragment: KeyStroke ks1 = KeyStroke.getKeyStroke ('B', Event.CTRL_MASK); KeyStroke ks2 = KeyStroke.getKeyStroke (KeyEvent.VK_B, Event.CTRL_MASK); KeyStroke ks3 = KeyStroke.getKeyStroke ('B'); Java has several techniques for binding keystrokes to actions. The first two techniques involve JComponent 's registerKeyboardAction methods (for nontext components) and key maps (for text components). Version 1.3 of the Java 2 Platform Standard Edition introduces a third technique that unifies these other two techniques. (This third technique will be examined later.) All three techniques are thoroughly explored in an online article called "Keyboard Bindings in Swing" (located at http://java.sun.com/products/jfc/tsc/special_report/kestrel/keybindings.html). Imagine that you have a text field component, and you want to generate a beep when Ctrl+B is pressed. For starters, a text field is associated with an editor kit that serves as the component's controller. This editor kit supplies a list of actions that can be bound to key strokes. If you look in the DefaultEditorKit class (located in the javax.swing.text package), you'll find a String field called beepAction. This field names the action that causes a text component to issue a beep. You can determine if the beep action is supported by the text field by doing the following: Call the text field's getActions method to return an array of all supported actions. Search this array for the beep action by calling Action 's getValue method (with an Action.NAME argument that identifies the action's name field) for each array element and comparing the result with the beep action's name. If there is a match, you extract the action, create the key stroke that triggers the action, obtain the text component's key map, and call its addActionForKeyStroke method to bind the keystroke to the action. This is all demon- strated in the following code fragment: JTextField jt = new JTextField (20); Action [] aList = jt.getActions (); for (int i = 0; i < aList.length; i++) if (aList [i].getValue (Action.NAME) == DefaultEditorKit.beepAction) { Action a = aList [i]; KeyStroke ks = KeyStroke.getKeyStroke (KeyEvent.VK_B, Event.CTRL_MASK); jt.getKeymap ().addActionForKeyStroke (ks, a); } Listing 16.21 presents source code to a BindingDemo1 application that uses a key map to bind the Ctrl+B key stroke to a text field's beep action. You can use this application to experiment with discovering text component actions, creating different key strokes, and binding these key strokes to these actions. Listing 16.21 The BindingDemo1 Application Source Code // BindingDemo1.java import javax.swing.*; import javax.swing.plaf.*; import javax.swing.text.*; import java.awt.*; import java.awt.event.*; import java.util.*; class BindingDemo1 extends JFrame { BindingDemo1 (String title) { super (title); addWindowListener (new WindowAdapter () { public void windowClosing (WindowEvent e) { System.exit (0); } }); JPanel jp = new JPanel (); JLabel jl = new JLabel ("Name:"); jp.add (jl); JTextField jt = new JTextField (20); jp.add (jt); Action [] aList = jt.getActions (); for (int i = 0; i < aList.length; i++) if (aList [i].getValue (Action.NAME) == DefaultEditorKit.beepAction) { Action a = aList [i]; KeyStroke ks = KeyStroke.getKeyStroke (KeyEvent.VK_B, Event.CTRL_MASK); jt.getKeymap ().addActionForKeyStroke (ks, a); } getContentPane ().add (jp); pack (); setVisible (true); } public static void main (String [] args) { new BindingDemo1 ("Binding Demo1"); } } Version 1.3 of the Java 2 Platform Standard Edition introduces the InputMap and ActionMap classes for unifying earlier techniques that bind keystrokes to nontext and text components. These classes support any kind of component. To get a sense of the power behind these classes, check out the following code fragment (taken from the BindingDemo2 application, which is practically identical to BindingDemo1, and is included with the book's source code), which binds the Ctrl+B keystroke to the text field's beep action: KeyStroke ks = KeyStroke.getKeyStroke (KeyEvent.VK_B, Event.CTRL_MASK); jt.getInputMap ().put (ks, DefaultEditorKit.beepAction); The text field's input map object is obtained by calling the text field's getInputMap method. This object contains all the current keystroke/action mappings for this component. By calling the input map's put method, an association between the keystroke and beep action is made for the text field. Note Actually, there are three tables of mappings: one for the component when it has the focus, one for its ancestor , and one for a descendent component. The "Keyboard Bindings in Swing" article, mentioned earlier, provides an explanation for the existence of three tables. Unlike input maps, which associate keystrokes with action names, action maps associate action names with action objects. For example, suppose you want to modify a combo box so that when you enter the first few characters of a pop-up menu item and press the down-arrow key, the first matching menu item (the menu item whose first few characters match the characters entered in the editor) is highlighted. To accomplish this task, you need to know which action gets executed when the down-arrow key is pressed. (It was discovered that the selectNext action is executed by looking at the source code to the BasicComboBoxUI class.) After you know which action to override, you call the component's getActionMap method to return its current action map, and then call the action map's put method to replace the existing action. This is demonstrated by the following code fragment: jcb = new JComboBox (v); jcb.setEditable (true); jcb.getActionMap ().put ("selectNext", new DownAction ()); This code fragment replaces the selectNext action object with an object created from the DownAction class. The actionPerformed method (in this class) will be called when the user presses the Down Arrow key, because this key is internally registered to an action called selectNext, and the actionPerformed method in the object associated with selectNext is called when this key is pressed. How would you introduce a brand new action? For example, suppose you want to erase all characters in the combo box's editor when a user presses Ctrl+Delete. The solution is to work with the combo box's current input and action maps. The following code fragment demonstrates: KeyStroke ks = KeyStroke.getKeyStroke (KeyEvent.VK_DELETE, Event.CTRL_MASK); jcb.getInputMap (JComponent.WHEN_ANCESTOR_OF_FOCUSED_COMPONENT).put (ks, "rubOut"); jcb.getActionMap ().put ("rubOut", new RubOutAction ()); This code fragment creates a KeyStroke object for the Ctrl+Delete key combination. It then calls the combo box's getInputMap method to associate this keystroke with a fictional action name called rubOut. This name, and an object created from the RubOutAction class, are added to the action table. Now, when the Ctrl and Delete keys are simultaneously pressed, the input map is searched to find the name of the action. This name is then used to search the action map for the action object. If found, its actionPerformed method is called and the deletion takes place. You might be wondering why WHEN_ANCESTOR_OF_FOCUSED_COMPONENT is passed as an argument to getInputMap. The answer has to do with a combo box consisting of multiple components (a pop-up menu and an editor ”in edit mode). For detailed information, check out the "Keyboard Bindings in Swing" article discussed earlier. To conclude, check out Listing 16.22. This listing presents source code to the BindingDemo3 application, and demonstrates overriding an existing combo box action and introducing a brand new action. Listing 16.22 The BindingDemo3 Application Source Code // BindingDemo3.java import javax.swing.*; import javax.swing.plaf.*; import java.awt.*; import java.awt.event.*; import java.util.*; class BindingDemo3 extends JFrame { JComboBox jcb; BindingDemo3 (String title) { super (title); addWindowListener (new WindowAdapter () { public void windowClosing (WindowEvent e) { System.exit (0); } }); JPanel jp = new JPanel (); Vector v = new Vector (); v.add ("Camaro"); v.add ("Corvette"); v.add ("Firebird"); v.add ("TransAM"); v.add ("Porsche"); v.add ("Lamborgini"); jcb = new JComboBox (v); jcb.setEditable (true); jcb.getActionMap ().put ("selectNext", new DownAction ()); KeyStroke ks = KeyStroke.getKeyStroke (KeyEvent.VK_DELETE, Event.CTRL_MASK); jcb.getInputMap (JComponent.WHEN_ANCESTOR_OF_FOCUSED_COMPONENT) .put (ks, "rubOut"); jcb.getActionMap ().put ("rubOut", new RubOutAction ()); jp.setPreferredSize (new Dimension (200, 35)); jp.add (jcb); getContentPane ().add (jp); pack (); setVisible (true); } public static void main (String [] args) { new BindingDemo3 ("Binding Demo3"); } } class DownAction extends AbstractAction { public void actionPerformed (ActionEvent e) { JComboBox jcb = (JComboBox) e.getSource (); ComboBoxUI ui = jcb.getUI (); if (ui.isPopupVisible (jcb)) { int i = jcb.getSelectedIndex (); if (i < jcb.getModel ().getSize () - 1) { jcb.setSelectedIndex (i + 1); jcb.repaint (); } } else { int nItems = jcb.getItemCount (); ComboBoxEditor cbe = jcb.getEditor (); String st; // Search text st = ((String) cbe.getItem ()).toUpperCase (); for (int i = 0; i < nItems; i++) { String item = ((String) jcb.getItemAt (i)).toUpperCase (); if (item.startsWith (st)) { jcb.setSelectedIndex (i); break; } } ui.setPopupVisible (jcb, true); } } } class RubOutAction extends AbstractAction { public void actionPerformed (ActionEvent e) { JComboBox jcb = (JComboBox) e.getSource (); ComboBoxEditor cbe = jcb.getEditor (); cbe.setItem (""); } } PaintingSwing GUIs are painted when they are made visible for the first time, or because something changes in a component's state (such as a component becoming invalid and then being resized). Painting begins with the highest component in the containment hierarchy and works its way down to the lowest component. This process is under the control of the AWT's windowing toolkit. (Yes, the AWT's windowing toolkit serves as the foundation for painting Swing components.) However, Swing's repaint manager (identified by the RepaintManager class in the javax.swing package) and double-buffering logic improve the efficiency of this process and eliminate flicker. Swing's windowing toolkit forces painting code to execute in the event handling thread. As a result, if it takes too long to handle an event, painting will slow down (and the GUI's appearance will deteriorate). On the other hand, if painting logic takes too long to execute, the GUI will not be very responsive to user interaction. As you learned in Chapter 12, "Introduction to Java Foundation Classes," a component's (typically overridden) paint method is called to perform component-specific painting. However, this changes in Swing. Because JComponent overrides paint to call the paintComponent, paintBorder, and paintChildren methods, you must not override this method. If you do, you will probably forget to call paintComponent, paintBorder, and paintChildren. The resulting component's UI will suffer. The paintComponent method is the first method called by paint. It first calls its superclass paintComponent method to ensure that the component's background is painted. (This background is painted if the component's opaque property is true ”the result of a call to JComponent 's setOpaque method with a Boolean true argument.) The paintBorder method is called after paintComponent, to paint the component's border (if there is a border). (This method must not be overridden or invoked.) The paintChildren method is called after paintBorder, to allow child components of the current container component to paint themselves . (Do not override or invoke this method.) In each of Swing's component classes, the paintComponent method calls the component's UI delegate to perform the actual painting. Because a UI delegate is not associated with JComponent, the background of any component (whose class extends JComponent ) will not be painted. However, if you extend another class that has a UI delegate (such as JLabel ), the background will be painted. (You must override paintComponent and call super.paintComponent to ensure that a background is painted, if the opaque property is true.) This is demonstrated in the following code fragment: class MyPanel extends JPanel { // public void paintComponent (Graphics g) { super.paintComponent (g); // Paint the background. // Call Graphics methods to perform custom painting. } } PropertiesWhen you study the SDK documentation for JComponent and its many subclasses, you'll come across the term property. This JavaBeans term refers to the various state items (such as opaque) that are part of a Swing component. Furthermore, by calling JComponent 's putClientProperty method, you can add your own properties for associating extra information with components. For example, a layout manager can store constraint information in a component. The putClientProperty method is called to store or remove a property. This method takes Object key and Object value arguments. The key identifies the property. If null is passed, the property is removed. (Internally, properties are stored in a hash table.) To obtain the value of a current property, call getClientProperty. When a change is made to one of these properties, a property change event is fired . Listeners can then react to these events and perform component-specific tasks . (For more information on properties, check out the SDK documentation.) Threading IssuesUnlike the AWT, Swing requires you to take care when working with threads. Apart from a few methods, Swing's methods can only be called from the event-handling thread. (This thread handles Swing and AWT events.) It all boils down to the single-thread rule: After a Swing component is visible (through a call to the setVisible method), any code that might affect or depend on a component's state must be executed from the event-handling thread. If you need to execute GUI code from another thread, you should investigate the invokeAndWait and invokeLater methods, located in the SwingUtilities class. (The Java Tutorial shows how to use these methods.) Troubleshooting Tip If one or more of your components are behaving strangely (perhaps as a result of improperly using threads), and you need some help in finding the cause, see "Debugging Swing Components" in the "Troubleshooting" section at the end of this chapter. TimersSwing provides a Timer class (located in the javax.swing package) that fires an action event to one or more listeners after a delay. (The ToolTip manager uses this class to determine when to show and hide a ToolTip.) Because a timer's task (code executed in the timer's actionPerformed method) is executed in the event-handling thread, components can be safely manipulated. However, this task shouldn't take too long to execute, otherwise a GUI's performance will suffer. Call Timer (int delay, ActionListener l) to create a timer that notifies action listener l every delay milliseconds . (You can add more action listeners by calling Timer 's addActionListener method.) The newly created timer is in its stopped state. To start the timer, call its start method. Conversely, you would call stop to terminate the timer. Furthermore, by calling its isRunning method, you can find out if a timer is running. To get a sense of how to use a Swing timer, examine Listing 16.23's source code to the TimerDemo1 application. Listing 16.23 The TimerDemo1 Application Source Code // TimerDemo1.java import javax.swing.*; import java.awt.*; import java.awt.event.*; class TimerDemo1 extends JFrame { Timer timer; int counter; TimerDemo1 (String title) { super (title); addWindowListener (new WindowAdapter () { public void windowClosing (WindowEvent e) { System.exit (0); } }); ActionListener a = new ActionListener () { public void actionPerformed (ActionEvent e) { System.out.println ("Counter = " + counter); if (++counter > 10) { timer.stop (); System.exit (0); } } } ; timer = new Timer (300, a); timer.start (); pack (); setVisible (true); } public static void main (String [] args) { new TimerDemo1 ("Timer Demo1"); } } Timers can simplify Swing-based animation. When the next frame is to be drawn, the timer's actionPerformed method increments the frame number and calls the repaint method on the component whose paintComponent method draws the next frame. The source code to a TimerDemo2 application, which shows how to use a timer to animate an image, is presented in Listing 16.24. Listing 16.24 The TimerDemo2 Application Source Code // TimerDemo2.java import javax.swing.*; import java.awt.*; import java.awt.event.*; import java.awt.image.*; class TimerDemo2 extends JFrame { final static int WIDTH = 200; final static int HEIGHT = 200; final static int DIRECTCOLORBACK = 0; final static int INDEXCOLORBACK = 1; int backType = INDEXCOLORBACK; Timer timer; int frameNumber = 1; TimerDemo2 (String title) { super (title); addWindowListener (new WindowAdapter () { public void windowClosing (WindowEvent e) { System.exit (0); } }); int [] pixels = new int [WIDTH * HEIGHT]; Toolkit tk = Toolkit.getDefaultToolkit (); Image imBack; if (backType == DIRECTCOLORBACK) { MkDirectColorBackground (pixels, WIDTH, HEIGHT); imBack = tk.createImage (new MemoryImageSource (WIDTH, HEIGHT, pixels, 0, WIDTH)); } else { IndexColorModel icm; icm = MkIndexColorBackground (pixels, WIDTH, HEIGHT); imBack = tk.createImage (new MemoryImageSource (WIDTH, HEIGHT, icm, pixels, 0, WIDTH)); } Image imFront = tk.getImage ("bullet.gif"); final AnimPane ap = new AnimPane (imBack, imFront); setContentPane (ap); ActionListener a = new ActionListener () { public void actionPerformed (ActionEvent e) { frameNumber++; ap.repaint (); } } ; timer = new Timer (300, a); timer.start (); setSize (WIDTH, HEIGHT); setVisible (true); } void MkDirectColorBackground (int [] pixels, int w, int h) { int index = 0; for (int y = 0; y < h; y++) { int numerator = y * 255; int b = numerator / h; int r = 255 - numerator / h; for (int x = 0; x < w; x++) { int g = x * 255 / w; pixels [index++] = (255 << 24) (r << 16) (g << 8) b; } } } IndexColorModel MkIndexColorBackground (int [] pixels, int w, int h) { Color [] colors = { Color.magenta, Color.green, Color.blue } ; byte [] reds = new byte [colors.length]; byte [] greens = new byte [colors.length]; byte [] blues = new byte [colors.length]; for (int i = 0; i < colors.length; i++) { reds [i] = (byte) colors [i].getRed (); greens [i] = (byte) colors [i].getGreen (); blues [i] = (byte) colors [i].getBlue (); } int stripeSize = w / colors.length; int colorIndex; int index = 0; for (int y = 0; y < h; y++) for (int x = 0; x < w; x++) { if (x < stripeSize) colorIndex = 0; else if (x < stripeSize * 2) colorIndex = 1; else colorIndex = 2; pixels [index++] = colorIndex; } IndexColorModel icm; icm = new IndexColorModel (8, colors.length, reds, greens, blues); return icm; } class AnimPane extends JPanel { Image back, front; AnimPane (Image back, Image front) { this.back = back; this.front = front; } //Draw the current frame of animation. public void paintComponent (Graphics g) { super.paintComponent (g); // Paint space not covered // by background image. int compWidth = getWidth (); int compHeight = getHeight (); int imgWidth, imgHeight; // If you have a valid width and height for the // background image, draw this image - centered // horizontally and vertically. imgWidth = back.getWidth (this); imgHeight = back.getHeight (this); if (imgWidth > 0 && imgHeight > 0) g.drawImage (back, (compWidth - imgWidth) / 2, (compHeight - imgHeight) / 2, this); // If you have a valid width and height for the // front image, draw it. imgWidth = front.getWidth (this); imgHeight = front.getHeight (this); if (imgWidth > 0 && imgHeight > 0) { // Compute new horizontal position to fall in component // bounds. The larger the multiplier (such as 10), the // greater the horizontal distance that's traveled. int x = (frameNumber * 10) % (imgWidth + compWidth) - imgWidth; // Center front image vertically. int y = (compHeight - imgHeight) / 2; // Draw front image. g.drawImage (front, x, y, this); } } } public static void main (String [] args) { new TimerDemo2 ("Timer Demo2"); } } TimerDemo2 creates a background image in memory. This image uses either a direct color model (if the backType variable is set to DIRECTCOLORBACK ) or an index color model (if backType is set to INDEXCOLORBACK ). An animation pane, which is nothing more than a subclassed JPanel component, is created and its paintComponent method overridden to paint the background and foreground images. Every 300 milliseconds, the timer calls its actionPerformed method. Each call increments the frameNumber variable and issues a call to the animation pane's repaint method. This call eventually results in a call back to the animation pane's paintComponent method, which uses frameNumber 's value to determine the next horizontal location. This value is multiplied by 10 to increase the distance covered during each call. Figure 16.30 shows TimerDemo2 's output when the index color background is used. Figure 16.30. Timers can be used to achieve slick-looking Swing animations. Note Because Swing painting is double-buffered, the flickering problems that are prevalent with AWT animations don't exist. |
EAN: 2147483647
Pages: 353