4.3 Online Addition and Replacement: OLA/R The ability to replace interface cards, online, was new for the HP-UX 11i release. It became a necessity for the operating system to perform this task with the advent of new, highly available servers such as Superdome. In fact, servers such as Superdome can support the online addition and replacement of not only PCI interface cards but also cell components at the hardware level. Unfortunately, at this time, the operating system is slightly behind the hardware. In the not too distant future, it is anticipated that HP-UX will be able to perform OLA/R on cell components as well. For the moment, we will have to satisfy ourselves with the OLA/R for PCI interface cards. There are a number of servers that support OLA/R for PCI interface cards (including Superdome). I won't list here the current supported servers because it will no doubt be out of date by the time you read this. Be sure to check your system documentation as to whether your server supports OLA/R. The motivation for using OLA/R is to avoid rebooting a server in order to add a new PCI interface card or to replace a failed PCI interface card. These are the two tasks we can perform with OLA/R. In the near future, we will be able to perform the deletion of PCI cards. I make a point of mentioning this because it will have a bearing on the task of replacing a failed PCI card, as we see later. We start with replacing a failed PCI card, as this is probably the more involved task. 4.3.1 Replacing a failed PCI card If the card that has failed is supporting our root disk, then we will certainly have a problem on our hands. In today's IT climate, more and more installations utilize some form of disk/data mirroring in order to protect not only their user data but also their operating system software; downtime can be expensive these days. What is a little scary is the number of installations that use the same interface card to house both the original (primary) disk and the additional (secondary and possibly tertiary ) disk(s). In these times of high availability, we need to ensure that all of our mirrored disks are on separate interfaces to avoid a single-point-of-failure (SPOF), and that we don't fall into the trap of just using any old other interface. I know some customers who used the second SCSI port on a dual-port SCSI card to attach their mirror-disks. Not until someone pointed out that the entire PCI card was a SPOF did they think twice about how their mirroring was configured. I will make the assumption that you have your mirrored disks on a separate interface which is an interface on a separate PCI card. I suspect that you have noticed a certain amount of hardware diagnostic messages in syslog since the PCI card failed. We look at what some of those diagnostic messages mean later on. In my demonstration, I simulate a PCI card that has failed and perform the necessary steps to replace that card. You can either use SAM to perform OLA/R or perform the steps manually. If you perform the steps manually, you will have to ensure that you have additional resources online when you disable the affected PCI card. SAM will perform a task known as Critical Resource Analysis before disabling an affected PCI card. If your system fails Critical Resource Analysis , SAM will not disable the affected PCI card. As such, SAM is the preferred method for performing this task. In my demonstration, I will perform the steps manually in order to explain each step in turn as well as to highlight any potential pitfalls. I have all the logical volumes on my root disk mirrored (except my dump device(s); you can't mirror a dump device); you can see this from the output from the lvlnboot and lvdisplay commands below:
root @uksd3 # lvlnboot -v vg00 Boot Definitions for Volume Group /dev/vg00: Physical Volumes belonging in Root Volume Group: /dev/dsk/c0t0d0 (2/0/1/0/0.0.0) -- Boot Disk /dev/dsk/c0t1d0 (2/0/1/0/0.1.0) /dev/dsk/c3t8d0 (2/0/4/0/0.8.0) -- Boot Disk /dev/dsk/c3t10d0 (2/0/4/0/0.10.0) Boot: lvol1 on: /dev/dsk/c0t0d0 /dev/dsk/c3t8d0 Root: lvol3 on: /dev/dsk/c0t0d0 /dev/dsk/c3t8d0 Swap: lvol2 on: /dev/dsk/c0t0d0 /dev/dsk/c3t8d0 Dump: lvol2 on: /dev/dsk/c0t0d0, 0 root @uksd3 # root @uksd3 # lvdisplay -v /dev/vg00/lvol1 --- Logical volumes --- LV Name /dev/vg00/lvol1 VG Name /dev/vg00 LV Permission read/write LV Status available/syncd Mirror copies 1 Consistency Recovery MWC Schedule parallel LV Size (Mbytes) 300 Current LE 75 Allocated PE 150 Stripes 0 Stripe Size (Kbytes) 0 Bad block off Allocation strict/contiguous IO Timeout (Seconds) default --- Distribution of logical volume --- PV Name LE on PV PE on PV /dev/dsk/c0t0d0 75 75 /dev/dsk/c3t8d0 75 75 --- Logical extents --- LE PV1 PE1 Status 1 PV2 PE2 Status 2 00000 /dev/dsk/c0t0d0 00000 current /dev/dsk/c3t8d0 00000 current 00001 /dev/dsk/c0t0d0 00001 current /dev/dsk/c3t8d0 00001 current 00002 /dev/dsk/c0t0d0 00002 current /dev/dsk/c3t8d0 00002 current ... 00073 /dev/dsk/c0t0d0 00073 current /dev/dsk/c3t8d0 00073 current 00074 /dev/dsk/c0t0d0 00074 current /dev/dsk/c3t8d0 00074 current root @uksd3 #
The process to replace a failed PCI card can be summarized as follows : -
Identify the failed PCI card.
-
Perform Critical Resource Analysis on the affected PCI card.
-
Turn on the attention light for the affected PCI card slot.
-
Check that the affected PCI slot is in its own power domain.
-
Check that the affected PCI card is not a multi-function card.
-
Run any associated driver scripts before suspending the driver.
-
Suspend the kernel driver for the affected PCI slot.
-
Turn off the power to the affected PCI slot.
-
Replace the PCI card.
-
Turn on the power to the affected PCI slot.
-
Run any associated driver scripts before resuming the driver.
-
Resume the driver for the affected PCI slot.
-
Check functionality of the newly replaced PCI card.
-
Turn off the attention light for the affected PCI slot.
I will go through each of these steps on a live system. This system is a Superdome system running HP-UX 11i version 1. I will replace the PCI card attached to the root disk from which I booted . 1 IDENTIFY THE FAILED PCI CARD In my example, I am going to replace the PCI card for the disks I booted from. Using adb , I can see which disk and hence which interface card I booted from:
root @uksd3 # echo "boot_string/S" adb /stand/vmunix /dev/kmem boot_string: boot_string: disk(2/0/1/0/0.0.0.0.0.0.0;0)/stand/vmunix root @uksd3 #
The interface card I am going to disable is the Ultra2 Wide LVD interface at hardware path 2/0/1/0/0:
root @uksd3 # ioscan -fnkH 2/0/1/0 Class I H/W Path Driver S/W State H/W Type Description ======================================================================== ext_bus 0 2/0/1/0/0 c720 CLAIMED INTERFACE SCSI C895 Ultra2 Wide LVD target 0 2/0/1/0/0.0 tgt CLAIMED DEVICE disk 0 2/0/1/0/0.0.0 sdisk CLAIMED DEVICE FUJITSU MAJ3182MC /dev/dsk/c0t0d0 /dev/rdsk/c0t0d0 target 1 2/0/1/0/0.1 tgt CLAIMED DEVICE disk 1 2/0/1/0/0.1.0 sdisk CLAIMED DEVICE FUJITSU MAJ3182MC /dev/dsk/c0t1d0 /dev/rdsk/c0t1d0 target 2 2/0/1/0/0.2 tgt CLAIMED DEVICE disk 2 2/0/1/0/0.2.0 sdisk CLAIMED DEVICE SEAGATE ST118202LC /dev/dsk/c0t2d0 /dev/rdsk/c0t2d0 target 3 2/0/1/0/0.7 tgt CLAIMED DEVICE ctl 0 2/0/1/0/0.7.0 sctl CLAIMED DEVICE Initiator /dev/rscsi/c0t7d0 target 4 2/0/1/0/0.15 tgt CLAIMED DEVICE ctl 1 2/0/1/0/0.15.0 sctl CLAIMED DEVICE HP A5272A /dev/rscsi/c0t15d0 root @uksd3 #
You will normally have some idea of which disks have failed by having numerous SCSI and LVM error messages in syslog.log . You should be able to work out the hardware path of the interface card from the hardware path of the disks that have failed. In this example, we will see the SCSI and LVM error messages when I disable the PCI card in question. I will then decipher the error messages to trace back to the hardware path of the failed interface card. Once we know the hardware address of the PCI interface card, we need to translate this into a PCI slot-id. The type of partitioned server you have will determine how HP-UX converts a hardware path into a PCI slot-id. We need the slot-id in order to communicate with the PCI slot, regardless what type of interface card is in the slot. The most consistent way to translate a HP-UX hardware path into a PCI slot-id is to use the rad command (on HP-UX 11.23 we can use the olrad or pdweb commands). Below, you can see the output from the rad “q command on my system:
root @uksd3 # rad -q Driver(s) Slot Path Bus Speed Power Occupied Suspended Capable 0-1-1-0 2/0/0 0 33 On Yes No No 0-1-1-1 2/0/1/0 8 33 On Yes No Yes 0-1-1-2 2/0/2/0 16 33 On Yes No Yes 0-1-1-3 2/0/3/0 24 33 On Yes No Yes 0-1-1-4 2/0/4/0 32 33 On Yes No Yes 0-1-1-5 2/0/6/0 48 33 On No N/A N/A 0-1-1-6 2/0/14/0 112 33 On No N/A N/A 0-1-1-7 2/0/12/0 96 33 On Yes No Yes 0-1-1-8 2/0/11/0 88 33 On Yes No Yes 0-1-1-9 2/0/10/0 80 33 On Yes No Yes 0-1-1-10 2/0/9/0 72 33 On Yes No Yes 0-1-1-11 2/0/8/0 64 33 On Yes No Yes root @uksd3 #
I have underlined the line for our interface card. Notice on the right side of the output the column headed Capable . This will tell us whether the driver is capable of being disabled or, as we'll call it in OLA/R, suspended . Currently, our card is not suspended; it is capable, and power to the slot is on. 2 PERFORM CRITICAL RESOURCE ANALYSIS ON THE AFFECTED PCI CARD If you are performing OLA/R on a failed PCI interface card, it is absolutely crucial that you perform an exhaustive Critical Resource Analysis . As the name suggests, we are analyzing the system to ensure that we have enough additional resource online to allow our critical resource to be disabled without having any noticeable effect on system availability. In my example, I will need to be absolutely sure that my mirror disks are on separate interfaces and that if the system is rebooted, it will reboot from the mirror disks. I can see the mirror disks from the output of the lvlnboot command:
root @uksd3 # lvlnboot -v vg00 Boot Definitions for Volume Group /dev/vg00: Physical Volumes belonging in Root Volume Group: /dev/dsk/c0t0d0 (2/0/1/0/0.0.0) -- Boot Disk /dev/dsk/c0t1d0 (2/0/1/0/0.1.0) /dev/dsk/c3t8d0 (2/0/4/0/0.8.0) -- Boot Disk /dev/dsk/c3t10d0 (2/0/4/0/0.10.0) Boot: lvol1 on: /dev/dsk/c0t0d0 /dev/dsk/c3t8d0 Root: lvol3 on: /dev/dsk/c0t0d0 /dev/dsk/c3t8d0 Swap: lvol2 on: /dev/dsk/c0t0d0 /dev/dsk/c3t8d0 Dump: lvol2 on: /dev/dsk/c0t0d0, 0 root @uksd3 #
From this I can also see the hardware path to those disks. Using ioscan , I can ensure that those interfaces are on separate PCI cards:
root @uksd3 # ioscan -fnkC ext_bus Class I H/W Path Driver S/W State H/W Type Description =========================================================================== ext_bus 0 2/0/1/0/0 c720 CLAIMED INTERFACE SCSI C895 Ultra2 Wide LVD ext_bus 1 2/0/3/0/0 c720 CLAIMED INTERFACE SCSI C87x Ultra Wide  Differential ext_bus 2 2/0/3/0/1 c720 CLAIMED INTERFACE SCSI C87x Ultra Wide Differential ext_bus 3 2/0/4/0/0 c720 CLAIMED INTERFACE SCSI C895 Ultra2 Wide LVD ext_bus 4 2/0/8/0/0 c720 CLAIMED INTERFACE SCSI C87x Ultra Wide Differential ext_bus 5 2/0/8/0/1 c720 CLAIMED INTERFACE SCSI C87x Ultra Wide Differential ext_bus 6 2/0/11/0/0 c720 CLAIMED INTERFACE SCSI C87x Ultra Wide Differential ext_bus 7 2/0/12/0/0.8.0.4.0 fcparray CLAIMED INTERFACE FCP Array Interface ext_bus 8 2/0/12/0/0.8.0.5.0 fcparray CLAIMED INTERFACE FCP Array Interface ext_bus 9 2/0/12/0/0.8.0.255.0 fcpdev CLAIMED INTERFACE FCP Device Interface root @uksd3 # Differential ext_bus 2 2/0/3/0/1 c720 CLAIMED INTERFACE SCSI C87x Ultra Wide Differential ext_bus 3 2/0/4/0/0 c720 CLAIMED INTERFACE SCSI C895 Ultra2 Wide LVD ext_bus 4 2/0/8/0/0 c720 CLAIMED INTERFACE SCSI C87x Ultra Wide Differential ext_bus 5 2/0/8/0/1 c720 CLAIMED INTERFACE SCSI C87x Ultra Wide Differential ext_bus 6 2/0/11/0/0 c720 CLAIMED INTERFACE SCSI C87x Ultra Wide Differential ext_bus 7 2/0/12/0/0.8.0.4.0 fcparray CLAIMED INTERFACE FCP Array Interface ext_bus 8 2/0/12/0/0.8.0.5.0 fcparray CLAIMED INTERFACE FCP Array Interface ext_bus 9 2/0/12/0/0.8.0.255.0 fcpdev CLAIMED INTERFACE FCP Device Interface root @uksd3 #
I need to ensure that the system will reboot from those disks in the event of a system reboot. I can do this with the setboot command, and on a partitioned server I can also use the pardisplay command:
root @uksd3 # setboot Primary bootpath : 2/0/1/0/0.0.0 Alternate bootpath : 2/0/4/0/0.8.0 Autoboot is ON (enabled) Autosearch is ON (enabled) Note: The interpretation of Autoboot and Autosearch has changed for systems that support hardware partitions. Please refer to the manpage. root @uksd3 # root @uksd3 # parstatus -w The local partition number is 2. root @uksd3 # parstatus -Vp 2 [Partition] Partition Number : 2 Partition Name : uksd3 Status : active IP address : 0.0.0.0 Primary Boot Path : 2/0/1/0/0.0.0 Alternate Boot Path : 2/0/4/0/0.8.0 HA Alternate Boot Path : 2/0/4/0/0.8.0 PDC Revision : 35.4 IODCH Version : 5C70 CPU Speed : 552 MHz Core Cell : cab0,cell2 [Cell] CPU Memory Use OK/ (GB) Core On Hardware Actual Deconf/ OK/ Cell Next Par Location Usage Max Deconf Connected To Capable Boot Num ========== ============ ======= ========= =================== ======= ==== === cab0,cell2 active core 4/0/4 4.0/ 0.0 cab0,bay1,chassis1 yes yes 2 [Chassis] Core Connected Par Hardware Location Usage IO To Num =================== ============ ==== ========== === cab0,bay1,chassis1 active yes cab0,cell2 2 root @uksd3 #
Finally, we will check that the correct ISL boot command is stored in the AUTO file on all mirror disks to ensure that we override LVM quorum specifications if necessary:
root @uksd3 # lifcp /dev/rdsk/c0t0d0:AUTO - hpux -lq root @uksd3 # lifcp /dev/rdsk/c3t8d0:AUTO - hpux -lq root @uksd3 #
We are now ready to proceed. 3 TURN ON THE ATTENTION LIGHT FOR THE AFFECTED PCI CARD SLOT The attention light is an orange blinking light located on the front of the plastic divider in our PCI card-cage (see Figure 4-2). Figure 4-2. Locating the correct PCI card slot 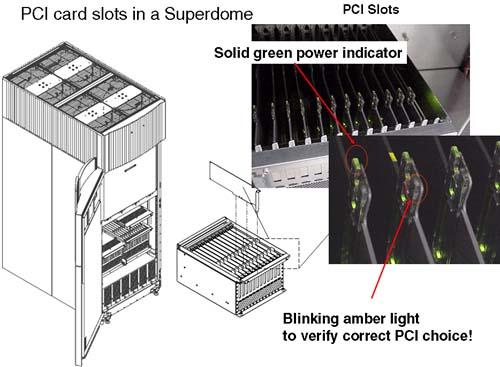
A solid green light tells us that there is power to the slot. The attention light will remain blinking orange even if we turn power to the slot off.
root @uksd3 # rad -f on 0-1-1-1 root @uksd3 #
I am not talking about any attention lights on the body of a card itself. This attention light issued from the light pipes located on the plastic separator between individual PCI card slots. Turning this attention light on has nothing to do with the attention light located on the front and back door of a server complex. Technically, we don't need to turn the attention light on. It is a good sanity check to ensure that both you and the engineer who is going to replace the card know exactly which card it is by flashing the attention light. If you mention the slot-id to an HP Hardware Customer Engineer, both of you can decipher it separately and confirm each other's diagnosis as to which card the slot-id refers to. Note : I haven't found a way to programmatically tell if the attention light is currently on for a PCI card slot. If you find out, please let me know. 4 CHECK THAT THE AFFECTED PCI SLOT IS IN ITS OWN POWER DOMAIN The fact that we are using a Superdome means that each PCI card is in its own power domain. A power domain is one or more PCI card slots sharing a common power source. If we had an rp5400 series machine, some PCI slots share a common power source. If we turn off power to one PCI slot, we turn off power on all slots sharing the common power source. Even on a Superdome system, I still check:
root @uksd3 # rad -a 0-1-1-1 0-1-1-1 root @uksd3 #
If this PCI card slot were sharing a common power source with other PCI card slots, we would see other slot-ids listed in the above output. 5 CHECK THAT THE AFFECTED PCI CARD IS NOT A MULTI-FUNCTION CARD Multi-function cards are cards with more than one interface on the card itself. This could be anything from a dual-port SCSI card to a four-port LAN card. If we turn power off to the entire card, then we will affect all ports on the card:
root @uksd3 # rad -h 0-1-1-1 2/0/1/0/0 root @uksd3 #
The above output shows us the hardware address(es) of all ports on the card. The fact that we have only one hardware address associated with this card is good; we don't have a multi-port or multi-function card. Both the rad “a and rad “ h commands can be seen as part of our Critical Resource Analysis . As such we have not affected anything in the system yet, except to turn a PCI card slot attention light on. The next step is the first disruptive step in the process. If our Critical Resource Analysis has been not been thorough enough, we could render the system unusable after using the next command. 6 RUN ANY ASSOCIATED DRIVER SCRIPTS BEFORE SUSPENDING THE DRIVER The programmer who wrote the device driver for this card may have supplied an associated shell script to run whenever we are performing OLA/R on a PCI card. First, we need to know the driver name and the associated HP-UX hardware path. We have probably seen this information previously, but we can just confirm it right here:
root @uksd3 # rad -h 0-1-1-1 2/0/1/0/0 root @uksd3 # root @uksd3 # ioscan -fnkH 2/0/1/0/0 Class I H/W Path Driver S/W State H/W Type Description ======================================================================== ext_bus 0 2/0/1/0/0 c720 CLAIMED INTERFACE SCSI C895 Ultra2 Wide LVD target 0 2/0/1/0/0.0 tgt CLAIMED DEVICE disk 0 2/0/1/0/0.0.0 sdisk CLAIMED DEVICE FUJITSU MAJ3182MC /dev/dsk/c0t0d0 /dev/rdsk/c0t0d0 target 1 2/0/1/0/0.1 tgt CLAIMED DEVICE disk 1 2/0/1/0/0.1.0 sdisk CLAIMED DEVICE FUJITSU MAJ3182MC /dev/dsk/c0t1d0 /dev/rdsk/c0t1d0 target 2 2/0/1/0/0.2 tgt CLAIMED DEVICE disk 2 2/0/1/0/0.2.0 sdisk CLAIMED DEVICE SEAGATE ST118202LC /dev/dsk/c0t2d0 /dev/rdsk/c0t2d0 target 3 2/0/1/0/0.7 tgt CLAIMED DEVICE ctl 0 2/0/1/0/0.7.0 sctl CLAIMED DEVICE Initiator /dev/rscsi/c0t7d0 target 4 2/0/1/0/0.15 tgt CLAIMED DEVICE ctl 1 2/0/1/0/0.15.0 sctl CLAIMED DEVICE HP A5272A /dev/rscsi/c0t15d0 root @uksd3 #
The driver name for this card is c720 . We can look in the directory /usr/sbin/olrad.d for a script of the same name as the kernel driver. This shell script may ask us for a timeout value for the driver; this is entirely up to the programmer who wrote the kernel driver and supplied this script. We can determine any timeout values associated with this driver using the rad “ V command:
root @uksd3 # rad -V 2/0/1/0/0 Name State Suspend_time Resume_time Remove_time Error time c720 RUNNING 120.000000 120.000000 0.000000 0.000000 root @uksd3 #
You might have noticed this is the first time the rad command has taken an HP-UX hardware path as an argument. The convention with the rad command is that an uppercase option needs an HP-UX hardware path while a lowercase option requires a PCI slot-id. Now that we have those timeout values, we can run the associated driver script with the appropriate command-line arguments:
root @uksd3 # ll /usr/sbin/olrad.d total 80 -r-xr-xr-x 1 bin bin 2889 Nov 14 2000 c720 -r-xr-xr-x 1 bin bin 2977 Dec 12 2001 c8xx -r-xr-xr-x 1 bin bin 2236 Jun 19 2001 fddi4 -r-xr-xr-x 1 bin bin 4542 Dec 21 2000 iop_drv -r-xr-xr-x 1 bin bin 2124 Jun 19 2002 td root @uksd3 # root @uksd3 #/usr/sbin/olrad.d/c720 prep_replace 2/0/1/0/0 root @uksd3 #
This script allows the driver developer to perform any task he feels necessary before all further requests are suspended for the affected PCI card slot. In this instance, I wasn't prompted for any of the timeout values obtained previously. This does not mean that a script you run will not ask you for one or all of those timeout values. We should run these scripts to ensure that anything that needs to be done is actually done. 7 SUSPEND THE KERNEL DRIVER FOR THE AFFECTED PCI SLOT Without this command, the kernel will produce a plethora of diagnostic messages when we turn off power to the specified PCI slot. This command will effectively suspend the PCI card slot from operating. Initially, kernel subsystems may complain that the card is no longer functioning; in our case, the SCSI and LVM subsystems will complain because outstanding IO requests will not be completed. Let's suspend the driver:
root @uksd3 # rad -s 0-1-1-1 The following interface driver node(s) will be suspended: 2/0/1/0/0 c720 Warning: rad does not perform critical resource analysis. Please ensure that no critical resources are affected by this operation before proceeding. Do you wish to continue(Y/N)? y root @uksd3 # root @uksd3 # rad -q Driver(s) Slot Path Bus Speed Power Occupied Suspended Capable 0-1-1-0 2/0/0 0 33 On Yes No No 0-1-1-1 2/0/1/0 8 33 On Yes Yes Yes 0-1-1-2 2/0/2/0 16 33 On Yes No Yes 0-1-1-3 2/0/3/0 24 33 On Yes No Yes 0-1-1-4 2/0/4/0 32 33 On Yes No Yes 0-1-1-5 2/0/6/0 48 33 On No N/A N/A 0-1-1-6 2/0/14/0 112 33 On No N/A N/A 0-1-1-7 2/0/12/0 96 33 On Yes No Yes 0-1-1-8 2/0/11/0 88 33 On Yes No Yes 0-1-1-9 2/0/10/0 80 33 On Yes No Yes 0-1-1-10 2/0/9/0 72 33 On Yes No Yes 0-1-1-11 2/0/8/0 64 33 On Yes No Yes root @uksd3 #
We will now look at the associated output from syslog :
root @uksd3 # more /var/adm/syslog/syslog.log ... Nov 4 18:15:50 uksd3 vmunix: SCSI: Write error -- dev: b 31 0x000000, errno: 126, resid: 8192, Nov 4 18:15:50 uksd3 vmunix: blkno: 7835584, sectno: 15671168, offset: -566296576, bcount: 8192. Nov 4 18:15:50 uksd3 vmunix: SCSI: Async write error -- dev: b 31 0x000000, errno: 126, resid: 2048, Nov 4 18:15:50 uksd3 vmunix: blkno: 6389028, sectno: 12778056, offset: -2047569920, bcount: 2048. Nov 4 18:15:50 uksd3 vmunix: blkno: 4701432, sectno: 9402864, offset: 519299072, bcount : 2048. Nov 4 18:15:50 uksd3 vmunix: blkno: 4701464, sectno: 9402928, offset: 519331840, bcount : 2048. Nov 4 18:15:50 uksd3 vmunix: blkno: 4701448, sectno: 9402896, offset: 519315456, bcount : 2048. Nov 4 18:15:50 uksd3 vmunix: blkno: 4701444, sectno: 9402888, offset: 519311360, bcount : 2048. Nov 4 18:15:50 uksd3 vmunix: blkno: 4572074, sectno: 9144148, offset: 386836480, bcount : 2048. Nov 4 18:15:50 uksd3 vmunix: blkno: 4572098, sectno: 9144196, offset: 386861056, bcount : 2048. Nov 4 18:15:50 uksd3 vmunix: blkno: 4572090, sectno: 9144180, offset: 386852864, bcount : 2048. Nov 4 18:15:50 uksd3 vmunix: SCSI: Read error -- dev: b 31 0x000000, errno: 126, resid: 2048, Nov 4 18:15:50 uksd3 vmunix: blkno: 8, sectno: 16, offset: 8192, bcount: 2048. Nov 4 18:15:50 uksd3 vmunix: SCSI: Async write error -- dev: b 31 0x000000, errno: 126, resid: 2048, Nov 4 18:15:50 uksd3 above message repeats 7 times Nov 4 18:15:50 uksd3 vmunix: LVM: Path (device 0x1f001000) to PV 1 in VG 0 Failed! Nov 4 18:15:50 uksd3 vmunix: LVM: vg[0]: pvnum=0 (dev_t=0x1f000000) is POWERFAILED Nov 4 18:15:50 uksd3 vmunix: Nov 4 18:15:51 uksd3 above message repeats 9 times Nov 4 18:15:50 uksd3 vmunix: LVM: vg[0]: pvnum=1 (dev_t=0x1f001000) is POWERFAILED Nov 4 18:15:55 uksd3 vmunix: DIAGNOSTIC SYSTEM WARNING: Nov 4 18:15:55 uksd3 vmunix: The diagnostic logging facility is no longer receiving excessive Nov 4 18:15:55 uksd3 vmunix: errors from the I/O subsystem. 15 I/O error entries were lost. root @uksd3 #
As we can see, SCSI has produced lbolt messages associated with some devices. Hopefully, in the lbolt message, or an LVM POWERFAIL message, we get a pointer to a device. This is the address of an affected device. The LVM POWERFAIL message has given us a dev_t pointer of 0x1f000000 and 0x1f001000 . If we look at one of the addresses, 1f000000 , the first two characters represent the major number of the affected device: 1f 16 = 31 10 . The remainder of the address is the minor number of the affected device. If we look at the disk under /dev/dsk , we are looking for a disk with major number = 31 and minor number of 000000 :
root @uksd3 # ll /dev/dsk total 0 brw-r----- 1 bin sys 31 0x000000 Jul 7 11:17 c0t0d0 brw-r----- 1 bin sys 31 0x001000 Jul 7 11:17 c0t1d0 brw-r----- 1 bin sys 31 0x002000 Jul 7 11:17 c0t2d0 brw-r----- 1 bin sys 31 0x03a000 Oct 31 11:17 c3t10d0 brw-r----- 1 bin sys 31 0x038000 Oct 31 11:17 c3t8d0 brw-r----- 1 bin sys 31 0x061000 Jul 7 11:17 c6t1d0 brw-r----- 1 bin sys 31 0x070000 Jul 7 11:17 c7t0d0 brw-r----- 1 bin sys 31 0x070100 Jul 7 11:17 c7t0d1 brw-r----- 1 bin sys 31 0x070200 Jul 7 11:17 c7t0d2 brw-r----- 1 bin sys 31 0x070300 Jul 7 11:17 c7t0d3 brw-r----- 1 bin sys 31 0x070400 Jul 7 11:17 c7t0d4 brw-r----- 1 bin sys 31 0x071000 Jul 7 11:17 c7t1d0 brw-r----- 1 bin sys 31 0x072000 Jul 7 11:17 c7t2d0 brw-r----- 1 bin sys 31 0x073000 Jul 7 11:17 c7t3d0 brw-r----- 1 bin sys 31 0x080000 Jul 7 11:17 c8t0d0 brw-r----- 1 bin sys 31 0x080100 Jul 7 11:17 c8t0d1 brw-r----- 1 bin sys 31 0x080200 Jul 7 11:17 c8t0d2 brw-r----- 1 bin sys 31 0x080300 Jul 7 11:17 c8t0d3 brw-r----- 1 bin sys 31 0x080400 Jul 7 11:17 c8t0d4 brw-r----- 1 bin sys 31 0x081000 Jul 7 11:17 c8t1d0 brw-r----- 1 bin sys 31 0x082000 Jul 7 11:17 c8t2d0 brw-r----- 1 bin sys 31 0x083000 Jul 7 11:17 c8t3d0 root @uksd3 #
As you can see, we have pinpointed the affected devices. With lssf , we can identify the interface card to which it pertains:
root @uksd3 # lssf /dev/dsk/c0t0d0 sdisk card instance 0 SCSI target 0 SCSI LUN 0 section 0 at address 2/0/1/0/0.0.0 /dev/dsk /c0t0d0 root @uksd3 # lssf /dev/dsk/c0t1d0 sdisk card instance 0 SCSI target 1 SCSI LUN 0 section 0 at address 2/0/1/0/0.1.0 /dev/dsk /c0t1d0 root @uksd3 #
We can also see that our root disk now has stale extents associated with the IO requests that never completed:
root @uksd3 # lvdisplay -v /dev/vg00/lvol* grep stale wc -l 52 root @uksd3 #
With the driver now suspended, the kernel will no longer process any requests or messages for this device. This should be born in mind if we are to use commands like ioscan at this point:
root @uksd3 # ioscan -fnC ext_bus Class I H/W Path Driver S/W State H/W Type Description =========================================================================== ext_bus 0 2/0/1/0/0 c720 CLAIMED INTERFACE SCSI C895 Ultra2 Wide LVD ext_bus 1 2/0/3/0/0 c720 CLAIMED INTERFACE SCSI C87x Ultra Wide Differential ext_bus 2 2/0/3/0/1 c720 CLAIMED INTERFACE SCSI C87x Ultra Wide Differential ext_bus 3 2/0/4/0/0 c720 CLAIMED INTERFACE SCSI C895 Ultra2 Wide LVD ext_bus 4 2/0/8/0/0 c720 CLAIMED INTERFACE SCSI C87x Ultra Wide Differential ext_bus 5 2/0/8/0/1 c720 CLAIMED INTERFACE SCSI C87x Ultra Wide Differential ext_bus 6 2/0/11/0/0 c720 CLAIMED INTERFACE SCSI C87x Ultra Wide Differential ext_bus 7 2/0/12/0/0.8.0.4.0 fcparray CLAIMED INTERFACE FCP Array Interface ext_bus 8 2/0/12/0/0.8.0.5.0 fcparray CLAIMED INTERFACE FCP Array Interface ext_bus 9 2/0/12/0/0.8.0.255.0 fcpdev CLAIMED INTERFACE FCP Device Interface root @uksd3 #
As you can see, the state of the driver for this card is still CLAIMED and we are not seeing a NO-HW state anywhere . The reason is that before we suspended the driver, the card was in a CLAIMED state. Now that the driver has been suspended, it will remain in this state until the driver is resumed . We can proceed with turning off power to the PCI card slot. 8 TURN OFF THE POWER TO THE AFFECTED PCI SLOT Now that the kernel driver is no longer processing requests for this PCI card slot, we can now turn off the power to the slot itself.
root @uksd3 # rad -o 0-1-1-1 root @uksd3 # root @uksd3 # rad -q Driver(s) Slot Path Bus Speed Power Occupied Suspended Capable 0-1-1-0 2/0/0 0 33 On Yes No No 0-1-1-1 2/0/1/0 8 33 Off Yes Yes Yes 0-1-1-2 2/0/2/0 16 33 On Yes No Yes 0-1-1-3 2/0/3/0 24 33 On Yes No Yes 0-1-1-4 2/0/4/0 32 33 On Yes No Yes 0-1-1-5 2/0/6/0 48 33 On No N/A N/A 0-1-1-6 2/0/14/0 112 33 On No N/A N/A 0-1-1-7 2/0/12/0 96 33 On Yes No Yes 0-1-1-8 2/0/11/0 88 33 On Yes No Yes 0-1-1-9 2/0/10/0 80 33 On Yes No Yes 0-1-1-10 2/0/9/0 72 33 On Yes No Yes 0-1-1-11 2/0/8/0 64 33 On Yes No Yes root @uksd3 #
We are now in a position to have the card replaced by a qualified HP engineer. You might want to tell the engineer that it is the PCI card in cabinet 0, Bay 1, IO cardcage 1, slot 1; it's the card with the attention light flashing. 9 REPLACE THE PCI CARD In most cases, you will need an HP Hardware Customer Engineer to replace hardware in your server. If you perform this task yourself, there is a possibility of rendering the entire system unusable as well as nullifying your Support Contract. Check this out before proceeding. If you are going to replace a PCI card on your own, please make sure you follow all electro-static discharge guidelines. The PCI cards do not have retention screws but are a tight fit in the PCI slot. When we turn power back on to the slot, if we have not inserted it properly, we will receive an error message. The card that we use must be of the same product type as the one currently in the PCI card slot. If one of your colleagues has told you that " it is a Fibre Channel card, it will be OK, " that's not necessarily true. Hewlett-Packard will only support the replacement of a PCI card with another PCI card of the same product number. This needs to be emphasized and explained a little further. If we had an A6795A Fibre Channel card, I must replace it with an A6795A Fibre Channel card. Just because we have another Fibre Channel card does not mean that any assumptions of predetermined behavior established by the kernel driver would be maintained if we replace the A6795A card with just another Fibre Channel card. Another aspect of this is that if we have a PCI card slot occupied with a card, e.g., our A6795A Fibre Channel card, and we want to replace it with an ATM card, for example, we would have to go through a reboot of the server to effect this change. The reason for this is that OLA/R does not support deleting the old driver from the kernel IO tree before adding a new card into the kernel IO tree. 10 TURN ON THE POWER TO THE PCI SLOT Now that the card has been replaced, we can now turn on power to the slot. If we have not inserted the replacement card properly, we will get an error message:
root @uksd3 # rad -i 0-1-1-1 root @uksd3 # rad -q Driver(s) Slot Path Bus Speed Power Occupied Suspended Capable 0-1-1-0 2/0/0 0 33 On Yes No No 0-1-1-1 2/0/1/0 8 33 On Yes Yes Yes 0-1-1-2 2/0/2/0 16 33 On Yes No Yes 0-1-1-3 2/0/3/0 24 33 On Yes No Yes 0-1-1-4 2/0/4/0 32 33 On Yes No Yes 0-1-1-5 2/0/6/0 48 33 On No N/A N/A 0-1-1-6 2/0/14/0 112 33 On No N/A N/A 0-1-1-7 2/0/12/0 96 33 On Yes No Yes 0-1-1-8 2/0/11/0 88 33 On Yes No Yes 0-1-1-9 2/0/10/0 80 33 On Yes No Yes 0-1-1-10 2/0/9/0 72 33 On Yes No Yes 0-1-1-11 2/0/8/0 64 33 On Yes No Yes root @uksd3 #
11 RUN ANY ASSOCIATED DRIVER SCRIPTS BEFORE RESUMING THE DRIVER The script we ran in Step 6 has a number of command line options depending on whether we are adding or replacing a driver. One of the options is post_replace . Like the prep_replace option, it allows the kernel developer to do something to the card at the specified hardware path before the kernel driver is resumed. An example cited to me could be a Fibre Channel card where the laser can be turned on and tested , independently of the rest of the card. We should ensure that we run the associated script to ensure that anything that needs to be done is done.
root @uksd3 # ll /usr/sbin/olrad.d total 80 -r-xr-xr-x 1 bin bin 2889 Nov 14 2000 c720 -r-xr-xr-x 1 bin bin 2977 Dec 12 2001 c8xx -r-xr-xr-x 1 bin bin 2236 Jun 19 2001 fddi4 -r-xr-xr-x 1 bin bin 4542 Dec 21 2000 iop_drv -r-xr-xr-x 1 bin bin 2124 Jun 19 2002 td root @uksd3 #/usr/sbin/olrad.d/c720 post_replace 2/0/1/0/0 root @uksd3 #
12 RESUME THE DRIVER FOR THE PCI SLOT Now that the card is replaced and is prepared for re-execution, we use the rad command to resume the kernel driver:
root @uksd3 # rad -r 0-1-1-1 root @uksd3 # root @uksd3 # rad -q Driver(s) Slot Path Bus Speed Power Occupied Suspended Capable 0-1-1-0 2/0/0 0 33 On Yes No No 0-1-1-1 2/0/1/0 8 33 On Yes No Yes 0-1-1-2 2/0/2/0 16 33 On Yes No Yes 0-1-1-3 2/0/3/0 24 33 On Yes No Yes 0-1-1-4 2/0/4/0 32 33 On Yes No Yes 0-1-1-5 2/0/6/0 48 33 On No N/A N/A 0-1-1-6 2/0/14/0 112 33 On No N/A N/A 0-1-1-7 2/0/12/0 96 33 On Yes No Yes 0-1-1-8 2/0/11/0 88 33 On Yes No Yes 0-1-1-9 2/0/10/0 80 33 On Yes No Yes 0-1-1-10 2/0/9/0 72 33 On Yes No Yes 0-1-1-11 2/0/8/0 64 33 On Yes No Yes root @uksd3 #
Depending on the original function of the card determines what happens next. If the card was a primary LAN interface in a MC/ServiceGuard cluster, I would expect MC/ServiceGuard to relocate the appropriate IP addresses back from the standby interface to the primary interface. In our case, we will check on the how our stale extents are behaving. 13 CHECK FUNCTIONALITY OF THE NEWLY REPLACED PCI CARD We can use the rad “c command to check the status of a particular PCI slot:
root @uksd3 # rad -c 0-1-1-1 Path :2/0/1/0/0 Name :c720 Device_ID :000c Vendor_ID :1000 Subsystem_ID :10f5 Subsystem_Vendor_ID :103c Revision_ID :2 Class :010000 Status :0200 Command :0157 Multi_func :No Bridge :No Capable_66Mhz :No Power_Consumption :75 root @uksd3 #
Normally, we will want to check with commands such as lanscan (for replaced LAN cards), LVM commands (for replaced Fibre Channel, SCSI cards), and the content of syslog.log to ensure that functionality has been restored. In our case, we should check up on the state of our stale extents:
root @uksd3 # lvdisplay -v /dev/vg00/lvol* grep stale wc -l 0 root @uksd3 #
As we can see, LVM has resynchronized all the stale extents. This is the normal behavior of LVM. From syslog.log , we can see that the disks attached to that interface have now been returned to the volume group:
root @uksd3 # tail -5 /var/adm/syslog/syslog.log Nov 4 18:32:45 uksd3 EMS [2738]: ------ EMS Event Notification ------ Value: "CRITICAL (5)" for Resource: "/storage/events/disks/default/2_0_1_0_0.2.0" ( Threshold: >= " 3") Execute the following command to obtain event details: /opt /resmon/bin/resdata -R 179437576 -r storage/events/disks/default/2_0_1_0_0 .2.0 -n 179437571 -a Nov 4 18:36:02 uksd3 vmunix: LVM: Recovered Path (device 0x1f001000) to PV 1 in VG 0. Nov 4 18:36:02 uksd3 vmunix: LVM: Recovered Path (device 0x1f000000) to PV 0 in VG 0. Nov 4 18:36:02 uksd3 vmunix: LVM: Restored PV 1 to VG 0. Nov 4 18:36:03 uksd3 vmunix: LVM: Restored PV 0 to VG 0. root @uksd3 #
14 TURN OFF THE ATTENTION LIGHT FOR THE AFFECTED PCI SLOT At the beginning, we turned on the attention light for the affected PCI slot. We would remiss to leave it blinking; this would alert someone to the possibility of a potential hardware problem. It is a good practice to turn the attention light off. We do so with the rad “f command:
root @uksd3 # rad -f off 0-1-1-1 root @uksd3 #
4.3.2 Adding a new PCI card Before we add a new PCI card, we must make sure that the driver for the new card is currently in the kernel. If we don't have the driver loaded in the kernel, chances are good that we will have to reboot the server to include the driver into the kernel. If the card is a multi-function card, we need to ensure that all the drivers for all the functions are loaded in the kernel. From HP-UX 11.0 onward, HP-UX supported Dynamically Linked Kernel Modules (DLKM). If the driver you need to load is not a DLKM, then it needs to be linked into the kernel. I will not cover this in great detail here, but just to remind you:
root @uksd3 # kmadmin -s Name ID Status Type ===================================================== krm 1 UNLOADED WSIO root @uksd3 #
This command tells me all the DLKM modules installed and compiled on my system. If the driver in question is a DLKM module, I will need to install and compile it (usually performed as part of a swintsall of the driver software). When completed, I should see the driver listed in the output to kmadmin “s . As such, few drivers for HP-UX are DLKM modules, although new software products, e.g., IPFilter, are introducing more and more DLKM every day. It is worth checking the documentation for the driver concerned . We could then load the driver into memory simply with this command:
root @uksd3 # kmadmin -L krm kmadmin: Module krm loaded, ID = 1 root @uksd3 # kmadmin -Q krm Module Name krm Module ID 1 Module Path /stand/dlkm/mod.d/krm Status LOADED Size 61440 Base Address 0xe84000 BSS Size 53248 BSS Base Address 0xe85000 Hold Count 1 Dependent Count 0 Unload Delay 0 seconds Description krm Type WSIO Block Major -1 Character Major 76 Flags a5 root @uksd3 #
We are now in a position to proceed with adding the new PCI card. The process is quite similar to the process for replacing a failed PCI card, so I will simply list the relevant bullet points and make any additional comments: -
Identify any empty PCI card slot.
We would use the rad “q command to identify an empty slot.
-
Perform Critical Resource Analysis on the affected PCI card slot. There are currently no resources using this slot, but we do have to consider the consequences of turning off power to this slot. -
Check that the affected PCI slot is in its own power domain. -
Turn on the attention light for the affected PCI card slot.
-
Turn off the power to the affected PCI slot.
-
Add the PCI card and attach any associated devices.
-
Turn on the power to the affected PCI slot.
-
Run any associated driver scripts before resuming the driver.
The script located in /usr/sbin/olrad.d has a command line option of post_add . We should run the associated script to ensure that anything that needs to be done is done.
-
Check functionality of the newly replaced PCI card.
In this case, we will most likely have to assign an Instance number to the card (run ioscan ) and create the necessary device files (run insf “ve ) before we can use any of the new devices.
-
Turn off the attention light for the affected PCI slot.
That concludes our discussions regarding Managing HP-UX Peripherals. |