| To check out sources from a CVS repository: Choose CVS | Checkout from the main menu. On the first page of the CVS Checkout wizard, specify the location of the CVS repository by choosing it from the CVS Root drop-down menu. The IDE automatically offers all of the existing CVS roots from your .cvspass file, which is usually located in your home directory. If you are unfamiliar with the syntax, you can click the Edit button and enter the required information using the dialog. Depending on which connection method you chose, you may have to enter additional information. The available connection methods are as follows: :pserver. Connects to a remote server using password authentication. You have to specify your password. :ext. Connects to a remove server using SSH. You have to specify your password or an external SSH command to run. See the Connecting with SSH section below for details. :local. Connects to a local repository on your computer. Although you do not have to specify any additional information, you do have to correctly configure the CVS repository on your machine. See the Connecting to a Local CVS Repository section below. :fork. A different implementation of the :local connection method that allows you to connect to a local CVS repository. On the Module to Checkout page, specify the modules you want to check out. You can use the Browse button to browse all of the available modules in the repository. To check out the entire repository, leave the Modules field empty. If you want to check out a branch or a specific revision of the repository, specify the specific branch name, revision number, or tag. You can click the Browse button to choose from a list of all branches in the repository. If you just want to check out the latest version of the trunk, leave this field empty. Specify the local working directory into which you want to check out the selected modules or branches. Click Finish to check out the files.
When you check out sources from a CVS repository, NetBeans IDE immediately scans the sources for existing NetBeans projects. If the sources are already in a NetBeans project, the IDE lets you open the project immediately. If the sources are not in a project, the IDE lets you immediately create a project from them. You should use one of the templates for creating projects from existing source code or with an existing Ant script. See Chapter 3 for more information. Connecting with SSH The pserver connection method is inherently insecure, since it transmits your user name and password over the Internet in decrypted form. To guarantee your information is secure when you connect to a remote repository, you should set up a Secure Shell (SSH) tunnel to the repository through which you can communicate with the repository. The IDE has an internal SSH client that you can use without having an external SSH client installed on your computer. If you are using public key authentication, you have to use an external SSH client. To connect to a repository using the internal SSH client: Choose CVS | Checkout from the main menu. Type :ext: in the CVS Root field. The wizard automatically updates to display fields for SSH information. Enter the CVS root in the following format: :ext:username@hostname:/repository_path For example, to connect to the NetBeans test project on SourceForge, you would enter the following URL: :ext:myDeveloperName@cvs.sourceforge.net:/cvsroot/nb4sf-cvs Select Use Internal SSH and enter your password. It is recommended that you select the option to remember your password. Otherwise, the IDE asks you for a password whenever you perform a CVS command. Set your proxy information if necessary. Click Next to continue checking out modules.
If you need to use an external SSH client, you can select the Use External Shell option in the Checkout wizard. You enter the SSH command exactly as you would run it from the command line. The IDE automatically appends the user name, server name, and CVS command that is executed to the SSH command. A few notes about using an external SSH client: You must run the client in non-interactive mode, meaning the commands can execute without any input from the user. If the command you enter requires that the user input his or her password or any other information, the command does not work with NetBeans IDE. You should therefore use public key authentication to verify your identity. Your SSH command must handle firewall tunnelling if you are behind a firewall. You either have to make the SSH executable available on your computer's path or specify the absolute path to the executable in the command string.
Connecting to a Local CVS Repository In addition to connecting to repositories on remote servers, you can also set up a local CVS repository on your computer and connect to it with the :local connection method. If you are working on a UNIX system, there is no additional configuration needed to use the :local connection method. On a Windows machine, you have to install and configure special software. To set up a local repository on a Windows machine: Download and install CVSNT. You can download CVSNT for free at http://www.march-hare.com/cvspro. Use the CVSNT Control Panel to create a new repository, as shown in Figure 4-2. Figure 4-2. Using CVSNT Control Panel to set up a local CVS repository 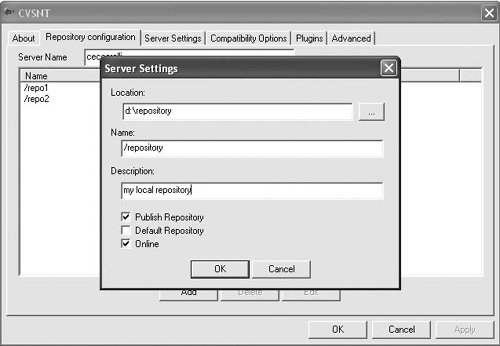 Set up an environment variable called CVS_EXE that points to the location of the cvs.exe executable in your CVSNT installation. When doing a CVS checkout as described above, use the following syntax for your CVS root: :local:/repository-name
|