Using the NetBeans APIs
| Once you have set up a plug-in module, you need to start coding. The NetBeans APIs provide interfaces to the standard plug-in modules that make up the NetBeans system. The NetBeans APIs enable you to integrate your own functionality with the IDE. For example, if you want the IDE to access user files on disk, you use the NetBeans Filesystems API. For the NetBeans API List, see http://www.netbeans.org/download/dev/javadoc. Each NetBeans API may have mandatory methods as well as optional methods. For example, the NetBeans Actions API, which you use when you define menu items, requires that you specify the label that appears in the menu item. It leaves it up to you to decide whether the menu item should include an icon. There are many NetBeans APIs. However, the most commonly used are:
The IDE provides several ways of simplifying the process of working with the NetBeans APIs. Most importantly, the IDE assists you by providing several wizards that guide you through the initial phase of working with an API. For example, the New Action wizard provides the basis of an implementation of the NetBeans Actions API, the New File Type wizard provides the basis of an implementation of the NetBeans Loaders API, etc. In the following sections you will look at several of these wizards and how they relate to their APIs. In the process, you will learn how to add menu items, toolbar buttons, loaders, and custom components to the IDE. Adding a Menu Item and a Toolbar Button to the IDEMenu items, toolbar buttons, and keyboard shortcuts are implemented via the NetBeans Actions API. They are "presenters" that may display the same action. What distinguishes the presenters from each other is how they are displayed and how they are invokeda menu item is displayed in the menu bar, in a file or folder's pop-up menu, or in an editor's pop-up menu. A toolbar button is normally displayed in the main toolbar, while a keyboard shortcut isn't displayed anywhere but its underlying action is invoked by pressing one or more keys. NetBeans IDE includes a template that kickstarts your work with the NetBeans Actions APIthe New Action wizard. Once you've worked through the New Action wizard, you have a Java source file that provides the skeleton of an implementation of the NetBeans Actions API. To use the New Action wizard:
Even though you yourself have added no code whatsoever, the plug-in module has all the content it needs to be built, installed, and distributed. Creating an Editor for a New File TypeThe centerpiece of NetBeans IDE is its Source Editor. In it, you can edit a wide variety of file types. Supporting you in the Source Editor are various features, such as syntax highlighting, code completion, code folding, and drag-and-drop functionality. Each of these features is tailored toward a specific file type. Therefore, when you want to create an editor for a new file type, the first thing you must do is ensure that NetBeans is able to distinguish your file type from all other file types. Only once it is able to do that does it make sense to provide features such as syntax highlighting for the file type. File types that are recognized in the IDE have their own icons, menu items, and behavior. The files that are shown in the IDE are FileObjects, which are generally wrappers around java.io.File. What the user sees are Nodes, which provide functionality such as actions, as defined in the previous section, and localized names to objects such as files. In between Nodes and FileObjects are DataObjects. A DataObject is like a FileObject, except that it knows what kind of file is being shown. There are usually different types of DataObjects for files with different extensions and for XML files with different namespaces. Each DataObject is provided by a different module, each implementing support for one or more file types. For example, the Image module makes it possible to recognize and open .gif and .png files. A plug-in module that recognizes a file type installs a DataLoader, which is a factory for a file-type-specific DataObject. When a folder is expanded, the IDE asks each known DataLoader, "Do you know what this is?" The first DataLoader that says "Yes" creates the DataObject for the file. In order to actually display something for each file, the underlying NetBeans IDE subsystem calls DataObject.getNodeDelegate() for each DataObject and the Nodes are what you actually see in the IDE. A template is included in the NetBeans IDE for kickstarting your work with the NetBeans Loaders APIthe New File Type wizard. Once you've worked through the New File Type wizard, you have a basic loaderall the classes that are needed for the IDE to recognize the file type as distinct from all other file types. Once you have a newly recognized file type, you can add a lot of functionality to it, such as syntax coloring, a multi-view editor, code completion, and so on. To use the New File Type wizard:
When you click Finish, the following files are created by the wizard:
Even though you have added no code whatsoever, the plug-in module has all the content it needs for the IDE to distinguish files with the mf or MF extension from all other file types. After you try out the plug-in module, you can extend it further by adding code completion, syntax coloring, and other typical editor features for the file type. Adding a Component to the Main WindowThe user interface of a plug-in module often makes use of one or more panels. Whether you are creating a wizard, a GUI editor, or a toolbar, your plug-in module will frequently need to make use of a windowing component. In the NetBeans APIs, a visual component called "top component" is provided, which you can embed in one of many places in the IDE. A top component can correspond to a single window or a tab in a window. It can provide a variety of functionality, including its own nodes and actions. NetBeans IDE includes a template that kickstarts your work with the NetBeans Window System APIthe New Window Component wizard. Once you've worked through the New Window Component wizard, you have a Java source file that provides the skeleton of an implementation of the NetBeans Window System API. To use the New Window Component wizard:
Figure 17-7. New Window Component wizard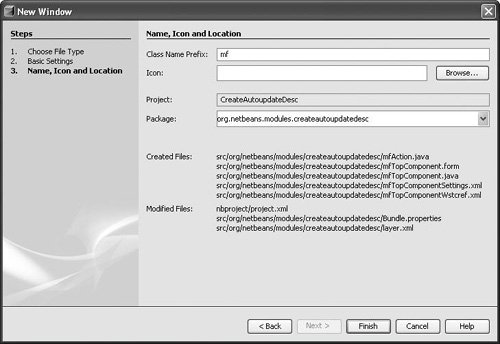 This determines the prefix of all the Java source files that the wizard will create. Optionally, you can specify an icon. This icon will be displayed in the tab of the window component. When you click Finish, several files are created. Some of themTopComponentWstcref.xml and TopComponentSettings.xmlare used for serializing the window component. When you open the Java source file that subclasses TopComponent in the Form Editor, you can use the Free Design layout (as explained in Chapter 6) for the design and layout of the window component. However, without adding any additional code, you can build your plug-in module. When you install it, a new menu item is added to the Window menu. When you select it, the empty window component will be displayed in the location that you specified in the wizard. Finding the NetBeans APIs That You NeedAfter you have used one or more wizards to create items such as actions and windowing components, you begin coding. One way in which the IDE helps you at this stage is by letting you find the NetBeans APIs that you need very quickly and easily. If you know the name of the class you need to work with, but not the NetBeans API that it belongs to, the IDE provides a search facility for you. To search for a NetBeans API, do the following:
Figure 17-8. Add Module Dependency dialog box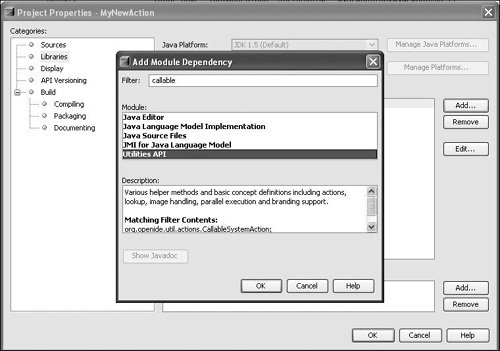 The module list continues to narrow until only the modules that can provide the class remain. You can then select the module. It is added to the list in the Libraries panel. When you click OK, the module dependency is declared in the plug-in module's metadata, in the project.xml file. |

EAN: N/A
Pages: 279